1. Vöru lokiðview
The Skytronic Compact Hifi Stereo Karaoke DJ PA Amplifier (Model 103.102) is designed for versatile audio applications, offering a blend of compact size and powerful performance. It features multiple input options for various audio sources and microphones, along with adjustable sound controls for an enhanced listening and karaoke experience.
1.1 Helstu eiginleikar
- Ultra-compact dimensions for easy placement.
- 400 W Max Power (equivalent to 2 x 50 W RMS).
- Two 6.3 mm jack microphone inputs with adjustable echo effect.
- Three RCA stereo line inputs (CD/VCD, AUX, AC-3).
- One 3.5 mm jack AUX input (front panel).
- One RCA stereo line output.
- Two sets of screw terminals for speaker connections.
- 2-band equalizer with adjustable bass and treble.
- Adjustable balance and master volume controls.
- Large input-selection knob for easy source switching.
1.2 Stjórnborð og vísar á framhlið

Figure 1: Front Panel Layout. This image displays the amplifier's front panel, highlighting the power button, input selection knob, volume control, microphone inputs, and tone controls.
- POWER hnappur: Skiptir um ampkveikt/slökkt á lyftara.
- Input Selector (CD/VCD, AUX, AC-3): Rotates to select the desired audio input source.
- VOLUME hnappur: Stillir heildarútgangshljóðstyrkinn.
- BALANCE hnappur: Stillir jafnvægið á vinstri/hægri rásinni.
- TREBLE hnappur: Stillir svörun við hátíðni.
- BASS hnappur: Stillir lágtíðnisvörunina.
- MIC1 / MIC2 Inputs: 6.3mm jack inputs for microphones.
- M. VOL Knob: Stillir hljóðstyrk hljóðnemans.
- ECHO hnappur: Adjusts the echo effect level for microphones.
- Upplýstur skjár: Shows current input selection and audio level indicators.
1.3 Tengingar að aftan
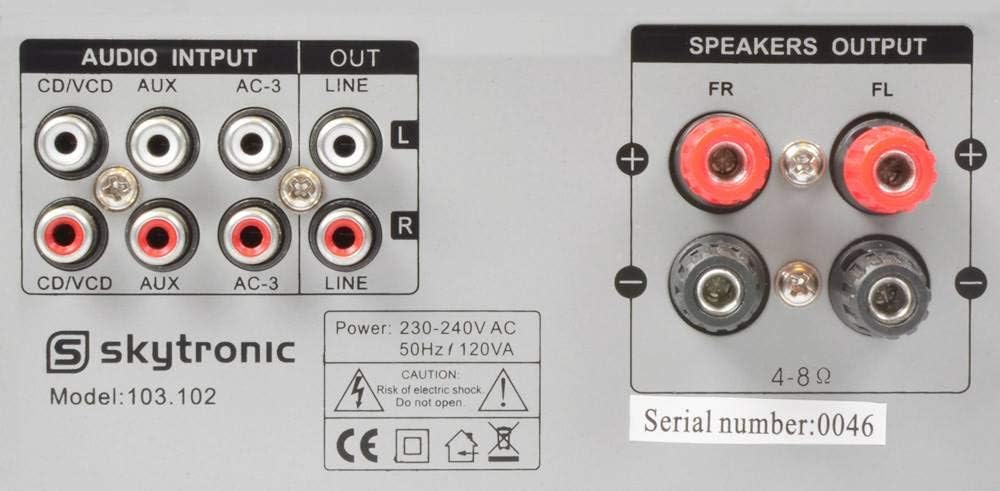
Figure 2: Rear Panel Connections. This image illustrates the various audio input and output ports, including RCA inputs, line output, and speaker terminals.
- AUDIO INPUTS (CD/VCD, AUX, AC-3): RCA stereo inputs for connecting external audio sources like CD/DVD players, media players, or other audio devices.
- LÍNU ÚT: RCA stereo output for connecting to another amplíflegri eða upptökutæki.
- SPEAKERS OUTPUT (FR, FL): Screw terminals for connecting passive speakers. Ensure correct polarity (+ to + and - to -).
- Rafmagnsinntak: For connecting the 230V, 50Hz power supply cable.
2. Uppsetningarleiðbeiningar
Follow these steps to properly set up your Skytronic amplíflegri.
2.1 Hátalarar tengdir
- Tryggðu að ampSlökkt er á tækinu og það tekið úr sambandi við rafmagn.
- Connect your passive speakers to the "SPEAKERS OUTPUT" terminals on the rear panel.
- Match the positive (+) terminal on the amplifier to the positive (+) terminal on your speaker, and the negative (-) terminal on the amplifier to the negative (-) terminal on your speaker.
- Ensure all speaker wire connections are secure and there are no loose strands that could short circuit.
- The amplifier supports speakers with an impedance of 4-8 ohms.
2.2 Tenging hljóðgjafa
- Connect your audio sources (e.g., CD player, DVD player, media streamer) to the appropriate RCA "AUDIO INPUTS" (CD/VCD, AUX, AC-3) on the rear panel using RCA cables.
- For devices with a 3.5mm output (e.g., smartphone, MP3 player), use a 3.5mm to 3.5mm audio cable to connect to the "AUX" input on the front panel.
- If connecting to another amplifier or recording device, use RCA cables from the "LINE OUT" on the rear panel of this amplifier to the input of the other device.
2.3 Að tengja hljóðnema
- Insert 6.3mm jack microphones into the "MIC1" or "MIC2" inputs on the front panel.
2.4 Rafmagnstenging
- Once all audio and speaker connections are made, plug the amplifier's power cable into a standard 230V, 50Hz AC power outlet.
3. Notkunarleiðbeiningar
This section details how to operate your Skytronic amplyftara fyrir bestu frammistöðu.
3.1 Grunnaðgerð
- Ýttu á KRAFTUR hnappinn til að kveikja á amplifier. The illuminated display will light up.
- Snúðu Inntaksval knob to choose the desired audio source (CD/VCD, AUX, AC-3).
- Start playback from your selected audio source.
- Stilltu RÁÐMÁL knob to your desired listening level. Start with a low volume and gradually increase it.
3.2 Hljóðstilling
- BASSI: Turn the BASS knob clockwise to increase low frequencies (deeper sound) or counter-clockwise to decrease them.
- TRÍBÆLI: Turn the TREBLE knob clockwise to increase high frequencies (brighter sound) or counter-clockwise to decrease them.
- JAFNAÐA: Adjust the BALANCE knob to shift the audio output between the left and right speakers. Set to the center for balanced sound.
3.3 Using Microphones for Karaoke
- Ensure microphones are connected to the MIC1 or MIC2 inputs.
- Stilltu M. VOL (Microphone Volume) knob to control the microphone's output level.
- Stilltu EKKI hnappur til að bæta við eða fjarlægja bergmálsáhrif frá hljóðnemanum.
- Sing into the microphone while playing background music from your selected audio source.
4. Viðhald
Rétt viðhald tryggir langlífi og bestu mögulegu afköst bílsins þíns. amplíflegri.
- Þrif: Notaðu mjúkan, þurran klút til að þrífa ytra byrðina ampEkki nota fljótandi hreinsiefni eða úðabrúsa, þar sem þau geta skemmt áferðina eða innri íhluti.
- Loftræsting: Ensure the ventilation slots on the top and sides of the ampLoftflæði er ekki stíflað. Nægilegt loftflæði er mikilvægt til að koma í veg fyrir ofhitnun.
- Geymsla: Ef geymt er ampEf tækið er notað í langan tíma skaltu taka það úr sambandi við rafmagnið og geyma það á köldum, þurrum stað fjarri beinu sólarljósi og miklum hita.
- Rafmagnssnúra: Regularly inspect the power cord for any signs of damage. If damaged, do not use the amplifier and seek professional repair.
5. Bilanagreining
Ef þú lendir í vandræðum með þinn ampLifier, vísaðu til eftirfarandi algengra vandamála og lausna.
| Vandamál | Möguleg orsök | Lausn |
|---|---|---|
| Enginn kraftur | Rafmagnssnúra ekki tengd; Rafmagnsinnstunga biluð; AmpÖryggi í hleðslutæki sprungið. | Ensure power cord is securely plugged in; Test power outlet with another device; Contact qualified service personnel for fuse replacement. |
| Ekkert hljóðúttak | Incorrect input selected; Volume too low; Speakers not connected or faulty; Audio source not playing. | Select correct input source; Increase VOLUME knob; Check speaker connections and ensure speakers are functional; Verify audio source is playing correctly. |
| Bjagað hljóð | Volume too high; Incorrect impedance speakers; Loose connections. | Reduce VOLUME; Ensure speakers are 4-8 ohms; Check all audio and speaker connections. |
| Hljóðnemi virkar ekki | Microphone not connected; M. VOL too low; Microphone faulty. | Ensure microphone is securely plugged into MIC1/MIC2; Increase M. VOL knob; Test microphone with another device if possible. |
| Hummandi eða suðandi hávaði | Ground loop issue; Interference from other electronics; Loose audio cables. | Try plugging amplifier into a different outlet; Move amplifier away from other electronic devices; Ensure all audio cables are securely connected. |
Ef vandamálið er enn til staðar eftir að þessar lausnir hafa verið prófaðar, vinsamlegast hafið samband við þjónustuver.
6. Tæknilýsing
Detailed technical specifications for the Skytronic Stereo Karaoke Amplifier (Model 103.102).
| Eiginleiki | Forskrift |
|---|---|
| Gerðarnúmer | 103.102 |
| Hámarksafköst | 400 W (equivalent to 2 x 50 W RMS) |
| Tíðni svörun | 20 Hz til 20 kHz |
| Merki-til-hávaða hlutfall | > 76 dB |
| Viðnám | 4-8 óm |
| Aflgjafi | 230 V, 50 Hz |
| Vörumál (L x B x H) | 11.02 x 8.66 x 37.4 tommur |
| Þyngd hlutar | 5.73 pund |
| Framleiðandi | Skytronics |
7. Ábyrgð og stuðningur
This section provides general information regarding product warranty and customer support.
7.1 Upplýsingar um ábyrgð
Specific warranty details for the Skytronic Stereo Karaoke Amplifier (Model 103.102) are typically provided at the point of purchase or within separate warranty documentation included with the product. Please refer to your purchase receipt or the manufacturer's official website for the most accurate and up-to-date warranty terms and conditions. Standard warranties usually cover manufacturing defects for a specified period from the date of purchase.
7.2 Þjónustuver
For technical assistance, troubleshooting beyond this manual, or inquiries regarding parts and service, please contact Skytronic customer support. Contact information can usually be found on the manufacturer's official website or on the product packaging. When contacting support, please have your product model number (103.102) and purchase details ready.
Note: As specific contact details are not provided in this manual, please refer to the official Skytronic website or your retailer for support contact information.