1. Inngangur
This manual provides detailed instructions for the safe and efficient operation of your Acer X1140A DLP Projector. Please read this manual thoroughly before using the projector and retain it for future reference. The Acer X1140A is designed for office and school environments, offering 2700 ANSI Lumens brightness and DLP 3D ready functionality.
2. Öryggisupplýsingar
Fylgið eftirfarandi öryggisráðstöfunum til að koma í veg fyrir eld, rafstuð eða meiðsli:
- Ekki loka loftræstiopum. Tryggið nægilegt pláss í kringum skjávarpann til að tryggja rétta loftflæði.
- Ekki horfa beint í linsuna á skjávarpanum þegar ...amp er kveikt. Sterkt ljós getur skemmt augun.
- Ekki setja skjávarpann á óstöðuga kerru, stand eða borð.
- Unplug the projector from the power outlet before cleaning.
- Látið alla þjónustu til hæfs þjónustufólks.
- Notaðu aðeins viðhengi/aukahluti sem framleiðandi tilgreinir.
3. Innihald pakka
Gakktu úr skugga um að allir hlutir séu til staðar í pakkanum þínum:
- Acer X1140A DLP Projector
- Rafmagnssnúra
- VGA snúru
- Fjarstýring með rafhlöðum
- Notendahandbók (þetta skjal)
- Flýtileiðarvísir
- Linsulok
4. Vöru lokiðview
4.1 Framhlið View

Mynd 4.1: Framan view of the Acer X1140A projector, showing the main lens on the right and ventilation grilles on the left. The Acer logo is visible on the top left surface.
The front of the projector features the projection lens, which is used to display images. Ensure the lens cap is removed before operation. Ventilation grilles are located on the side to facilitate airflow.
4.2 Efst View

Mynd 4.2: Efst view of the Acer X1140A projector, highlighting the control panel with buttons for power, menu navigation, source selection, and keystone correction. The focus/zoom ring is also visible.
The top panel includes the control buttons for power, menu navigation, source selection, and keystone correction. The focus and zoom rings are located near the lens for image adjustment.
- Aflhnappur: Kveikir eða slekkur á skjávarpanum.
- Valmyndarhnappur: Opnar skjávalmyndina (OSD).
- Leiðsagnarhnappar (upp/niður/vinstri/hægri): Notað til að fletta í gegnum valmyndarvalkosti.
- Uppruni hnappur: Selects input sources (VGA, HDMI, Video).
- Keystone leiðrétting: Stillir myndbjögun.
- Fókushringur: Sharpens the projected image.
- Aðdráttarhringur: Adjusts the size of the projected image.
4.3 Aftan View (Inntaks-/úttakstengingar)
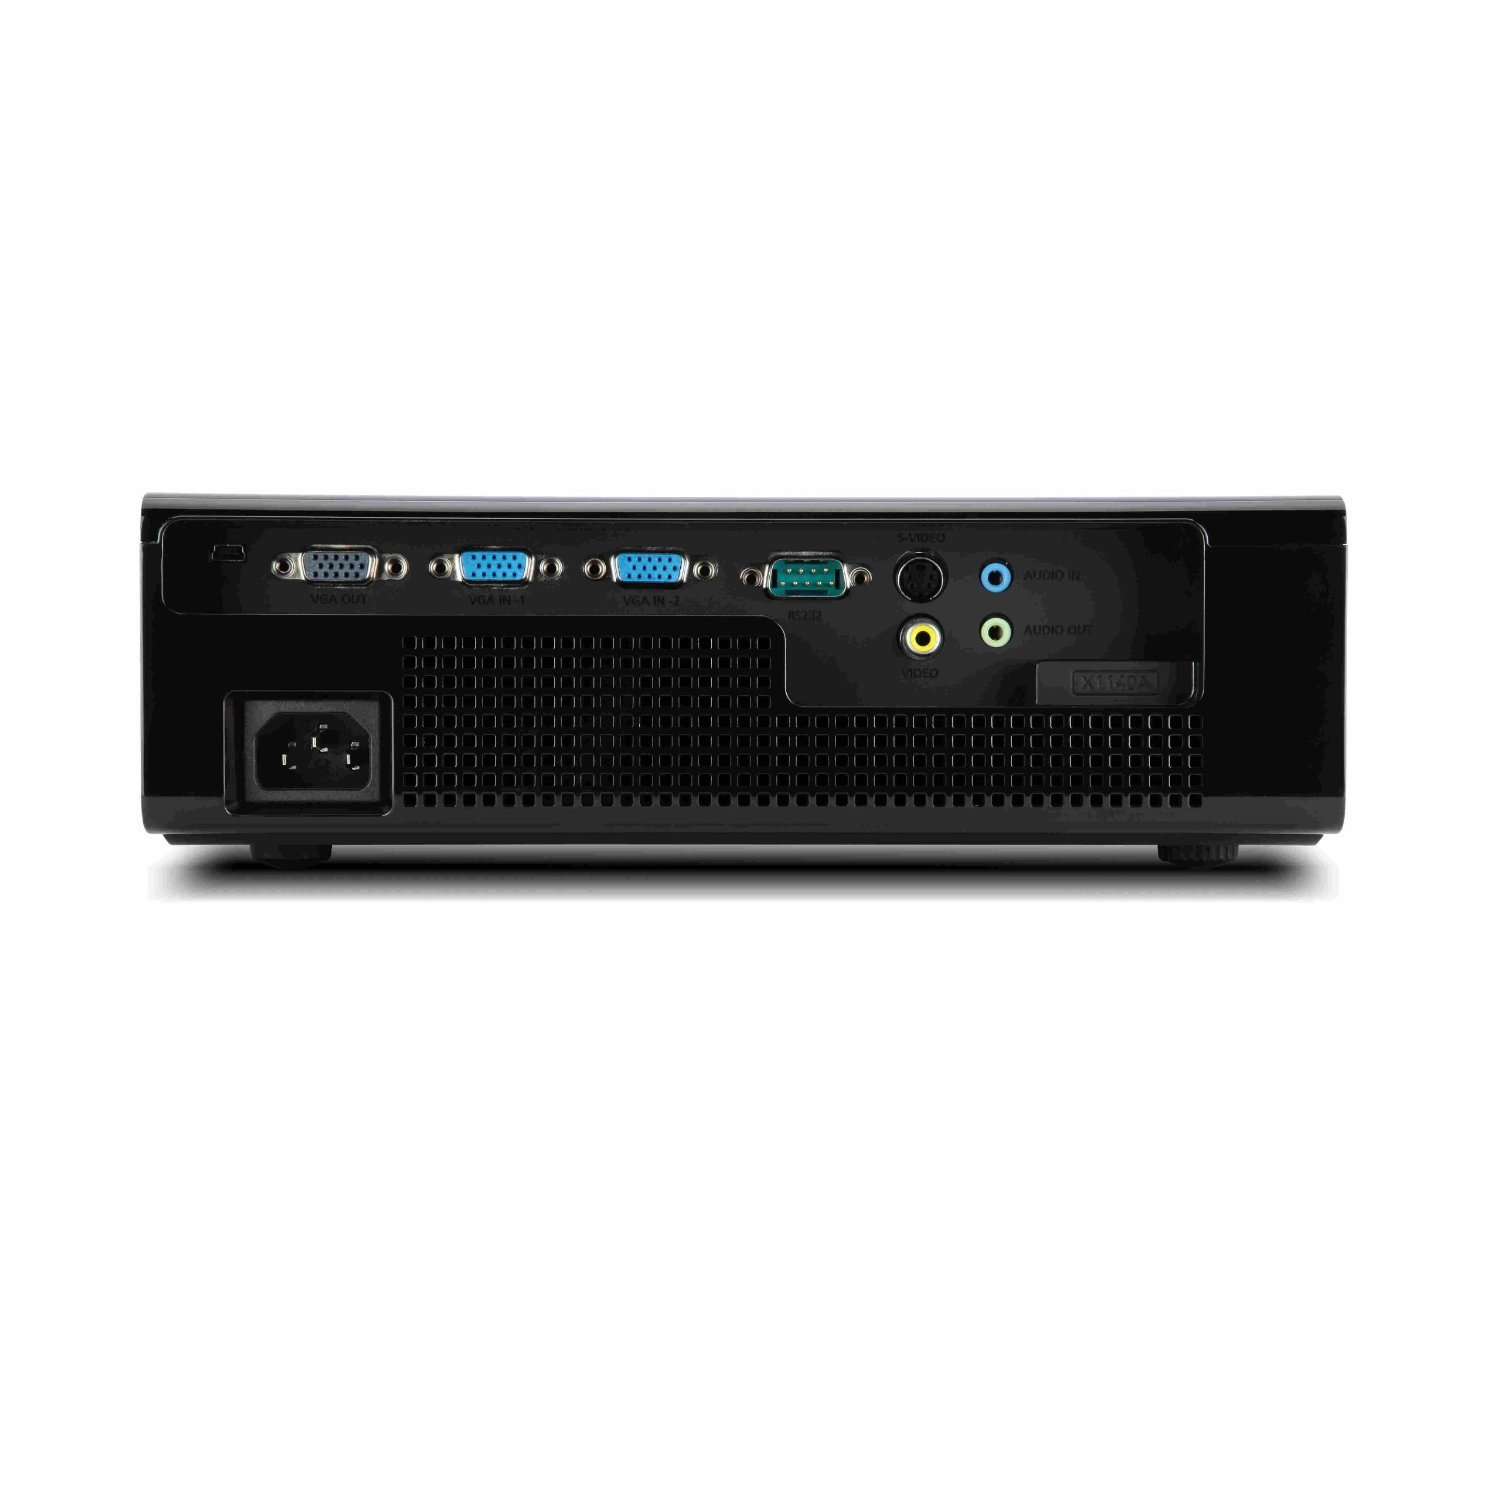
Mynd 4.3: Aftan view of the Acer X1140A projector, displaying various input and output ports including VGA IN, VGA OUT, HDMI, Video, and Audio IN/OUT, alongside the power input.
The rear panel provides all necessary input and output connections:
- VGA IN (x2): Connects to computers or other VGA-compatible devices.
- VGA ÚTGANGUR: Connects to an external monitor.
- HDMI: Connects to digital video sources.
- Myndband (RCA): Connects to composite video sources.
- Audio IN (3.5mm, RCA L/R): Tengist við hljóðgjafa.
- Audio OUT (3.5mm): Connects to external speakers.
- Rafmagnsinntak: Tengir rafmagnssnúruna.
5. Uppsetning
5.1 Staðsetning skjávarpa
Place the projector on a stable, flat surface or mount it securely. Ensure the projector is positioned at an appropriate distance from the screen to achieve the desired image size. Avoid placing it in direct sunlight or near heat sources.
5.2 Rafmagnstenging
- Connect the AC power cord to the projector's power input.
- Stingdu hinum enda rafmagnssnúrunnar í jarðtengda rafmagnsinnstungu.
5.3 Tenging myndbandsgjafa
Choose the appropriate cable for your source device and connect it to the corresponding port on the projector.
- VGA: Connect a VGA cable from your computer's VGA output to one of the projector's VGA IN ports.
- HDMI: Connect an HDMI cable from your device's HDMI output to the projector's HDMI port.
- Samsett myndband: Connect an RCA video cable (yellow) from your device's video output to the projector's Video port.
For audio, connect a 3.5mm audio cable or RCA L/R audio cables from your source device to the projector's Audio IN ports if using VGA or Composite Video. HDMI carries both video and audio.
6. Notkun skjávarpans
6.1 Kveikt/slökkt
- Til að kveikja á: Press the Power button on the projector's control panel or remote control. The power indicator light will turn blue.
- Til að slökkva á: Press the Power button again. A confirmation message may appear. Press Power again to confirm shutdown. Allow the projector to cool down before unplugging.
6.2 Val á inntaksgjafa
Ýttu á Heimild button on the control panel or remote control repeatedly to cycle through available input sources (VGA1, VGA2, HDMI, Video).
6.3 Myndastilling
- Fókus: Rotate the focus ring around the lens until the image is sharp and clear.
- Aðdráttur: Rotate the zoom ring around the lens to adjust the image size.
- Keystone leiðrétting: Use the keystone buttons on the control panel or remote to correct trapezoidal image distortion if the projector is not perfectly perpendicular to the screen.
6.4 Skjávalmynd (OSD)
Ýttu á Matseðill button to access the OSD. Use the navigation buttons to browse options and the Enter button (often the right arrow or a dedicated button) to select. Options include Picture settings (brightness, contrast, color), Display settings (resolution, aspect ratio), and Management settings (lamp hours, security).
7. Viðhald
7.1 Þrif á skjávarpanum
- Skápur: Notaðu mjúkan, lólausan klút dampendað með mildri hreinsiefnislausn. Ekki nota slípiefni.
- Linsa: Use a lens cleaning cloth and lens cleaning fluid specifically designed for optical surfaces. Avoid touching the lens with your fingers.
- Loftræstiop: Periodically clean the ventilation grilles with a soft brush or a vacuum cleaner to prevent dust buildup.
7.2 Lamp Skipti
Lamp has a limited lifespan (Standard: 5000 hours, Extreme Eco: up to 7000 hours). When the lamp life is nearing its end, a warning message may appear, or the lamp indicator light may illuminate. Refer to the full service manual or contact Acer support for detailed lamp replacement instructions. Always allow the projector to cool completely before attempting lamp skipti.
Warning: Risk of electric shock. Do not open the lamp cover unless the projector is unplugged and cooled.
8. Bilanagreining
| Vandamál | Möguleg orsök | Lausn |
|---|---|---|
| Engin mynd á skjánum | Power not connected; Incorrect input source; Lens cap on; Source device off. | Check power connection; Select correct input source; Remove lens cap; Ensure source device is on. |
| Myndin er óskýr | Linsan er ekki í fókus; Skjávarpinn of nálægt/fjarri skjánum. | Adjust the focus ring; Reposition the projector. |
| Myndin er trapisulaga | Skjávarpinn er ekki hornréttur á skjáinn. | Use keystone correction. |
| Ekkert hljóð | Volume too low; Incorrect audio cable connection; Muted. | Increase volume; Check audio cable connections; Unmute projector/source. |
| Myndvarpi ofhitnar | Blocked ventilation; Dusty filters. | Ensure clear airflow around projector; Clean ventilation grilles. |
9. Tæknilýsing
- Gerð: Acer X1140A
- Skjátækni: DLP
- Innfædd upplausn: SVGA (800 x 600)
- Hámarksupplausn: UXGA (1600 x 1200), 1080p (1920 x 1080)
- Birtustig: 2700 ANSI lumen
- Andstæðahlutfall: 10,000:1
- Til sýnis litir: 1.07 Milljarðar litir
- Lamp Líf: Standard 5000 Hours, Extreme Eco up to 7000 Hours
- Hávaðastig: 30 dB (Standard), 26 dB (Eco Mode)
- Hvaðtage: 270 Watt
- Tengingar: 2x VGA IN, 1x VGA OUT, 1x HDMI, 1x Composite Video, 2x Audio IN (3.5mm, RCA L/R), 1x Audio OUT (3.5mm)
- Stærðir (LxBxH): Um það bil 39.37 x 14.48 x 44.96 cm (15.5 x 5.7 x 17.7 tommur)
- Þyngd: 2 kg (4.4 lbs)
- Sérstakir eiginleikar: Portable, DLP 3D capability
10. Ábyrgð og stuðningur
Fyrir upplýsingar um ábyrgð, vinsamlegast skoðið ábyrgðarkortið sem fylgir vörunni eða heimsækið opinberu Acer vefsíðuna. website. For technical support, product registration, or service inquiries, please contact Acer customer service through their official channels. Keep your purchase receipt and product serial number (MR.JER11.00D) readily available when contacting support.
Acer Official Websíða: www.acer.com