
1. Inngangur
This manual provides detailed instructions for the installation, operation, and maintenance of your Antec P50 Window R Mid-Tower PC Case. The Antec P50 Window R is designed for silent computing with optimized airflow and support for Micro ATX and Mini-ITX motherboards. It features a dual-chamber structure, liquid cooling support, and multiple drive bays for a versatile build.
Vinsamlegast lesið þessa handbók vandlega áður en uppsetning hefst til að tryggja rétta uppsetningu og til að hámarka afköst og endingu kerfisins.
2. Uppsetning og uppsetning
2.1 Upptaka og skoðun
Carefully remove the PC case from its packaging. Inspect the case for any signs of damage that may have occurred during shipping. Retain the packaging for future transport or warranty claims.
2.2 Að fjarlægja hliðarplötur
Locate and unscrew the thumbscrews on the rear of the case. Slide the side panels backward and lift them off to access the interior.

Mynd: Hornlaga view of the Antec P50 Window R PC Case, showing its compact mid-tower design and front panel.
2.3 Uppsetning móðurborðs
- Setjið I/O skjöldinn í aftari opnun kassans.
- Ensure the motherboard standoffs are correctly aligned for your Micro ATX or Mini-ITX motherboard.
- Settu móðurborðið varlega á standfestingarnar og jafnaðu skrúfugötin.
- Festið móðurborðið með meðfylgjandi skrúfum.

Mynd: Innrétting view of the Antec P50 Window R PC Case, highlighting the motherboard tray and cable routing options.
2.4 Uppsetning aflgjafa
The P50 Window R supports bottom-mount power supplies. Install your power supply into the designated compartment at the bottom rear of the case and secure it with screws.
2.5 Uppsetning drifs
The case features 6 drive bays:
- One 5.25" external drive bay (for optical drives).
- Three 3.5" HDD drive bays.
- Two 2.5" SSD drive bays.
Follow the case's internal guides for tool-less or screw-based installation of your storage devices.

Mynd: Innrétting view of the Antec P50 Window R PC Case, showing the rear of the motherboard tray with cable management space and drive bay locations.
2.6 Uppsetning stækkunarkorts
The case provides 4 expansion slots. Remove the slot covers as needed and install your graphics card or other expansion cards, securing them with screws.
2.7 Uppsetning viftu og ofns
The P50 Window R comes with pre-installed fans: two 120mm fans and one 80mm fan at the front, and one 80mm fan at the rear. It supports additional 80mm/120mm fan mounts and a 240mm radiator in the front or top for liquid cooling.
- For liquid cooling, install the 240mm radiator in the designated front or top mounting points.
- Ensure fans are oriented correctly for optimal airflow (intake at front, exhaust at rear/top).
2.8 Kapalstjórnun
Nýttu útskurðina fyrir kapalleiðslur og festingarpunktana fyrir aftan móðurborðsbakkann til að halda utan um snúrurnar. Þetta bætir loftflæði og útlit.
2.9 Connecting Front Panel I/O
Tengdu snúrurnar á framhliðinni (USB 3.0, USB 2.0, HD Audio, Power Switch, Reset Switch, Power LED, HDD LED) við samsvarandi tengi á móðurborðinu þínu. Vísað er til handbókar móðurborðsins varðandi staðsetningu tengi.
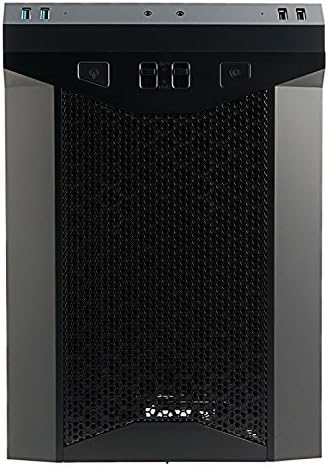
Mynd: Framan view of the Antec P50 Window R PC Case, showing the mesh intake and front panel controls.
3. Rekstur
3.1 Stjórntæki og tengi á framhliðinni
Framhliðin veitir þægilegan aðgang að:
- Aflhnappur: Til að kveikja eða slökkva á kerfinu.
- Endurstilla hnappur: Til að endurræsa kerfið.
- USB 3.0 tengi (x2): Fyrir gagnaflutning á miklum hraða.
- USB 2.0 tengi (x2): Fyrir venjuleg USB tæki.
- Hljóðtengi: Fyrir heyrnartól og hljóðnema.
- Viftustýringar: Two fan control switches are available to adjust fan speeds for optimal balance between cooling and noise.
3.2 Loftflæði og kæling
The P50 Window R features a dual-chamber structure designed for direct airflow, separating heat-generating components. The pre-installed fans and additional mounting options ensure efficient cooling for your system.
4. Viðhald
4.1 Þrif á ryksíum
Regularly clean the dust filters to maintain optimal airflow and prevent dust buildup inside the case. Dust filters are typically located at the front, top, and bottom (for the power supply intake). Gently remove them and clean with compressed air or rinse with water (ensure they are completely dry before reinstallation).
4.2 Almenn þrif
Notaðu mjúkan, damp cloth to clean the exterior surfaces of the case. Avoid abrasive cleaners. For interior cleaning, use compressed air to remove dust from components and internal surfaces.
5. Bilanagreining
5.1 Kerfið kveikir ekki á sér
- Ensure all power cables (24-pin ATX, 8-pin CPU, GPU power) are securely connected to the motherboard and components.
- Gakktu úr skugga um að rofinn á aflgjafanum sé í 'ON' stöðu.
- Gakktu úr skugga um að snúran á framhliðinni sé rétt tengd við tengingu móðurborðsins.
5.2 Óhóflegur hávaði
- Check if any cables are obstructing fan blades.
- Ensure all fans are securely mounted.
- Utilize the front panel fan controls to adjust fan speeds.
5.3 Poor Cooling Performance
- Clean all dust filters to ensure unrestricted airflow.
- Verify that fans are oriented correctly (intake/exhaust).
- Ensure proper cable management to avoid blocking airflow.
5.4 Front Panel USB/Audio Ports Not Working
- Confirm that the front panel USB and audio cables are correctly connected to the corresponding headers on your motherboard.
6. Tæknilýsing
| Eiginleiki | Smáatriði |
|---|---|
| Nafn líkans | P50 WINDOW R |
| Tegund máls | Mid Tower |
| Samhæfni móðurborðs | Micro ATX, Mini-ITX |
| Mál (D x B x H) | 355mm x 260mm x 355mm (13.98"D x 355"H) |
| Efni | Pólýkarbónat (PC) |
| Drive Bays | 1 x 5.25" (external), 3 x 3.5" HDD, 2 x 2.5" SSD |
| Útvíkkun rifa | 4 |
| Fram / I / O höfn | 2 x USB 3.0, 2 x USB 2.0, Audio In/Out, 2 x Fan Controls |
| Foruppsettir viftur | Front: 2 x 120mm, 1 x 80mm; Rear: 1 x 80mm |
| Liquid Cooling Support | 240mm radiator (front/top) |
| Max Video Card Size | 300 mm |
| Max CPU kælirhæð | 130 mm |
| Uppsetning aflgjafa | Neðsta fjall |
| Þyngd hlutar | 11.7 pund |
7. Upplýsingar um ábyrgð
The Antec P50 Window R PC Case comes with a Limited Warranty period (parts): 1 year. Please retain your proof of purchase for warranty claims. For specific terms and conditions, refer to the official Antec websíðuna eða hafðu samband við þjónustuver.
8. Stuðningur
For further assistance, technical support, or to inquire about replacement parts, please visit the official Antec website or contact their customer service department. You can often find FAQs, driver downloads, and additional resources on the manufacturer's support pages.
Antec Official Websíða: www.antec.com