Terma WETS103KD
Notendahandbók fyrir Terma Split TS1 hitunarelement
Model: WETS103KD | Brand: Terma
1. Inngangur og yfirview
This manual provides essential information for the safe and efficient installation, operation, and maintenance of the Terma Split TS1 Heating Element. This product is designed to provide heating for compatible systems, typically radiators or towel warmers. Please read this manual thoroughly before installation and use, and retain it for future reference.
2. Öryggisleiðbeiningar
VIÐVÖRUN: Ef þessum öryggisleiðbeiningum er ekki fylgt getur það valdið raflosti, eldsvoða, alvarlegum meiðslum eða dauða.
- Installation and maintenance must be performed by a qualified electrician or authorized service personnel in accordance with all local and national electrical codes.
- Gangið úr skugga um að rafmagnið sé aftengt áður en uppsetning, viðhald eða bilanaleit eru framkvæmd.
- Do not operate the heating element if it is damaged or if the power cord is frayed or broken.
- This heating element is designed for specific applications. Do not use it for purposes other than its intended use.
- The heating element will become hot during operation. Avoid direct contact to prevent burns.
- Keep children and pets away from the heating element during operation.
- Tryggið rétta jarðtengingu rafkerfisins.
- Do not immerse the electrical connection part of the element in water or other liquids.
3. Vöruíhlutir og yfirview
The Terma Split TS1 Heating Element consists of a heating rod and an integrated electrical connection point. Below are images illustrating the product and its key features.

Mynd 3.1: Close-up of the Terma Split TS1 heating element's electrical connection and threaded base. This image highlights the brass-colored threaded section for secure installation and the multi-pin electrical connector at the end.

Mynd 3.2: Full lengd view of the Terma Split TS1 heating element. This image shows the entire length of the metallic heating rod, designed to be inserted into a compatible radiator or towel warmer, with the electrical connection visible at the bottom.
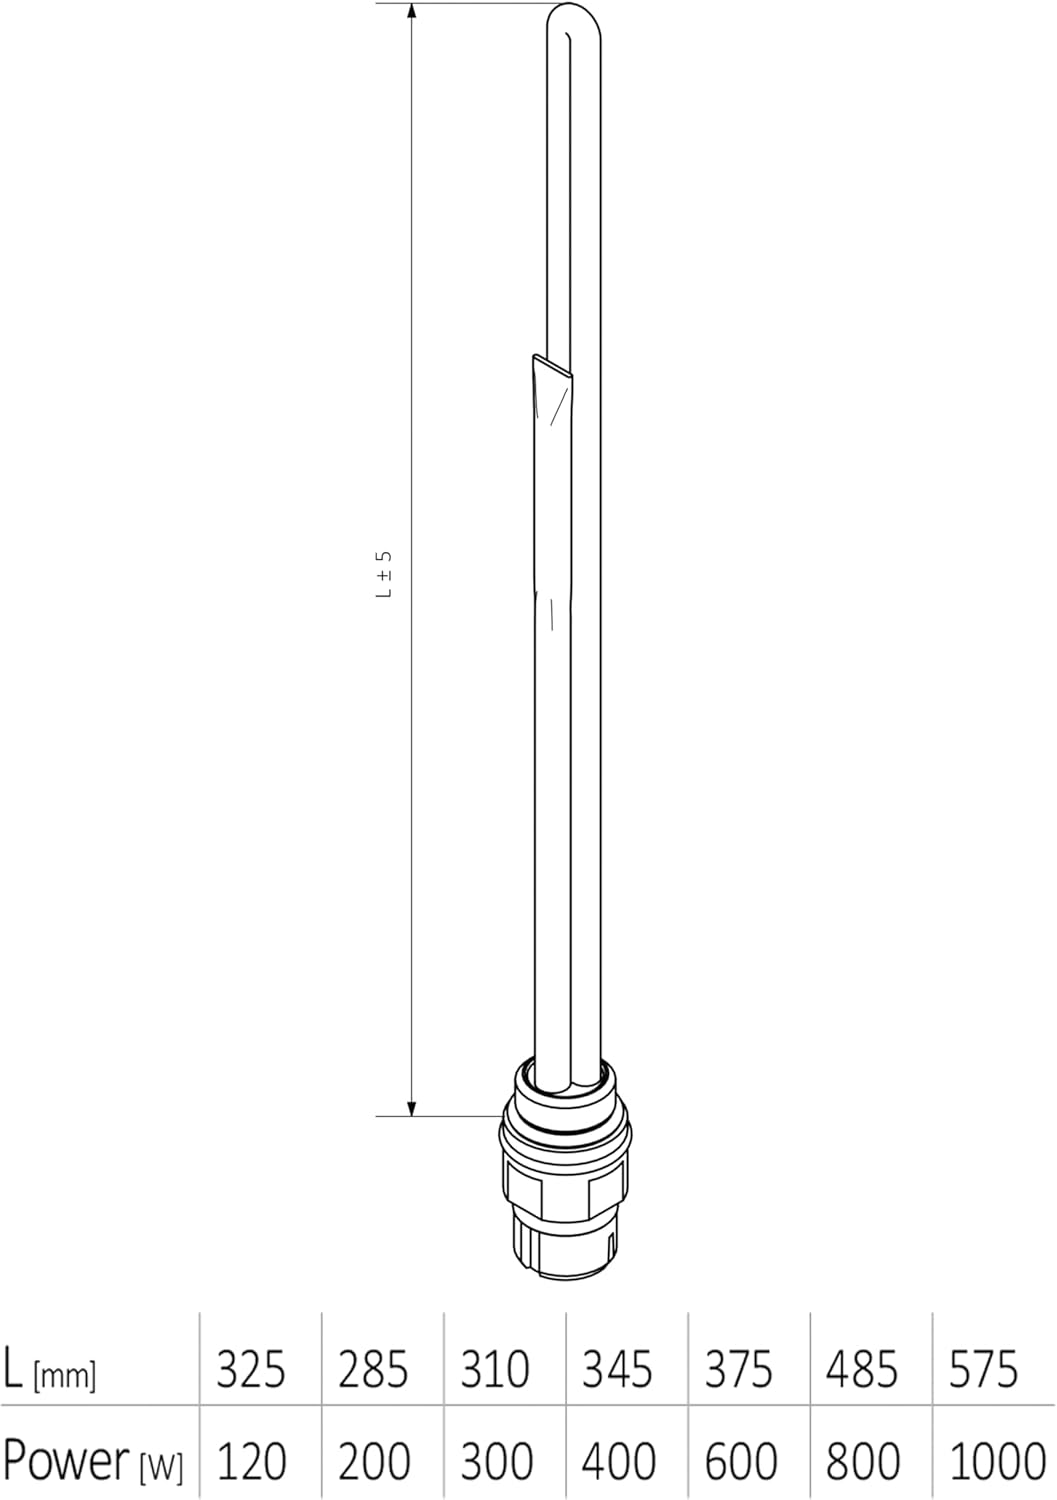
Mynd 3.3: Technical drawing of the Terma Split TS1 heating element, illustrating its dimensions (L ± 5 mm) and a table correlating length (L [mm]) with power (Power [W]). For this specific model, the length is 310 mm and the power is 300 W.
4. Uppsetning og uppsetning
The Terma Split TS1 Heating Element is designed for integration into compatible heating systems. Professional installation is highly recommended to ensure proper function and safety.
4.1 Athuganir fyrir uppsetningu
- Verify that the heating element's specifications (voltage, hvaðtage) match your system's requirements. This model operates at 230 Volts and 300 Watts.
- Ensure the radiator or towel warmer is compatible with the heating element's dimensions (310 mm length).
- Confirm that the electrical circuit has appropriate overcurrent protection.
- Inspect the heating element for any visible damage before installation.
4.2 Uppsetningaraðferð
- Aftengdu rafmagn: Ensure the main power supply to the installation area is completely disconnected at the circuit breaker.
- Prepare Radiator/Towel Warmer: If installing into an existing system, drain the radiator or towel warmer completely.
- Insert Element: Carefully insert the heating element into the designated opening of the radiator or towel warmer. The threaded section should align with the opening.
- Öruggur þáttur: Tighten the heating element securely into place. Use appropriate tools, but do not overtighten to avoid damaging the threads or seals.
- Rafmagnstenging: Connect the heating element to the electrical supply according to local wiring regulations. Ensure all connections are secure and properly insulated. This typically involves connecting live, neutral, and ground wires.
- Fill System (if applicable): If the system was drained, refill it with the appropriate heating fluid (e.g., water or glycol mixture) as per the radiator/towel warmer manufacturer's instructions. Bleed any air from the system.
- Próf: Once installation is complete and all connections are verified, restore power and test the heating element's operation.
5. Notkunarleiðbeiningar
The Terma Split TS1 Heating Element operates by converting electrical energy into heat. Once properly installed and connected to a power source, it will begin to heat the fluid within the radiator or towel warmer.
- Kveikt á: Activate the power supply to the heating element via its dedicated switch or circuit breaker.
- Hitahringrás: The element will begin to heat. The time required to reach the desired temperature will depend on the volume of fluid and the ambient conditions.
- Slökkva á: To turn off the heating element, deactivate the power supply.
- Hitastýring: If your system includes a thermostat or control unit, refer to its specific manual for temperature adjustment and programming. This heating element itself does not have integrated temperature controls.
6. Viðhald
Regular maintenance ensures the longevity and efficient operation of your heating element.
- Rafmagnstenging: Aftengdu alltaf rafmagnið áður en viðhald er framkvæmt.
- Þrif: Periodically clean the exterior of the heating element (if accessible) and the surrounding area to prevent dust and debris buildup. Use a soft, dry cloth. Do not use abrasive cleaners or solvents.
- Sjónræn skoðun: Regularly inspect the power cord and connections for any signs of wear, damage, or loose connections.
- Kerfisvökvi: Ensure the heating system fluid level is adequate and that the fluid quality is maintained according to the radiator/towel warmer manufacturer's recommendations.
- Athugun fagaðila: It is recommended to have a qualified technician inspect the heating system and element periodically, especially if you notice any changes in performance.
7. Bilanagreining
If you encounter issues with your Terma Split TS1 Heating Element, refer to the following common troubleshooting steps. For complex issues, contact a qualified technician.
| Vandamál | Möguleg orsök | Lausn |
|---|---|---|
| Heating element does not heat. |
|
|
| System not heating sufficiently. |
|
|
| Unusual noises from the system. |
|
|
8. Tæknilýsing
| Eiginleiki | Gildi |
|---|---|
| Vörumerki | skilmála |
| Gerðarnúmer | WETS103KD |
| Framleiðandi | Armacell GmbH |
| Mál (L x B x H) | 0.22 x 0.22 x 3.4 cm (element length 310 mm) |
| Þyngd | 150 grömm |
| Voltage | 230 volt |
| Power (Wattage) | 300 Watt |
| Magn hluta | 1 |
| Rafhlöður nauðsynlegar | Nei |
| ASIN | B07JRDP1N |
| Fyrsti laus dagsetning | 27. janúar 2019 |
9. Ábyrgð og stuðningur
Specific warranty information for the Terma Split TS1 Heating Element may vary by region and retailer. Please refer to your purchase documentation or contact your point of sale for detailed warranty terms and conditions.
For technical support or inquiries regarding this product, please contact Terma customer service or your authorized distributor. Ensure you have your product model number (WETS103KD) and purchase details available when contacting support.
Athugið: Upplýsingar um framboð varahluta eru ekki gefnar í vörulýsingunum.
Tengd skjöl - WETS103KD
 |
TERMA DRY rafmagns handklæðaofn: Eiginleikar, upplýsingar og uppsetning Explore the TERMA DRY electric towel rail heater. This document details its functionality, timer, smart home compatibility, safety features, design options, technical specifications, and configuration table. Find dimensions and available power outputs for this versatile heating solution. |
 |
Terma MOA WiFi: Intelligentna Grzałka Sterowana með WiFi og Bluetooth Odkryj Terma MOA WiFi, inteligentną grzałkę do grzejników z precyzyjną kontrolą temperatury, zdalnym sterowaniem przez aplikację mobilną, funkcjami oszczędzania energii i nowoczesnym designem. Dowiedz się więcej o specyfikacjach, kolorach i kodowaniu produktu. |
 |
TERMA MOA WiFi snjallhitunarelement: Eiginleikar, stjórnun og upplýsingar Skoðaðu TERMA MOA WiFi snjallhitunarþáttinn fyrir rafmagns- og tvöfalda eldsneytisofna. Býður upp á fjarstýringu í gegnum WiFi/Bluetooth með Terma Home appinu, handvirka notkun, tvo hitaskynjara, þurrkarastillingu, frostvörn og foreldralás. Fáanlegt í mörgum litum og aflgjöfum. |
 |
TERMA SPLIT I & II Heating Elements: Technical Specifications & Overview Explore the TERMA SPLIT I and TERMA SPLIT II heating elements. Learn about their specifications, class ratings, and compatibility with KTX/SKT heater systems. These are not independent devices; installation details are provided in separate manuals. |
 |
Terma MOA WiFi: Intelligentna Grzałka Sterowana með WiFi og Bluetooth Poznaj Terma MOA WiFi, inteligentną grzałkę do grzejników sterowaną zdalnie przez WiFi i Bluetooth za pomocą aplikacji Terma Home. Oferuje precyzyjną kontrolę temperatury, oszczędność energii i bezpieczeństwo. |
 |
TERMA MOA WIFI Electric Heating Element - Smart Control and Technical Specifications Explore the TERMA MOA WIFI electric heating element for radiators. Features smart control via TERMA Home app, WiFi/Bluetooth, precise temperature settings, dryer mode, and various color/cable options. Includes detailed technical specifications and configuration guide. |
Ask a question about this manual
Ask about setup, troubleshooting, compatibility, parts, safety, or missing instructions. Manuals+ will review the question and use this page’s manual context to help answer it.