1. Vöru lokiðview
The SIMBAILAI 7-inch Wireless Video Intercom System provides a secure and convenient way to monitor your entrance and communicate with visitors. Featuring a 7-inch indoor monitor and an IP55-rated outdoor unit, this system offers clear video, two-way audio, night vision, and motion detection capabilities.

Image: The SIMBAILAI 7-inch Wireless Video Intercom System, featuring the indoor monitor on the left displaying a family, and the outdoor unit on the right with a doorbell button and camera.
Helstu eiginleikar:
- Aukið þráðlaust svið: Operates up to 500 meters in open fields, though effective range may be reduced by walls or metal structures.
- Door Release Function: The outdoor station supports door opening via the indoor monitor, allowing integration with existing door openers.
- IP55 vatnsheldni: The outdoor unit is rated IP55 for water and dust resistance, ensuring reliable operation in various weather conditions.
- Sveigjanlegir rafmagnsvalkostir: Both indoor and outdoor units can be powered by lithium batteries (up to 1050 hours standby for outdoor unit) or connected to a power outlet for more stable operation.
- High-Quality Camera & Night Vision: Features a 100° wide-angle outdoor camera with automatic infrared night vision LEDs for clear visibility in low light.
- Motion Detection & Snapshot: The outdoor unit can detect motion, automatically activating the monitor and taking snapshots of visitors. Manual snapshot function is also available.
- Myndageymsla: Stores up to 100 photos with date and time stamps fyrir afturview hvenær sem er.
- Tamper viðvörun: The outdoor unit includes a tamper alarm that sounds if unauthorized attempts are made to remove it.
2. Öryggisupplýsingar
Please read all safety instructions carefully before installation and operation to ensure safe and proper use of the device.
- Ekki útsetja tækið fyrir miklum hita, raka eða beinu sólarljósi.
- Ensure all cables are properly connected and secured to prevent tripping hazards or damage.
- Use only the power adapters and batteries specified by the manufacturer.
- Ekki reyna að taka tækið í sundur eða gera við það sjálfur. Látið hæft starfsfólk sjá um alla þjónustu.
- Haltu tækinu í burtu frá sterkum segulsviðum.
- Ensure the outdoor unit is installed with its rain cover to protect it from weather elements.
3. Innihald pakka
Vinsamlegast athugið innihald pakkans við upptöku til að ganga úr skugga um að allir hlutir séu til staðar:
- 1 x 7-inch Indoor Monitor
- 1 x Útieining (dyrabjöllumyndavél)
- 1 x Rain Cover for Outdoor Unit
- 2 x Rechargeable Lithium Batteries (for indoor and outdoor units)
- 2 x Power Adapters (for indoor and outdoor units)
- Festingarskrúfur og veggfestingar
- Notendahandbók
4. Uppsetningarhandbók
4.1. Uppsetning utanhúss eininga
The outdoor unit should be installed in a location that provides a clear view of your entrance and is protected from direct sunlight. The recommended installation height is between 1.4 meters and 1.7 meters from the ground.
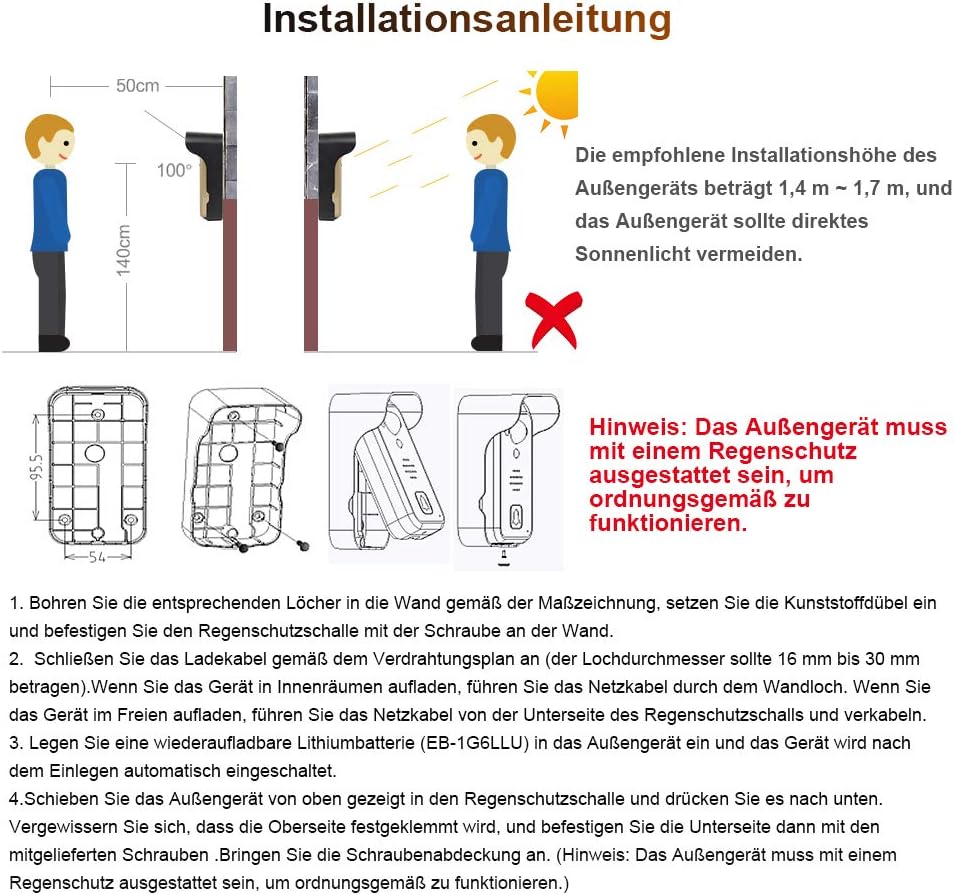
Image: Installation instructions for the outdoor unit, illustrating the recommended height (1.4m-1.7m) and the necessity of the rain cover.
- Drill the appropriate holes in the wall according to the dimension drawing provided in the manual. The hole diameter for wiring should be between 16 mm and 30 mm.
- Settu veggfestingarnar úr plasti í boraðar holur.
- Attach the rain cover to the wall using the supplied screws.
- If connecting to a power outlet, route the power cable from the bottom of the rain cover.
- Insert a rechargeable lithium battery (EB-1G6LLU) into the outdoor unit. The device will automatically turn on.
- Slide the outdoor unit into the rain cover from the top, pushing it down until it clicks into place. Ensure the top is securely clampútg.
- Secure the bottom of the outdoor unit to the rain cover using the supplied screws.
- Attach the screw cover to conceal the screws.

Image: Visual guide for installing the outdoor unit (top row, steps 1-4) and the indoor unit (bottom row, steps 1-3). Upon successful outdoor unit installation, the call button will light up blue for 2 seconds.

Image: The outdoor unit of the video intercom system is shown mounted on a white brick wall, positioned next to a dark brown entrance door.
4.2. Uppsetning innanhúss
The indoor unit can be placed on a desk or mounted on a wall. Ensure it is within the effective wireless range of the outdoor unit.
- Open the battery compartment on the back of the indoor unit.
- Insert the rechargeable lithium battery into the compartment, ensuring correct polarity.
- Close the battery compartment. The indoor unit will power on.

Image: The 7-inch indoor monitor is displayed on a kitchen counter, showing a family photo on its screen, highlighting its display capabilities.
4.3. Wireless Signal Considerations
The system operates on a 2.4 GHz signal. The effective range can be up to 500 meters in open conditions without obstacles. However, walls, especially metal objects like iron gates, can significantly reduce the signal strength.

Image: A diagram illustrating the 2.4 GHz signal transmission from the outdoor unit through an inner and outer wall to the indoor monitor, indicating a range of up to 500m in open conditions.

Image: This diagram provides guidance on optimal placement for the wireless video intercom system, showing how to avoid signal interference from metal objects and walls, and suggesting testing signal strength before final installation.
Ráðleggingar um uppsetningu:
- Prófmerkjastyrkur: Before final installation, test the optimal signal position for both the outdoor and indoor units. Adjust the indoor unit's position if the signal is weak.
- Avoid Metal Objects: Do not install the outdoor unit directly on metal objects (e.g., iron gates), as this can reduce the signal by approximately 80%.
- Lágmarka hindranir: Avoid placing large objects between the indoor and outdoor units that could obstruct the wireless signal. Adjust the indoor unit's position to minimize such obstructions.
- Villa with Boundary Wall: For villas with boundary walls, it is recommended to install the outdoor unit on the left side of the right fence. The fewer walls the signal passes through, the larger the covered area. Do not install on support structures. It is recommended to install the indoor unit near a window on the second floor for better signal reception.
5. Notkunarleiðbeiningar
5.1. Grunnaðgerð
- Svara símtali: When a visitor presses the call button on the outdoor unit, the indoor monitor will ring and display the visitor's image. Press the 'Answer' button on the indoor monitor to establish two-way communication.
- Hurðaropnun: If connected to an electronic door lock, press the 'Unlock' button on the indoor monitor to open the door for your visitor.
- Eftirlit: You can manually activate the outdoor camera view on the indoor monitor at any time to check your entrance.
5.2. Hreyfiskynjun
The outdoor unit is equipped with a motion detection function. When enabled, if someone moves in front of the camera, the system will automatically activate the indoor monitor and take snapshots.

Image: This diagram illustrates the automatic motion detection feature, showing how the system activates the monitor and captures images when movement is detected in front of the outdoor camera.
You can also manually trigger a snapshot at any time. All captured images are stored with date and time stampog hægt er að endurnýjaviewed on the indoor monitor. The system can store up to 100 photos.
5.3. Nætursjón
The outdoor unit features infrared night vision LEDs that automatically activate in low-light conditions. This ensures clear visibility of visitors even in complete darkness, enhancing security.
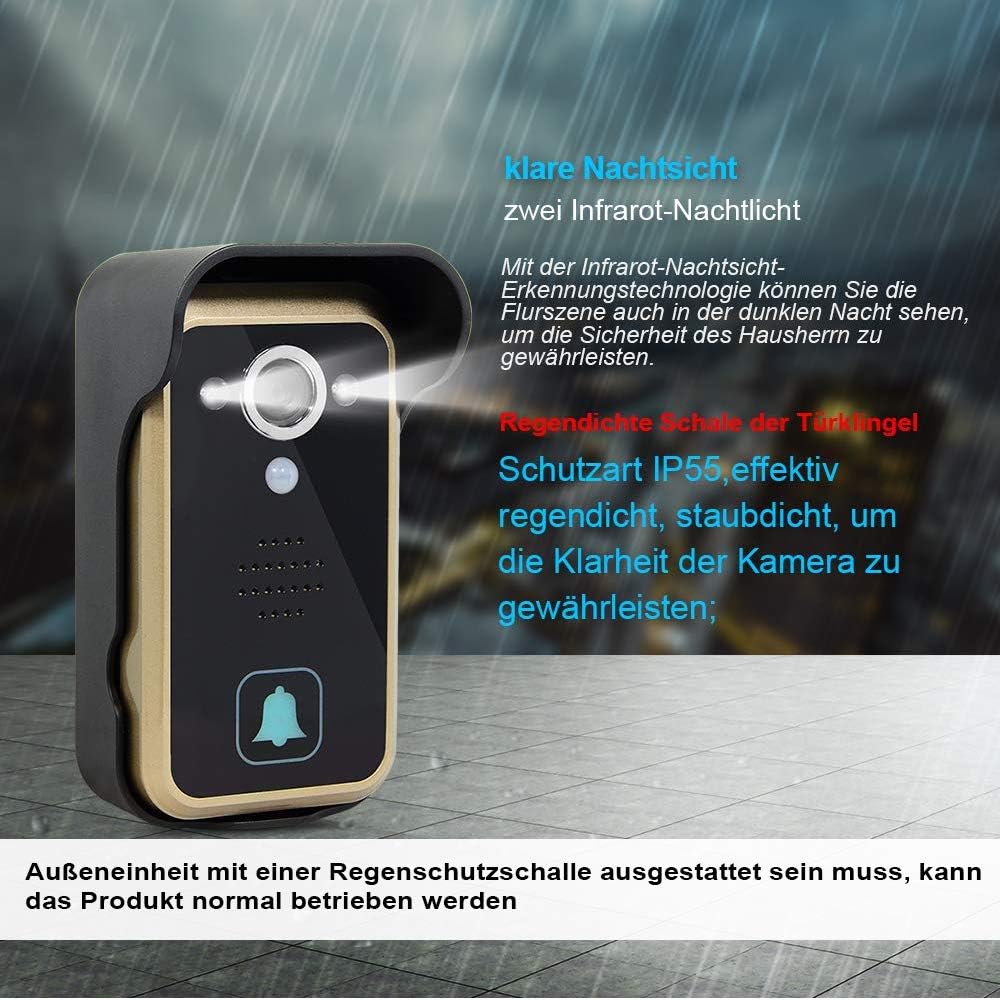
Image: This diagram highlights the clear night vision capability with two infrared night lights and the IP55 rainproof and dustproof shell of the outdoor unit, ensuring camera clarity and functionality in dark or wet conditions.
6. Viðhald
- Þrif: Notið mjúkan, þurran klút til að þrífa bæði skjáinn innandyra og utandyra. Notið ekki slípiefni eða leysiefni.
- Umhirða rafhlöðu: If using battery power, ensure batteries are charged regularly. For optimal battery life, avoid extreme temperatures.
- Outdoor Unit Protection: Regularly check that the rain cover is securely in place and free from debris to ensure proper protection for the outdoor unit.
7. Bilanagreining
| Vandamál | Möguleg orsök | Lausn |
|---|---|---|
| No signal or weak signal between units. | Too far apart, obstacles (walls, metal), interference. | Reduce distance between units. Relocate indoor unit to a position with fewer obstructions. Avoid installing outdoor unit on metal surfaces. |
| Outdoor unit not turning on. | Battery depleted or not inserted correctly. Power adapter not connected. | Charge or replace battery. Ensure battery is inserted with correct polarity. Connect power adapter. |
| Indoor monitor screen is blank. | Battery depleted. Unit is off. | Charge battery or connect to power. Press power button to turn on. |
| No image from outdoor camera. | Poor signal. Camera lens obstructed. | Check signal strength. Clean camera lens. |
| Hreyfiskynjun virkar ekki. | Feature not enabled. Sensor obstructed. | Check settings on indoor monitor to ensure motion detection is active. Clear any obstructions from the sensor area. |
8. Tæknilýsingar
| Eiginleiki | Forskrift |
|---|---|
| Vörumerki | SIMBAILAI |
| Tengitækni | Þráðlaust |
| Sérstakur eiginleiki | Hreyfiskynjari |
| Aflgjafi | Rafhlöðuknúið |
| Gerð stjórnanda | Þrýstihnappur |
| Gerð uppsetningar | Outdoor Unit: Wall; Indoor Unit: Desk/Wall |
| Litur | Þráðlaust |
| Fjöldi hluta | 1 |
| Fjöldi rása | 4 |
| Ráðlagður notkun vörunnar | Supports both wired and battery power supply modes. |
9. Ábyrgð og stuðningur
For warranty information and technical support, please refer to the documentation included with your product or contact SIMBAILAI customer service directly. Contact details can typically be found on the product packaging or the manufacturer's official websíða.