Whirlpool WHAD201CW
Whirlpool 20-Pint Portable Dehumidifier User Manual
Model: WHAD201CW
1. Vöru lokiðview
The Whirlpool 20-Pint Portable Dehumidifier is designed to efficiently remove excess moisture from your indoor environment, improving air quality and comfort. This unit is capable of removing up to 20 pints of moisture per day, suitable for spaces up to 1,500 square feet. It features an intuitive LED humidistat display, multiple fan speeds, and convenient options like a child lock and continuous draining.

Mynd 1.1: Framan view of the Whirlpool 20-Pint Portable Dehumidifier, showcasing þess netta og nútímalega hönnun.

Mynd 1.2: Hornlaga view of the dehumidifier, highlighting its side handles and overall shape.
2. Öryggisupplýsingar
Please read all instructions carefully before operating the dehumidifier to ensure safe and optimal performance. Keep this manual for future reference.
- Stingdu tækinu alltaf í jarðtengda rafmagnsinnstungu. Ekki nota framlengingarsnúrur eða millistykki.
- Ekki nota rakatækið ef rafmagnssnúran eða klóinn er skemmdur.
- Gakktu úr skugga um að tækið sé staðsett á sléttu og stöðugu yfirborði til að koma í veg fyrir að það velti og að vatn leki út.
- Haldið að minnsta kosti 20 cm bili í kringum tækið til að tryggja rétta loftflæði.
- Ekki stinga fingrum eða aðskotahlutum inn í loftinntakið eða úttakið.
- Aftengdu rakatækið áður en þú þrífur það eða framkvæmir viðhald.
- Þetta tæki er ekki ætlað til notkunar af einstaklingum (þar á meðal börnum) með skerta líkamlega, skynræna eða andlega getu, eða skort á reynslu og þekkingu, nema þeir hafi fengið eftirlit eða leiðbeiningar um notkun tækisins af einstaklingi sem ber ábyrgð á öryggi þeirra.
3. Uppsetning og uppsetning
3.1 Upptaka
Takið rakatækið varlega úr umbúðunum. Skoðið hvort tækið hafi skemmst við flutning. Geymið umbúðirnar til síðari geymslu eða flutnings.
3.2 Uppsetning hjóla
The dehumidifier comes with four caster wheels for easy mobility. Insert each caster wheel firmly into the designated holes at the bottom of the unit until they click into place.
3.3 Staðsetning
Place the dehumidifier in a location where the humidity is highest, such as a basement, garage, or living room. Ensure there is adequate space around the unit for proper air circulation. Avoid placing it against walls or furniture that could block the air intake or exhaust.

Image 3.1: Dehumidifier dimensions, showing approximate measurements of 15" (width) x 11" (depth) x 20" (height).

Image 3.2: Guide for selecting the appropriate dehumidifier size based on room area, indicating the 20-pint model is suitable for up to 1,500 sq. ft.
3.4 Rafmagnstenging
Plug the dehumidifier into a standard, grounded 120V AC electrical outlet. The unit is now ready for operation.
4. Notkunarleiðbeiningar
4.1 Stjórnborð yfirview
The dehumidifier features an electronic control panel with an LED display for easy operation.

Mynd 4.1: Lokiðview of the control panel features, including the LED display and various function indicators.
4.2 Kveikt/slökkt
Ýttu á Power hnappinn til að kveikja eða slökkva á tækinu.
4.3 Stilling á rakastigi
Use the humidity control buttons (usually Up/Down arrows) to set your desired humidity level. The LED display will show the current room humidity and your set humidity. The unit will operate until the desired level is reached, then cycle on and off to maintain it.
4.4 Val á viftuhraða
Press the Fan Speed button to cycle through available fan speeds (e.g., Low, High). Higher fan speeds will dehumidify faster but may produce more noise.
4.5 Tímamæliraðgerð
The 24-hour timer allows you to program the unit to turn on or off automatically after a set period. Consult the full manual for detailed timer programming instructions.

Image 4.2: Visual representation of key operating features: efficient moisture removal, automatic 24-hour turn on/shut off timer, and 2-speed fan for air circulation.
4.6 Barnalæsingaraðgerð
Activate the child lock to prevent accidental changes to settings. Refer to the control panel for the specific button combination or sequence to engage/disengage the child lock.
4.7 Continuous Draining Option
For extended operation without emptying the water bucket, connect a standard garden hose (not included) to the continuous drain port. Ensure the hose is sloped downwards to a suitable drain or floor drain to allow gravity drainage.

Image 4.3: Illustration of the continuous draining feature, allowing for direct water removal via a hose.
4.8 Loss of Power Protection
Ef um er að ræða völd outage.d. mun tækið sjálfkrafa halda áfram starfsemi með síðustu stillingum þegar rafmagn kemst aftur á.
5. Viðhald
5.1 Tæming vatnsfötunnar
When the water bucket is full, the unit will automatically shut off and an indicator light will illuminate. Carefully remove the bucket from the front of the unit and empty the collected water. Reinsert the bucket securely to resume operation.
5.2 Þrif á loftsíu
The dehumidifier is equipped with a removable, easy-to-clean air filter. A 'Clean Filter' alert will indicate when the filter needs attention. Regularly cleaning the filter ensures optimal performance and air quality.
- Slökktu á rakatækinu og taktu það úr sambandi.
- Locate and remove the air filter (typically on the side or back of the unit).
- Þvoið síuna með volgu sápuvatni. Skolið vandlega.
- Leyfðu síunni að loftþorna alveg áður en hún er sett aftur í tækið.

Mynd 5.1: Hlið view of the dehumidifier with the air filter access panel open, illustrating how to remove the filter for cleaning.
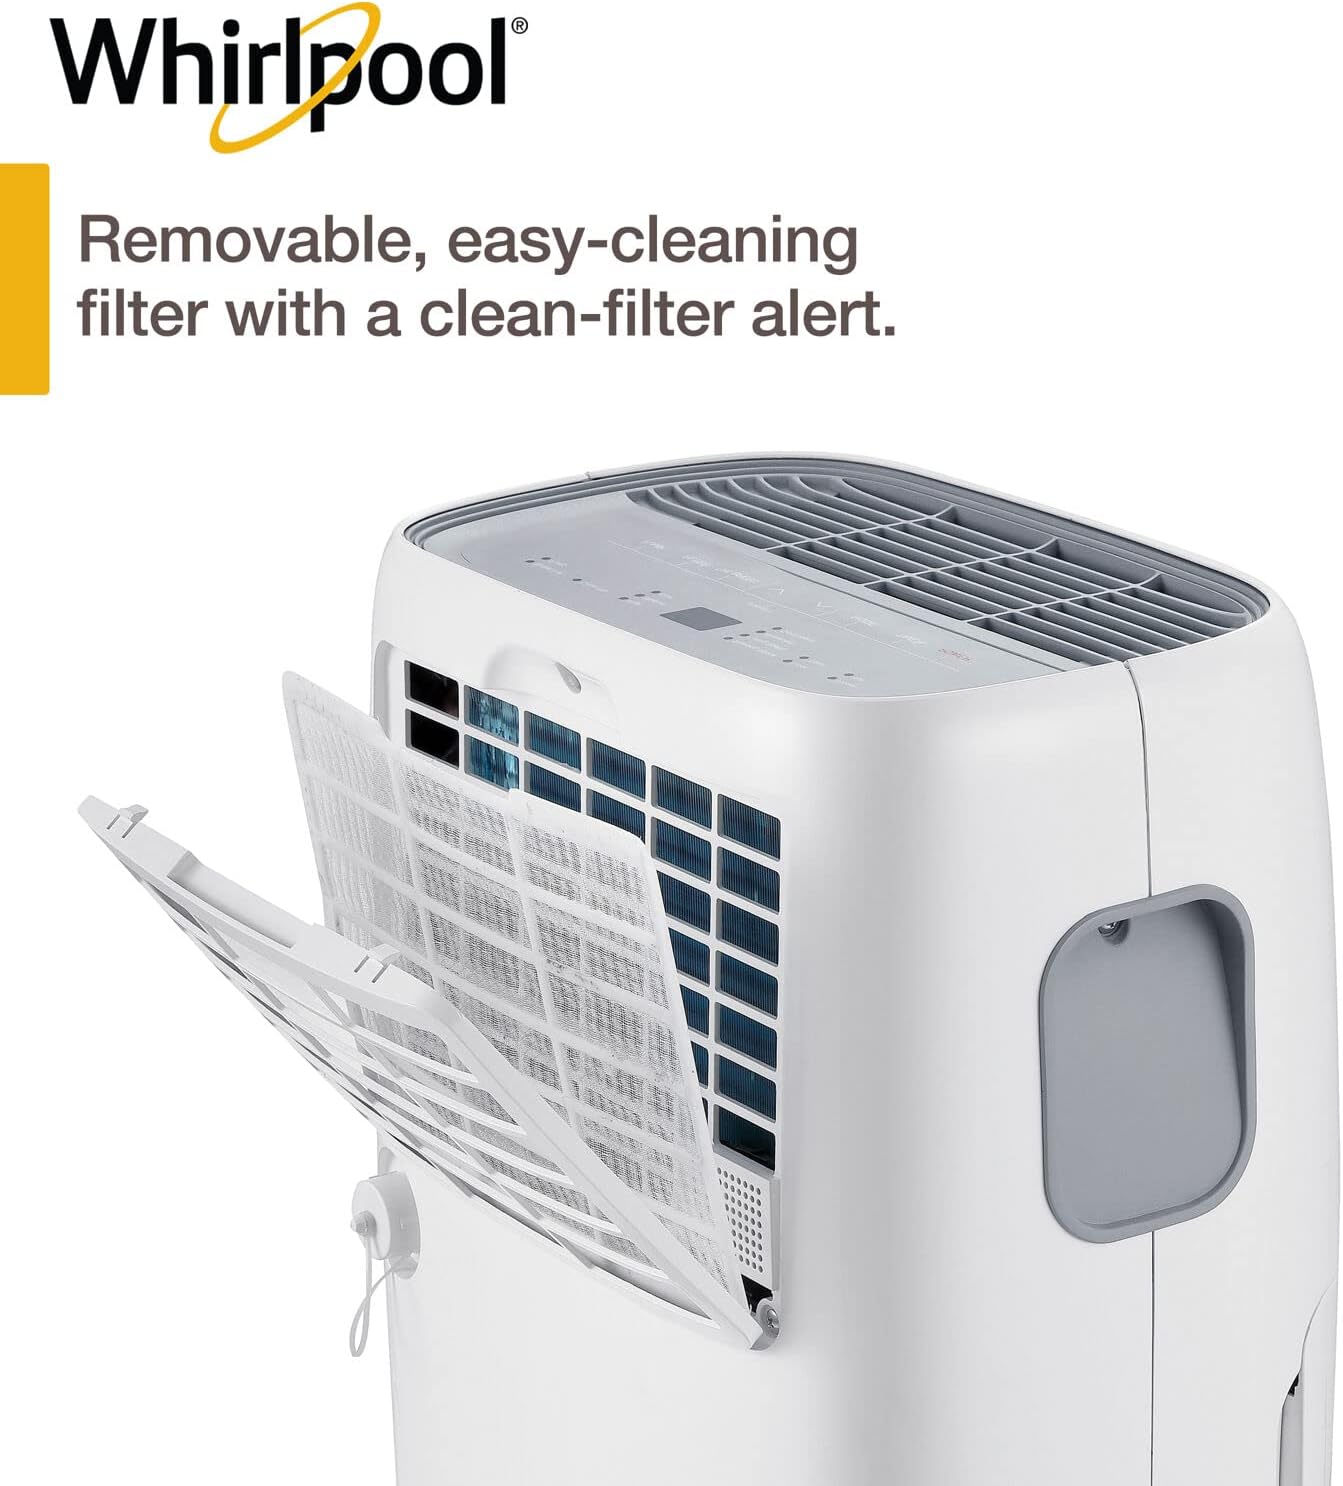
Mynd 5.2: Ítarlegt view of the removable filter, emphasizing its design for easy cleaning and the associated alert system.
5.3 Almenn þrif
Þurrkaðu ytra byrði rakatækisins með mjúku, damp cloth. Do not use harsh chemicals or abrasive cleaners. Ensure the unit is dry before plugging it back in.
5.4 Geymsla
If storing the unit for an extended period, ensure the water bucket is empty and the filter is clean and dry. Store the dehumidifier in an upright position in a cool, dry place, away from direct sunlight and extreme temperatures.
6. Bilanagreining
Áður en þú hefur samband við þjónustuver viðskiptavina skaltu skoða eftirfarandi töflu fyrir algeng vandamál og lausnir á þeim.
| Vandamál | Möguleg orsök | Lausn |
|---|---|---|
| Rakaþurrkan kveikir ekki á. | Enginn rafmagn, rafmagnssnúra úr sambandi, rofi slokknaður. | Athugið rafmagnstenginguna, gangið úr skugga um að innstungan virki, endurstillið rofann. |
| Tækið er í gangi en safnar ekki vatni. | Rakastigið er of hátt stillt, stofuhitastigið of lágt, loftsían er stífluð. | Lower desired humidity setting, ensure room temperature is above 5°C (41°F), clean air filter. |
| "Full Bucket" indicator is on, but bucket is not full. | Bucket not inserted correctly, sensor malfunction. | Ensure bucket is fully and correctly seated. If issue persists, contact support. |
| Einingin er hávær. | Unit not on a level surface, fan speed too high, internal component issue. | Place on a level surface, try a lower fan speed. If excessive, contact support. |
7. Tæknilýsing
| Eiginleiki | Smáatriði |
|---|---|
| Fyrirmynd | WHAD201CW |
| Getu | 20 pints / dag |
| Umfangssvæði | Allt að 1,500 fm |
| Þyngd hlutar | 14.4 kg |
| Litur | Hvítur |
| Sérstakur eiginleiki | Programmable, Auto-Shutoff, Timer, Child Lock |
| Innifalið íhlutir | Dehumidifier, 4 Caster Wheels, Manual, Warranty Card |
| Aflgjafi | 120V AC (Staðalbúnaður) |
8. Ábyrgð og stuðningur
8.1 Upplýsingar um ábyrgð
This Whirlpool dehumidifier comes with a 1 ára takmörkuð ábyrgð. This warranty covers defects in materials and workmanship under normal use. Please refer to the included warranty card for full terms and conditions, including what is covered and exclusions.

Image 8.1: Visual confirmation of product warranty.
8.2 Þjónustuver
For technical assistance, warranty claims, or to order replacement parts, please contact Whirlpool Customer Service. Contact information can typically be found on the Whirlpool official websíðunni eða á ábyrgðarkortinu sem fylgir vörunni.