1. Inngangur
This manual provides detailed instructions for the installation, configuration, and operation of your DollaTek Battery Capacity Voltage Monitor Tester. This device is designed to accurately display the voltage og prósenttage capacity of various battery types, including 12V-60V lead-acid, lithium-ion, and lithium-iron (LiFePO4) batteries.
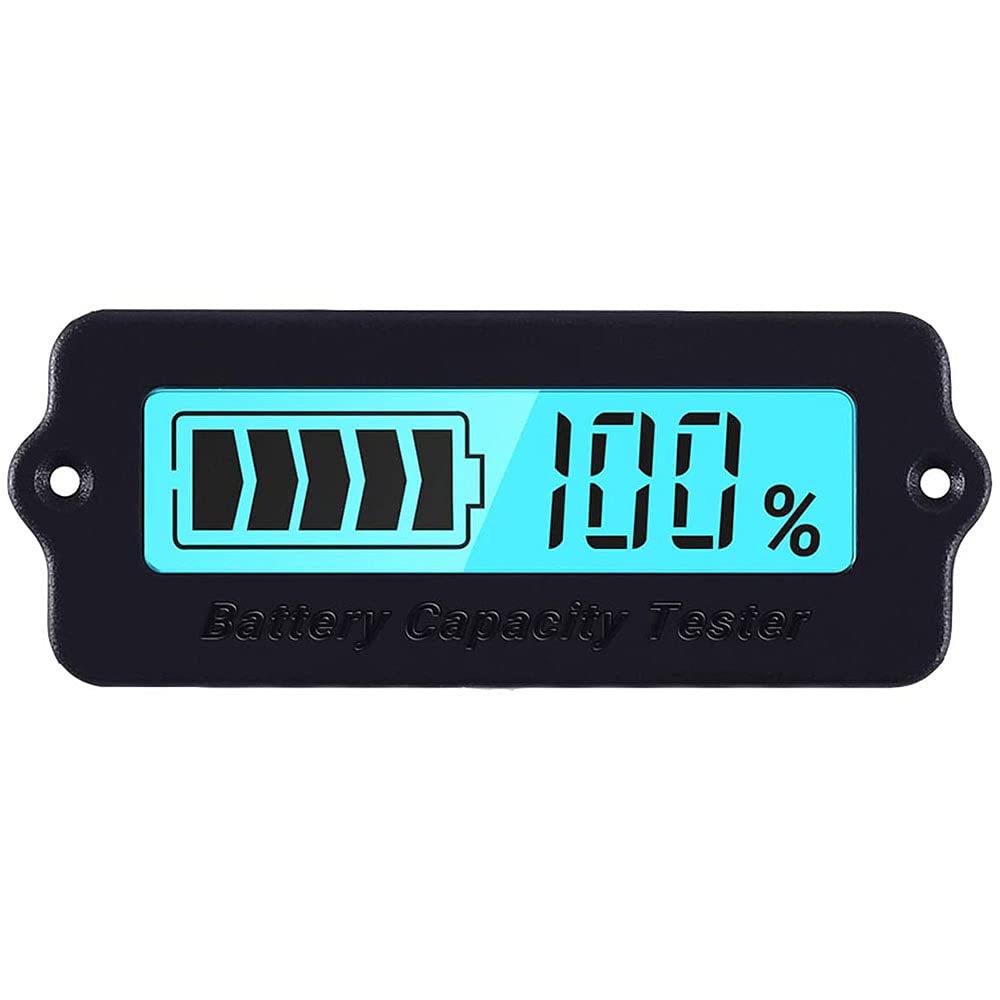
Figure 1: DollaTek Battery Capacity Voltage Monitor Tester. This image shows the compact, rectangular device with a clear display window, designed for monitoring battery status.
2. Öryggisupplýsingar
- Ensure proper polarity when connecting the device to a battery. Incorrect wiring can damage the monitor and the battery.
- Ekki fara yfir hámarks rekstrarrúmmáltage af 63V.
- Avoid exposing the device to extreme temperatures, moisture, or corrosive environments.
- This device is not waterproof. Protect it from water ingress.
- Geymið þar sem börn ná ekki til.
3. Innihald pakka
Pakkinn inniheldur:
- 1 x DollaTek Battery Capacity Voltage Monitor Tester
4. Vöru lokiðview
The DollaTek Battery Capacity Voltage Monitor Tester is a versatile device capable of measuring both battery capacity percentage og binditage. It supports a wide operating voltage range of DC 8V to 63V, making it suitable for various battery configurations.
- Breið samhæfni: Suitable for common 3-15 cell lithium batteries (8-63V operating voltage) and 12-48V lead-acid batteries. Note: Not applicable for lithium iron phosphate (LiFePO4) batteries without specific coulombmeter integration.
- Tvöfaldur skjástilling: Displays either battery capacity percentage eða binditage. A single button controls backlight and switches between these display modes.
- User-Adjustable Specifications: Users can configure the product specifications to match different battery types and voltages for accurate readings.
- Umsóknir: Ideal for mobile and portable equipment (excluding smartphones and PCs), such as cleaning machines, instruments, and other battery-powered devices.

Figure 2: Size comparison of the battery monitor. The image shows the compact size of the monitor, easily fitting in the palm of a hand.
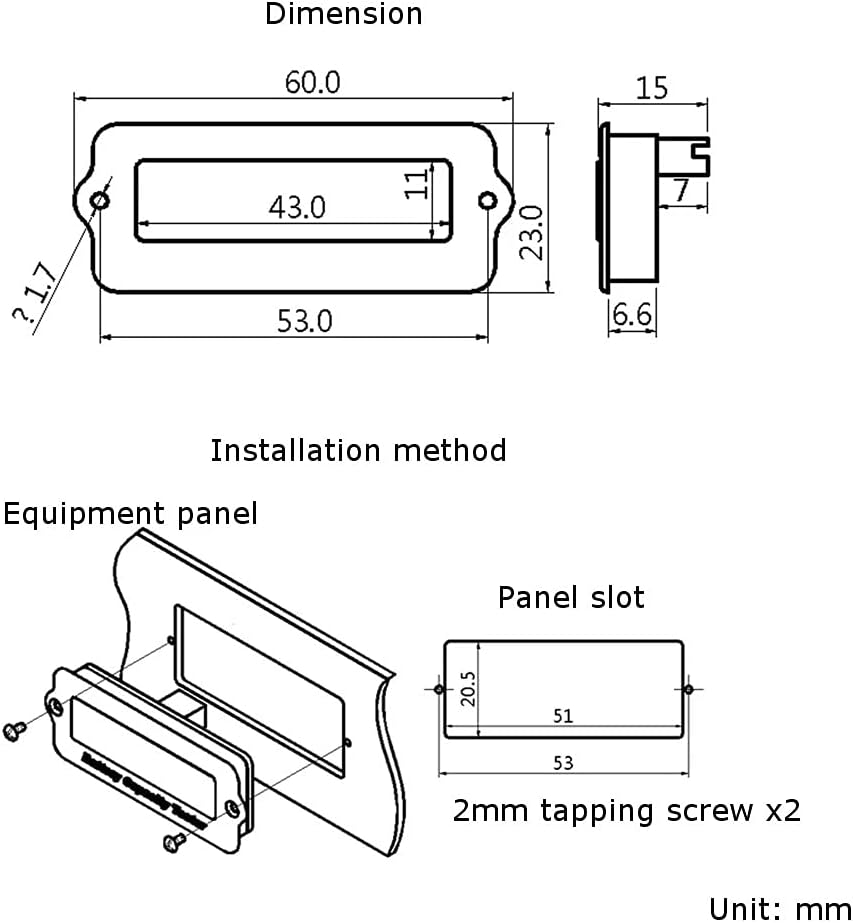
Figure 3: The monitor displaying 100% charge, surrounded by examples of its application, such as scooters, hoverboards, and various battery types.
5. Uppsetning og stillingar
Proper configuration is essential for accurate readings. Follow these steps carefully to set up your battery monitor:
5.1 Initial Setup and Battery Type Selection
- Do NOT connect the battery yet. Locate the single button on the back of the monitor.
- Ýttu á og halda niðri the button on the back of the monitor.
- While holding the button, connect the monitor to your battery.
- Release the button. The monitor will now enter the configuration interface.
- Press the button repeatedly to cycle through the available battery type settings until you find the correct code for your battery. Refer to the table below for battery type codes.
- Once the correct setting is displayed, disconnect the power from the monitor.
- Reconnect the power. The monitor is now configured and ready for use.
Important: The configured battery specification must precisely match your connected battery. Mismatched settings will result in inaccurate readings (e.g., displaying 0% or 100% incorrectly).

Mynd 4: Aftan view of the monitor, highlighting the circuit board and the single configuration button. This button is crucial for setting the battery type.
5.2 Battery Type Configuration Codes
| Tegund rafhlöðu | Kóði snið | Lýsing |
|---|---|---|
| Blý-sýru rafhlöður | 1P, 2P, 3P, 4P | 1P = 12V, 2P = 24V, 3P = 36V, 4P = 48V |
| Lithium-Ion rafhlöður | 3c, 4c, ..., 16c | 3c = 3 cells, 4c = 4 cells, up to 16 cells |
| Lithium-Iron (LiFePO4) Batteries | 1F, 2F, ..., 19F | 1F = 1 cell, 2F = 2 cells, up to 19 cells |
5.3 Leiðbeiningar um raflögn
The monitor connects to the battery using a simple two-wire connection. Identify the B- and B+ terminals on the monitor's connector. Connect the red wire to the positive (+) terminal of your battery and the black wire to the negative (-) terminal of your battery. Ensure a secure connection.
6. Notkunarleiðbeiningar
Once configured, the monitor will display the battery status. The single button on the back of the device serves to switch between display modes and control the backlight.
- Skipt um skjástillingar: Briefly press the button on the back of the monitor to toggle between displaying the battery capacity percentage og rafhlaðan voltage.
- Baklýsingastýring: The button also controls the backlight. A brief press will cycle through display modes and may affect backlight status depending on the model's specific firmware.
7. Viðhald
- Þrif: Notið mjúkan, þurran klút til að þrífa tækið. Notið ekki slípiefni eða leysiefni.
- Geymsla: When not in use for extended periods, store the monitor in a dry, cool place away from direct sunlight.
- Skoðun: Periodically check the wiring for any signs of wear or damage.
8. Bilanagreining
- Monitor displays 0% or 100% incorrectly: This indicates that the battery type configuration is incorrect. Refer to Section 5.1 and 5.2 to reconfigure the monitor for your specific battery type.
- Enginn skjár: Check the power connection to the battery. Ensure the voltage is within the operating range (8V-63V). Verify correct polarity.
- Ónákvæmar mælingar: Ensure the battery is fully charged and discharged a few times after initial setup to allow the monitor to calibrate. Recheck the battery type configuration.
- Display not switching between capacity and voltage: Ensure you are pressing the button correctly. If the issue persists, the device may have a fault.
9. Tæknilýsing
| Parameter | Gildi |
|---|---|
| Operation Voltage | Min 8V, Max 63V |
| Vinnustraumur | 8 mA (Min), 10 mA (Max) |
| Svefnstraumur | 15 úA |
| Hitastig | 0°C - 35°C |
| Voltage Nákvæmni | ± 3.0% |
| Afkastagetu Nákvæmni | ± 3.0% |
| Backlight On Current | 40 mA (Min), 50 mA (Max) |
| Backlight Off Current | 30 mA (Min), 40 mA (Max) |
| Mál | 60 x 23 x 15 mm (2.34 x 1.0 x 0.6 tommur) |
| Þyngd | 15g |
| Litur baklýsingu | Blár |

Figure 5: Technical drawing showing the dimensions of the monitor in millimeters and a diagram for panel installation. The panel slot dimensions are 53mm x 20.5mm.
10. Upplýsingar um ábyrgð
This DollaTek product comes with a 1 árs ábyrgð framleiðanda frá kaupdegi. Ábyrgðin nær til galla í efni og framleiðslu við eðlilega notkun. Hún nær ekki til tjóns sem hlýst af misnotkun, slysum, óheimilum breytingum eða óviðeigandi uppsetningu.
11. Þjónustudeild
For technical assistance, troubleshooting, or warranty claims, please contact DollaTek customer support through your original point of purchase or visit the official DollaTek websíða fyrir upplýsingar um tengiliði.