1. Inngangur
This manual provides detailed instructions for the installation, operation, and maintenance of your Denver DTB-145 DVB-T2 H.265 Set-Top Box. Please read this manual thoroughly before using the device to ensure proper functionality and to prevent damage. Keep this manual for future reference.
2. Öryggisupplýsingar
- Aflgjafi: Use only the power adapter supplied with the device. Ensure the voltage samsvarar staðbundinni aflgjafa.
- Loftræsting: Do not block any ventilation openings. Place the device on a stable, flat surface with adequate space around it for air circulation.
- Vatn og raki: Do not expose the device to rain, moisture, or any liquids. Do not place objects filled with liquids, such as vases, on the device.
- Hitagjafar: Haldið tækinu frá hitagjöfum eins og ofnum, hitaspjöldum, eldavélum eða öðrum tækjum sem framleiða hita.
- Þrif: Aftengdu tækið úr rafmagnsinnstungunni áður en það er hreinsað. Notið mjúkan, þurran klút. Notið ekki fljótandi hreinsiefni eða úðabrúsa.
- Þjónusta: Do not attempt to service this product yourself. Refer all servicing to qualified service personnel. Opening the cover may expose you to dangerous voltage eða aðrar hættur.
- Elding: Taktu tækið úr sambandi í eldingum eða þegar það er ónotað í langan tíma.
3. Innihald pakka
Gakktu úr skugga um að allir hlutir séu til staðar í pakkanum:
- Denver DTB-145 DVB-T2 H.265 Set-Top Box
- Fjarstýring
- Rafmagns millistykki
- Notendahandbók (þetta skjal)
4. Vöru lokiðview
4.1 Framhlið

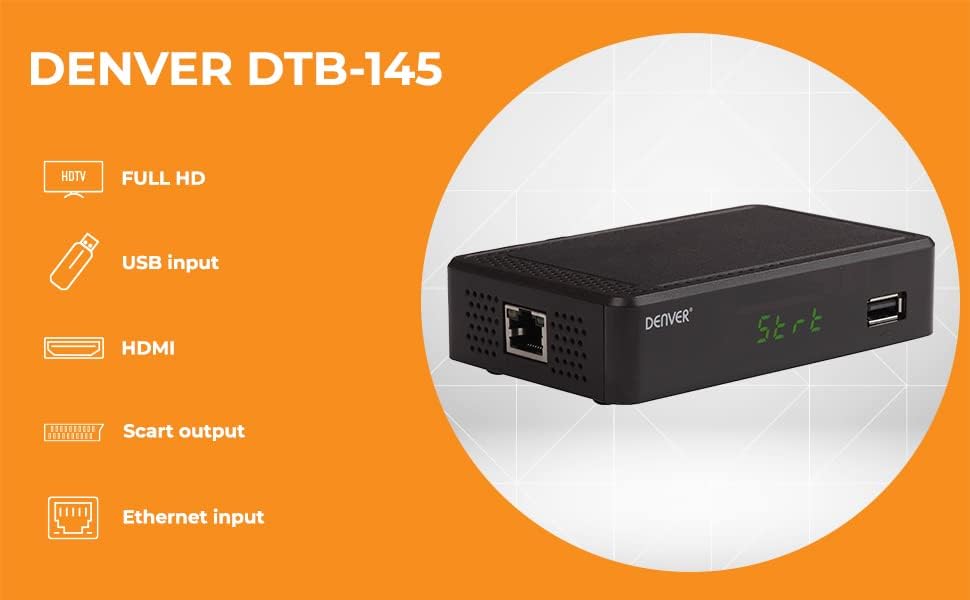
Myndlýsing: This image displays the front panel of the Denver DTB-145 Set-Top Box. On the left, the 'DENVER' logo is visible. In the center, a green LED display shows 'St-rt'. To the right, a USB port is present.
- LED skjár: Shows channel number, time, or operational status.
- USB tengi: For connecting USB storage devices for media playback.
4.2 Bakhlið

Myndlýsing: This image shows the rear panel of the Denver DTB-145 Set-Top Box. From left to right, the ports include: Antenna IN (RF IN), HDMI OUT, SCART, DC IN (12V), and an Ethernet port.
- RF IN: Connects to your terrestrial antenna.
- HDMI ÚT: Tengist sjónvarpinu þínu fyrir háskerpu myndband og hljóð.
- SCART: Connects to older TVs for standard-definition video and audio.
- Jafnstraumsinngangur (12V): Tengist við straumbreytinn.
- ETHERNET: Connects to your network for internet access (if supported by firmware for specific features).
4.3 Fjarstýring
Myndlýsing: This image displays the remote control for the Denver DTB-145 Set-Top Box. It features a standard layout with power, channel, volume, menu, navigation, EPG, and media control buttons.
The remote control allows you to operate all functions of the set-top box. Familiarize yourself with the button layout for easy navigation.
5. Uppsetning
5.1 Tenging við sjónvarpið þitt
- HDMI tenging (ráðlagt fyrir HD):
- Ensure both your TV and the set-top box are powered off.
- Tengdu annan enda HDMI snúru (fylgir ekki með) við HDMI OUT port on the set-top box.
- Connect the other end of the HDMI cable to an available HDMI input on your TV. Note the HDMI input number (e.g., HDMI 1, HDMI 2).
- SCART Connection (for older TVs):
- Ensure both your TV and the set-top box are powered off.
- Connect one end of a SCART cable (not included) to the SCART port on the set-top box.
- Connect the other end of the SCART cable to the SCART input on your TV.
5.2 Loftnetið tengt
- Connect your terrestrial antenna cable to the RF IN port on the rear panel of the set-top box.
5.3 Rafmagnstenging
- Tengdu meðfylgjandi straumbreyti við DC IN (12V) port on the rear panel of the set-top box.
- Plug the power adapter into a wall outlet. The set-top box should power on or enter standby mode.
5.4 First-Time Installation and Channel Scan
- Power on your TV and select the correct HDMI or SCART input source.
- Power on the set-top box using the remote control or the power button on the unit.
- The first-time installation wizard should appear. Follow the on-screen prompts to select your language, country, and initiate an automatic channel scan.
- The channel scan may take several minutes. Do not interrupt the process.
- Once the scan is complete, the set-top box will display the first available channel.
5.5 Connecting to Network (Optional)
- Connect an Ethernet cable (not included) from your router to the Ethernet port on the rear panel of the set-top box.
- This connection may be used for potential future firmware updates or specific internet-enabled features, depending on the device's software capabilities.
6. Rekstur
6.1 Grunnaðgerðir
- Kveikt/slökkt: Ýttu á BANDBY hnappinn á fjarstýringunni.
- Rásarval: Notaðu CH + / CH- buttons or enter the channel number directly using the numeric keypad.
- Hljóðstyrkur: Notaðu VOL + / VOL- hnappa.
- Þagga: Ýttu á ÞAGGA hnappinn til að þagga hljóðið tímabundið.
6.2 Valmyndarleiðsögn
- Ýttu á MENU hnappinn til að fá aðgang að aðalvalmyndinni.
- Notaðu directional arrows (▲ ▼ ◀ ►) til að fletta í gegnum valmöguleika í valmyndinni.
- Ýttu á OK til að staðfesta val.
- Ýttu á HÆTTA til að fara aftur í fyrri valmynd eða hætta alveg í valmyndinni.
6.3 Rafræn dagskrárleiðbeining (EPG)
- Ýttu á EPG hnappinn á fjarstýringunni til að view the Electronic Program Guide.
- The EPG displays program schedules for current and upcoming broadcasts. Use the directional arrows to navigate through channels and programs.
6.4 Spilun margmiðlunar í gegnum USB
- Settu USB-geymslutæki (t.d. USB-lykil) í USB-tengið á framhliðinni.
- Access the media player function through the main menu or by pressing a dedicated media button (if available) on the remote.
- Skoðaðu þína fileog veldu myndbandið, hljóðið eða myndina sem þú vilt file fyrir spilun.
6.5 DVB Subtitles and Teletext
- If available on the broadcast, press the SUB-T button to enable or disable DVB subtitles.
- Ýttu á TTX button to access Teletext services, if provided by the broadcaster.
7. Viðhald
7.1 Þrif
- Always unplug the set-top box from the power outlet before cleaning.
- Notið mjúkan, þurran og lólausan klút til að þurrka ytra byrði tækisins.
- Do not use liquid cleaners, abrasive pads, or chemical sprays, as these can damage the finish or internal components.
7.2 Hugbúnaðaruppfærslur
Athugaðu reglulega upplýsingar framleiðanda website for available software updates. Updates can improve performance, add features, or fix bugs. Follow the instructions provided with the update file vandlega.
8. Bilanagreining
| Vandamál | Möguleg orsök | Lausn |
|---|---|---|
| Engin mynd eða hljóð | Incorrect TV input selected Lausar kapaltengingar Set-top box not powered on | Select the correct HDMI/SCART input on your TV. Check all cable connections (HDMI/SCART, antenna, power). Ensure the set-top box is powered on. |
| Léleg myndgæði | Weak antenna signal Damaged antenna cable | Adjust antenna position or consider an amplined loftnet. Check antenna cable for damage and replace if necessary. |
| Fjarstýring virkar ekki | Tæmdar rafhlöður Obstruction between remote and box Incorrect remote mode | Skiptu um rafhlöður. Ensure a clear line of sight to the set-top box's IR receiver. Ensure the remote is in the correct mode for the set-top box. |
| Engar rásir fundust við skönnun | Antenna not connected or faulty Weak signal in your area | Check antenna connection. Ensure antenna is suitable for DVB-T2. Try repositioning the antenna or using an outdoor antenna. |
| USB-miðlar spilast ekki | Óstudd file sniði USB tæki ekki þekkt | Refer to specifications for supported media formats. Convert files ef þörf krefur. Ensure USB device is formatted correctly (e.g., FAT32). Try a different USB device. |
9. Tæknilýsing
| Eiginleiki | Forskrift |
|---|---|
| Fyrirmynd | DTB-145 (Manufacturer Model: 110131120090) |
| Vörumerki | Denver |
| Gerð útvarpstækis | DVB-T2 H.265 |
| Vídeókóðun | H.265, MPEG-1, MPEG-2, MPEG-4 |
| Upplausn | Full HD (1920x1080) via HDMI |
| Hljóð merkjamál | Dolby Digital (Plus) |
| Hljóðútgangsstilling | Umhverfishljóð (5.1 rása stilling) |
| Tengingar | HDMI, SCART, USB, Ethernet |
| Sérstakir eiginleikar | FTA (Free-to-Air) Channels, EPG, DVB Subtitles, Teletext, USB Media Playback |
| Mál (L x B x H) | 12 x 8 x 3 cm |
| Þyngd | 250 grömm |
| Power Input | 12V, 1A (via included power adapter) |
10. Ábyrgð og stuðningur
This product is covered by a standard manufacturer's warranty. For specific warranty terms and conditions, please refer to the warranty card included with your product or contact your retailer. For technical support or service inquiries, please contact Denver customer service or visit their official websíðu fyrir frekari aðstoð.