1. Inngangur
Thank you for choosing the IMIPAW 4L Automatic Pet Feeder. This device is designed to provide scheduled and portion-controlled meals for your pets, ensuring a consistent feeding routine. Please read this manual thoroughly before use to ensure proper operation and maintenance.
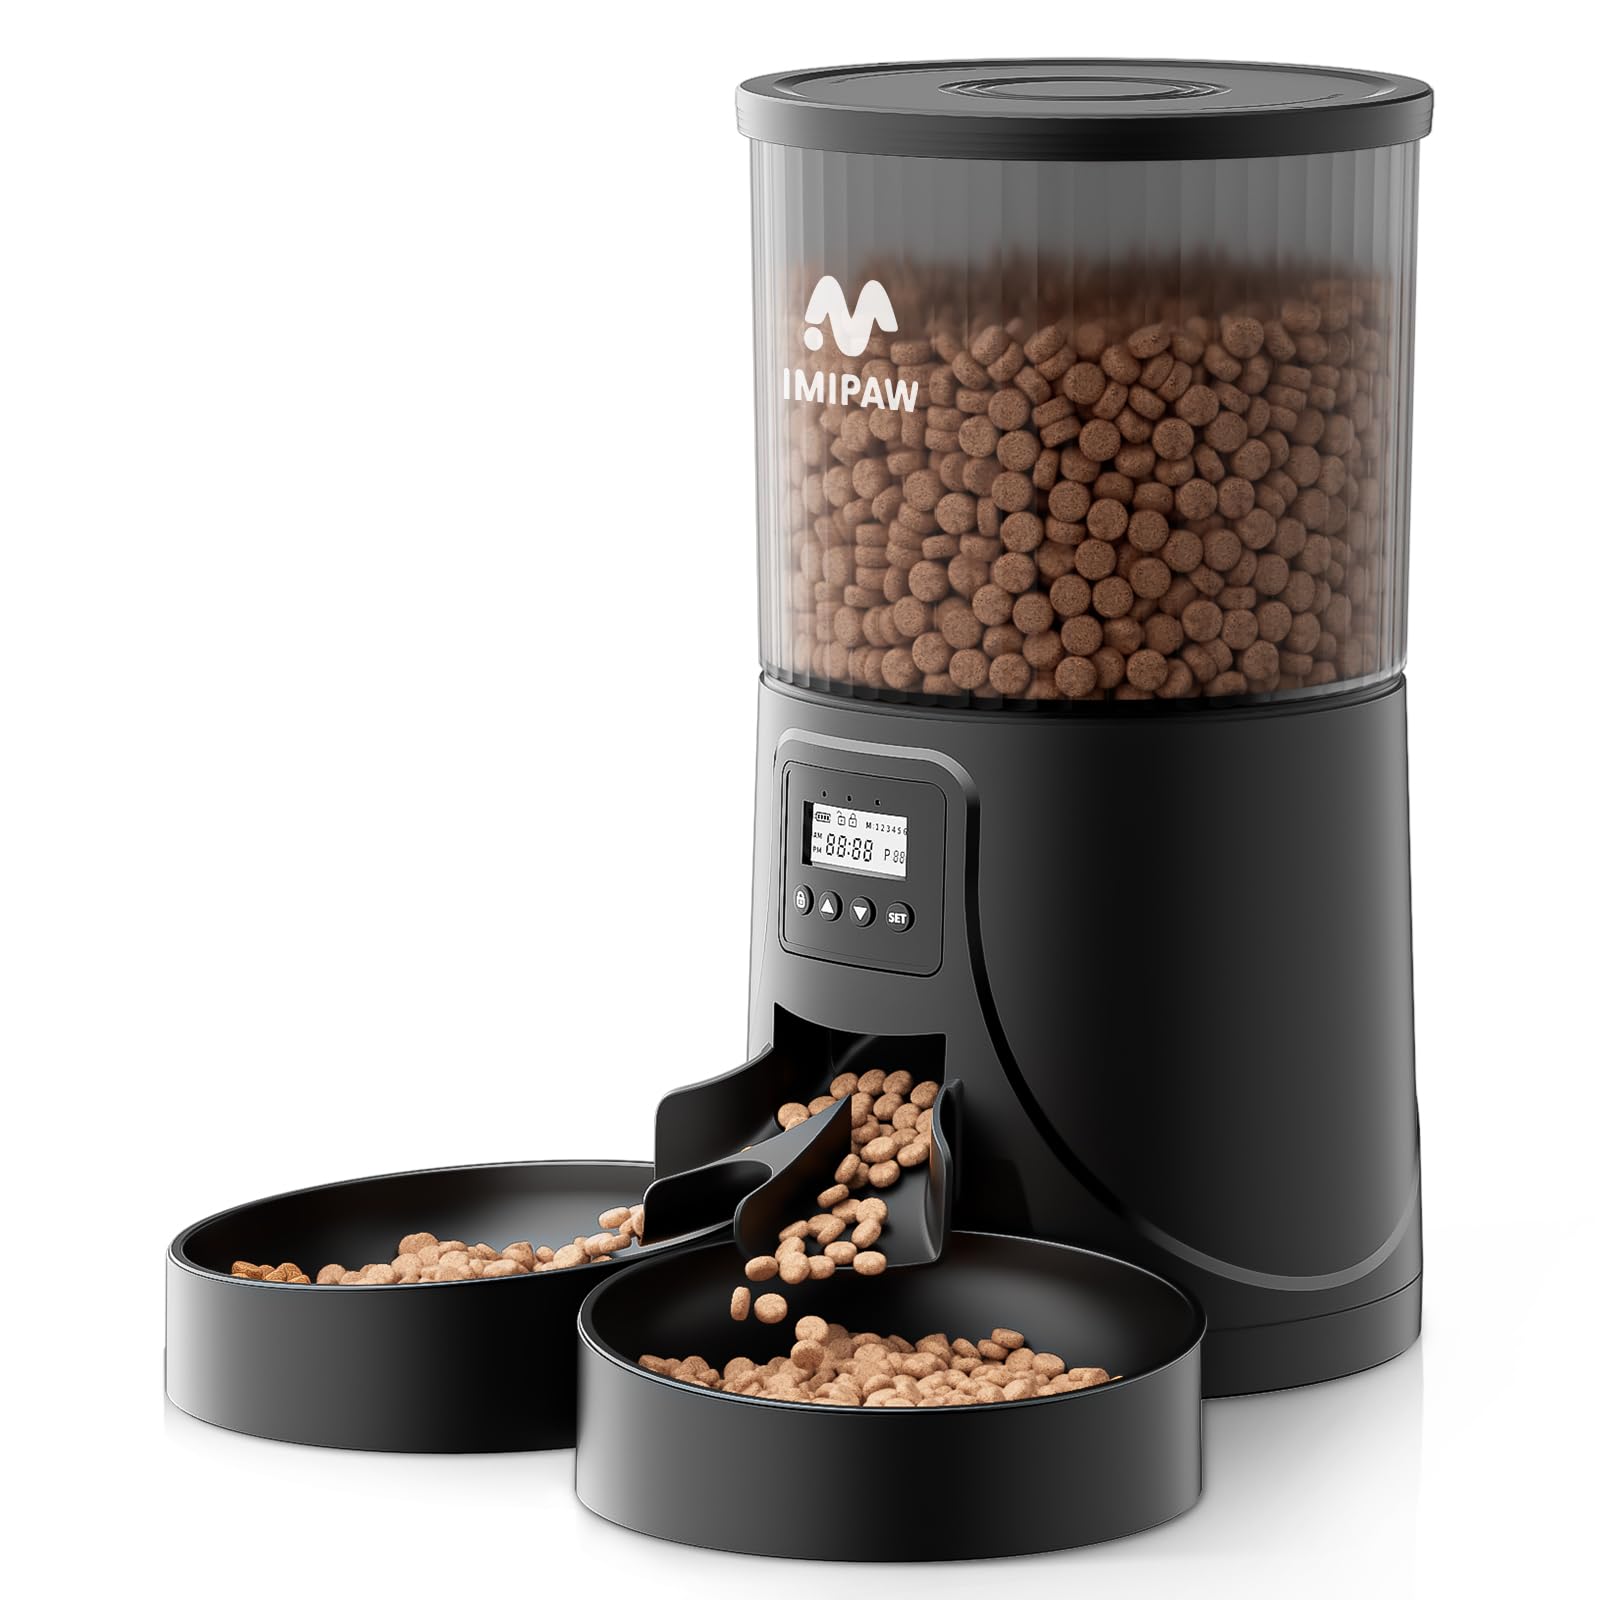
Image 1: The IMIPAW 4L Automatic Pet Feeder, featuring a transparent food container and dual feeding bowls.
2. Vöru lokiðview
2.1 Íhlutir
- Main Feeder Unit (4L capacity)
- Food Container Lid
- Dual Feeding Bowls
- Matarskiljari
- Rafmagns millistykki
- USB-C rafmagnssnúra
- Desiccant Bag (for freshness)
- Leiðbeiningarhandbók

Mynd 2: Yfirview of all included accessories: the main feeder, dual bowls, food separator, power cable, and power adapter.
2.2 Helstu eiginleikar
- 4L matarrúmmál: Stores a significant amount of dry pet food.
- Dual Bowls: Allows two pets to eat simultaneously.
- Forritanleg tímamælir: Skipuleggðu allt að 6 máltíðir á dag.
- Skammtastýring: Dispense 1 to 20 portions per meal.
- Hönnun gegn stíflu: Dual rotor and 40-degree slope ensure smooth food dispensing.
- Tvöföld aflgjafi: Operates with an AC adapter or 3 D-cell batteries (not included) for backup.
- Ferskleiki matarins: Includes a desiccant bag and secure locking lid to keep food fresh.
- Auðvelt að þrífa: Detachable components for thorough cleaning.

Image 3: Illustration of the anti-clogging mechanism and recommended dry kibble sizes (2-10mm) for optimal performance.

Image 4: The food separator and dual bowls, designed for feeding two pets simultaneously.
3. Uppsetning
3.1 Upptaka og samsetning
- Fjarlægðu alla íhluti úr umbúðunum.
- Twist the lid counter-clockwise to remove it from the food container.
- Insert the food separator into the dispenser chute, ensuring it is securely in place.
- Place the dual feeding bowls at the base of the feeder.

Image 5: Visual guide for initial setup: removing the lid, inserting internal components, placing bowls, adding food, securing the lid, and plugging in the power.
3.2 aflgjafi
The feeder can be powered by the included AC adapter or by 3 D-cell batteries (not included) as a backup. It is recommended to use both for uninterrupted operation in case of a power outage.
- AC Power: Connect the USB-C cable to the feeder and the adapter to a wall outlet.
- Afritun rafhlöðu: Open the battery compartment at the bottom of the feeder and insert 3 D-cell batteries, ensuring correct polarity.

Image 6: The feeder can be powered by a 5V DC adapter or 3 D-cell batteries (not included) for backup. The power cable is designed to be bite-resistant.

Mynd 7: Ítarlegt view of the battery compartment for backup power and the AC power connection point.
3.3 Að fylla matarílátið
- Ensure the lid is removed.
- Pour dry kibble into the container. The transparent design allows you to monitor food levels easily.
- Place the desiccant bag into the designated slot on the underside of the lid to maintain food freshness.
- Securely twist the lid clockwise until it locks into place.

Image 8: The desiccant bag is placed in the lid to absorb moisture and keep the pet food dry and fresh.

Image 9: The transparent food container allows for easy monitoring of the remaining food quantity. The 4-liter capacity can hold up to 16 cups of food.
4. Notkunarleiðbeiningar
4.1 Stjórnborð yfirview
The control panel features a display screen and several buttons for programming. The screen shows the current time, battery status, meal number, and portion size.
- Læsa hnappur: Press and hold for 3 seconds to unlock the panel for programming.
- Upp ör: Increase values when unlocked. When locked, press and hold for 5 seconds to reset the feeding plan.
- Niður ör: Decrease values when unlocked.
- SET hnappur: Confirm selection and move to the next programming step.

Image 10: The control panel showing the display and buttons for programming meal times and portions.
4.2 Setting the Feeding Schedule
You can program up to 6 meals per day, with each meal consisting of 1 to 20 portions. Each portion is approximately 10g of dry kibble.
- Opna: Press and hold the Lock button for 3 seconds until the display unlocks.
- Stilla núverandi tíma: Use the Up/Down arrows to set the current hour, then press SET. Repeat for minutes.
- Program Meal 1: The display will show 'M1'. Use Up/Down arrows to set the desired feeding time for Meal 1 (hour then minute), pressing SET after each.
- Set Portions for Meal 1: Use Up/Down arrows to select the number of portions (1-20) for Meal 1, then press SET.
- Program Subsequent Meals: Repeat steps 3 and 4 for Meals 2 through 6 as needed. If you do not wish to set all 6 meals, simply press SET to skip to the next step after setting the last desired meal.
- Vista stillingar: After setting all desired meals, the feeder will automatically save the settings and return to the current time display.

Mynd 11: Fyrrverandiample of a programmed feeding schedule, showing multiple meals throughout the day with varying portion sizes. The feeder supports 1-6 meals per day and 1-20 portions per meal.

Image 12: A visual representation of a customized feeding schedule, demonstrating how different meal times and portion sizes can be set to maintain a healthy diet for your pet.
4.3 Handvirk fóðrun
To dispense food manually, press the Down arrow button once. This will dispense one portion of food immediately. You can repeat this as needed.
Video 1: A demonstration of the IMIPAW Automatic Pet Feeder in action, showing food dispensing, cats eating, dual power options, and cleaning. This video provides a comprehensive overview of the product's features and functionality.
5. Viðhald
5.1 Þrif á fóðrara
Regular cleaning ensures hygiene and extends the life of your feeder. The food container, lid, food separator, and bowls are all detachable and washable.
- Unplug the feeder from the power source and remove any batteries.
- Remove the lid and empty any remaining food from the container.
- Detach the food container, food separator, and feeding bowls.
- Wash these components with mild soap and water. Rinse thoroughly and allow them to air dry completely before reassembling.
- Wipe the main feeder base with a damp klút. Do not submerge the base in water, as it contains electronic components.
- Reassemble all dry components.

Image 13: The detachable components of the feeder, including the food container, separator, and bowls, can be easily washed for deep cleaning.

Image 14: The simple and removable construction allows for easy cleaning of the food-contact parts. Remember not to wash the main base unit.
6. Bilanagreining
- Fóðrari gefur ekki út fóður:
- Check if the power adapter is securely plugged in and if batteries are installed correctly.
- Ensure the food container has enough kibble.
- Verify that the feeding schedule is programmed correctly.
- Check for any food blockages in the dispensing chute. Clean if necessary.
- Food getting stuck:
- Ensure kibble size is between 2-10mm. Larger kibble may cause blockages.
- Clean the dispensing mechanism regularly to prevent buildup.
- Skjárinn virkar ekki:
- Check power connection and battery status.
- Try resetting the feeder by holding the Up arrow button for 5 seconds when the panel is locked.
- Pets accessing stored food:
- Ensure the lid is securely twisted and locked.
- The feeder is designed with a secure lid to prevent pets from opening it.
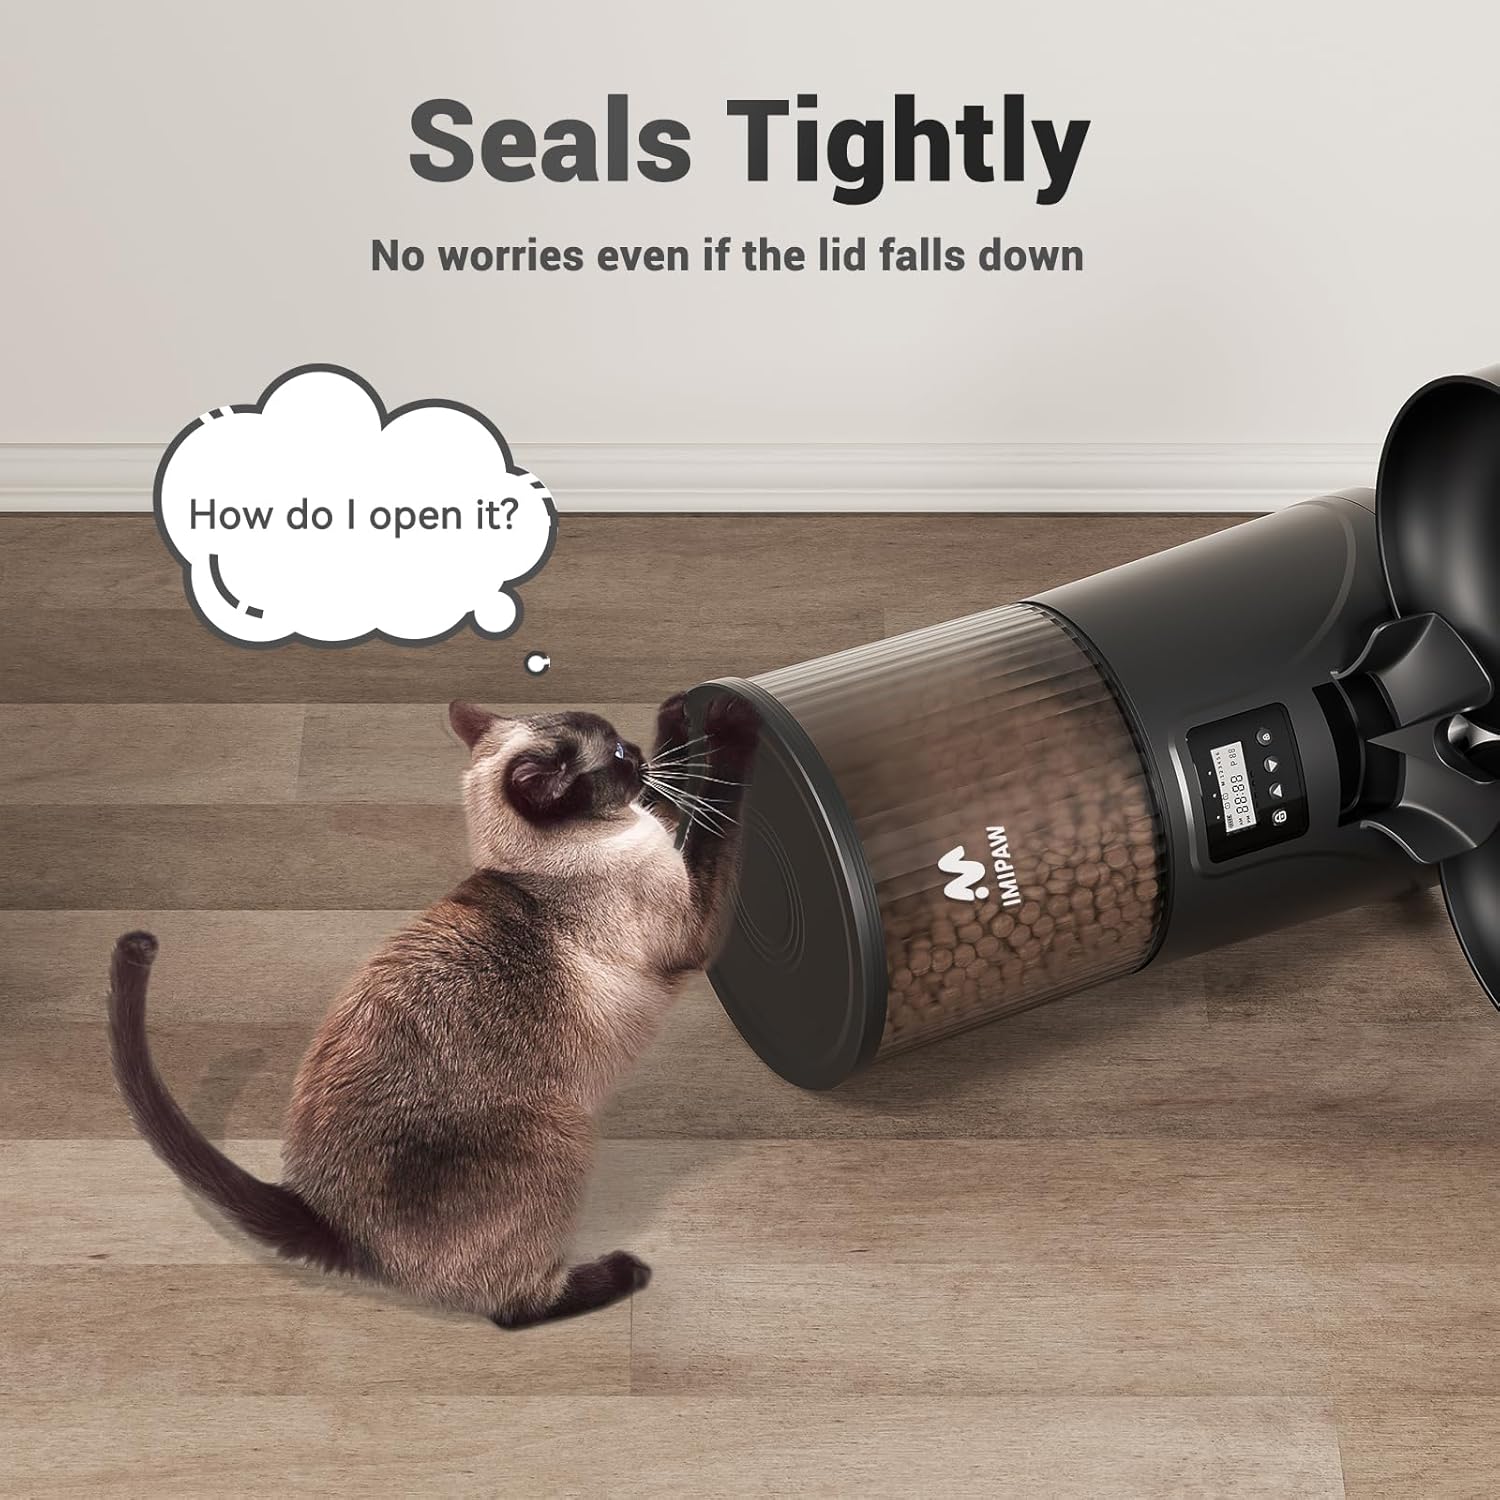
Image 15: A cat attempting to open the feeder lid, illustrating the secure locking mechanism designed to prevent pets from accessing the stored food.
7. Tæknilýsing
| Eiginleiki | Smáatriði |
|---|---|
| Gerðarnúmer | DU4LB-KYD |
| Mál (L x B x H) | 19.5 x 19 x 30.5 cm |
| Þyngd | 1.2 kg |
| Efni | Akrýlónítríl bútadíen stýren (ABS) |
| Getu | 4 lítrar |
| Máltíðir á dag | 1-6 (Programmable) |
| Skammtar á máltíð | 1-20 (Programmable) |
| Aflgjafi | AC Adapter (included), 3 x D-cell Batteries (not included) |
| Marktegundir | Cats, Small Dogs |
| Sérstakir eiginleikar | Anti-clogging, Portion Control, Timer, Programmable, Non-slip |

Image 16: Detailed dimensions of the IMIPAW 4L Automatic Pet Feeder.
8. Ábyrgð og stuðningur
The IMIPAW 4L Automatic Pet Feeder comes with a one-year warranty from the date of purchase. If you encounter any issues or have questions, please contact our customer support team.
Þjónustudeild: For assistance, please email us. Our team is available to provide friendly support.

Image 17: The automatic feeder ensures your cats are fed on time, anytime, anywhere, providing peace of mind during business trips, work, or vacations.