1. Inngangur
This manual provides detailed instructions for the installation, operation, maintenance, and troubleshooting of your Hon&Guan 4 Inch 212 CFM Air Filtration PRO Kit. This system is designed to optimize air circulation and filtration in various environments, including grow tents, hydroponic rooms, and other spaces requiring controlled ventilation.
Vinsamlegast lesið þessa handbók vandlega áður en varan er notuð til að tryggja rétta virkni og öryggi.
2. Innihald pakka
Staðfestu að allir íhlutir sem taldir eru upp hér að neðan séu til staðar í pakkanum þínum:
- 4-Inch Inline Duct Fan with EC Motor
- Smart Temperature Humidity Controller with Environmental Probe
- 4-Inch Carbon Filter
- 8 Ft Ducting Hose (3-layer tough construction)
- Gúmmítengi
- Slönguna Clamps (2 pairs)
- Pair of Ratchet Ropes
- Rafmagnssnúra

Image 2.1: All components included in the Hon&Guan 4 Inch Air Filtration PRO Kit. This image displays the inline duct fan, smart controller, carbon filter, ducting hose, rubber coupling, hose clamps, and ratchet ropes.
3. Uppsetning og uppsetning
Follow these steps to correctly set up your ventilation system. Ensure all connections are secure to prevent air leaks and optimize performance.
- Undirbúa íhlutina: Unpack all items and inspect them for any damage.
- Connect the Carbon Filter: Attach the carbon filter to one end of the inline duct fan. Use a hose clamp to secure the connection tightly.
- Attach the Ducting Hose: Connect the 8 ft ducting hose to the other end of the inline duct fan. Secure it with another hose clamp. The 3-layer tough ducting is designed for durability and flexibility.
- Integrate the Rubber Coupling: If needed, use the rubber coupling to connect different diameter ducts or to provide a more secure, noise-reducing connection between components. The recess design on the coupling helps secure clamps more tightly.
- Mount the System: Use the provided ratchet ropes to hang the inline fan and carbon filter within your grow tent or desired ventilation area. Ensure the system is securely suspended and balanced.
- Install the Smart Controller: Mount the smart controller in an accessible location. Connect the fan to the controller using the provided cord, and plug in the environmental probe.
- Rafmagnstenging: Plug the power cord into the inline duct fan and then into a standard electrical outlet.

Mynd 3.1: Dæmiample installation of the ventilation system within a grow tent, showing the inline fan and carbon filter connected via ducting.

Image 3.2: Various configuration options for installing the ventilation system, including filter inside/fan outside, fan inside/filter outside, and both fan and filter outside the grow tent.

Image 3.3: Diagram illustrating the multi-layer construction of the ducting hose, featuring PET protective film, steel spring structure, PVC film, and aluminum foil for durability and performance.
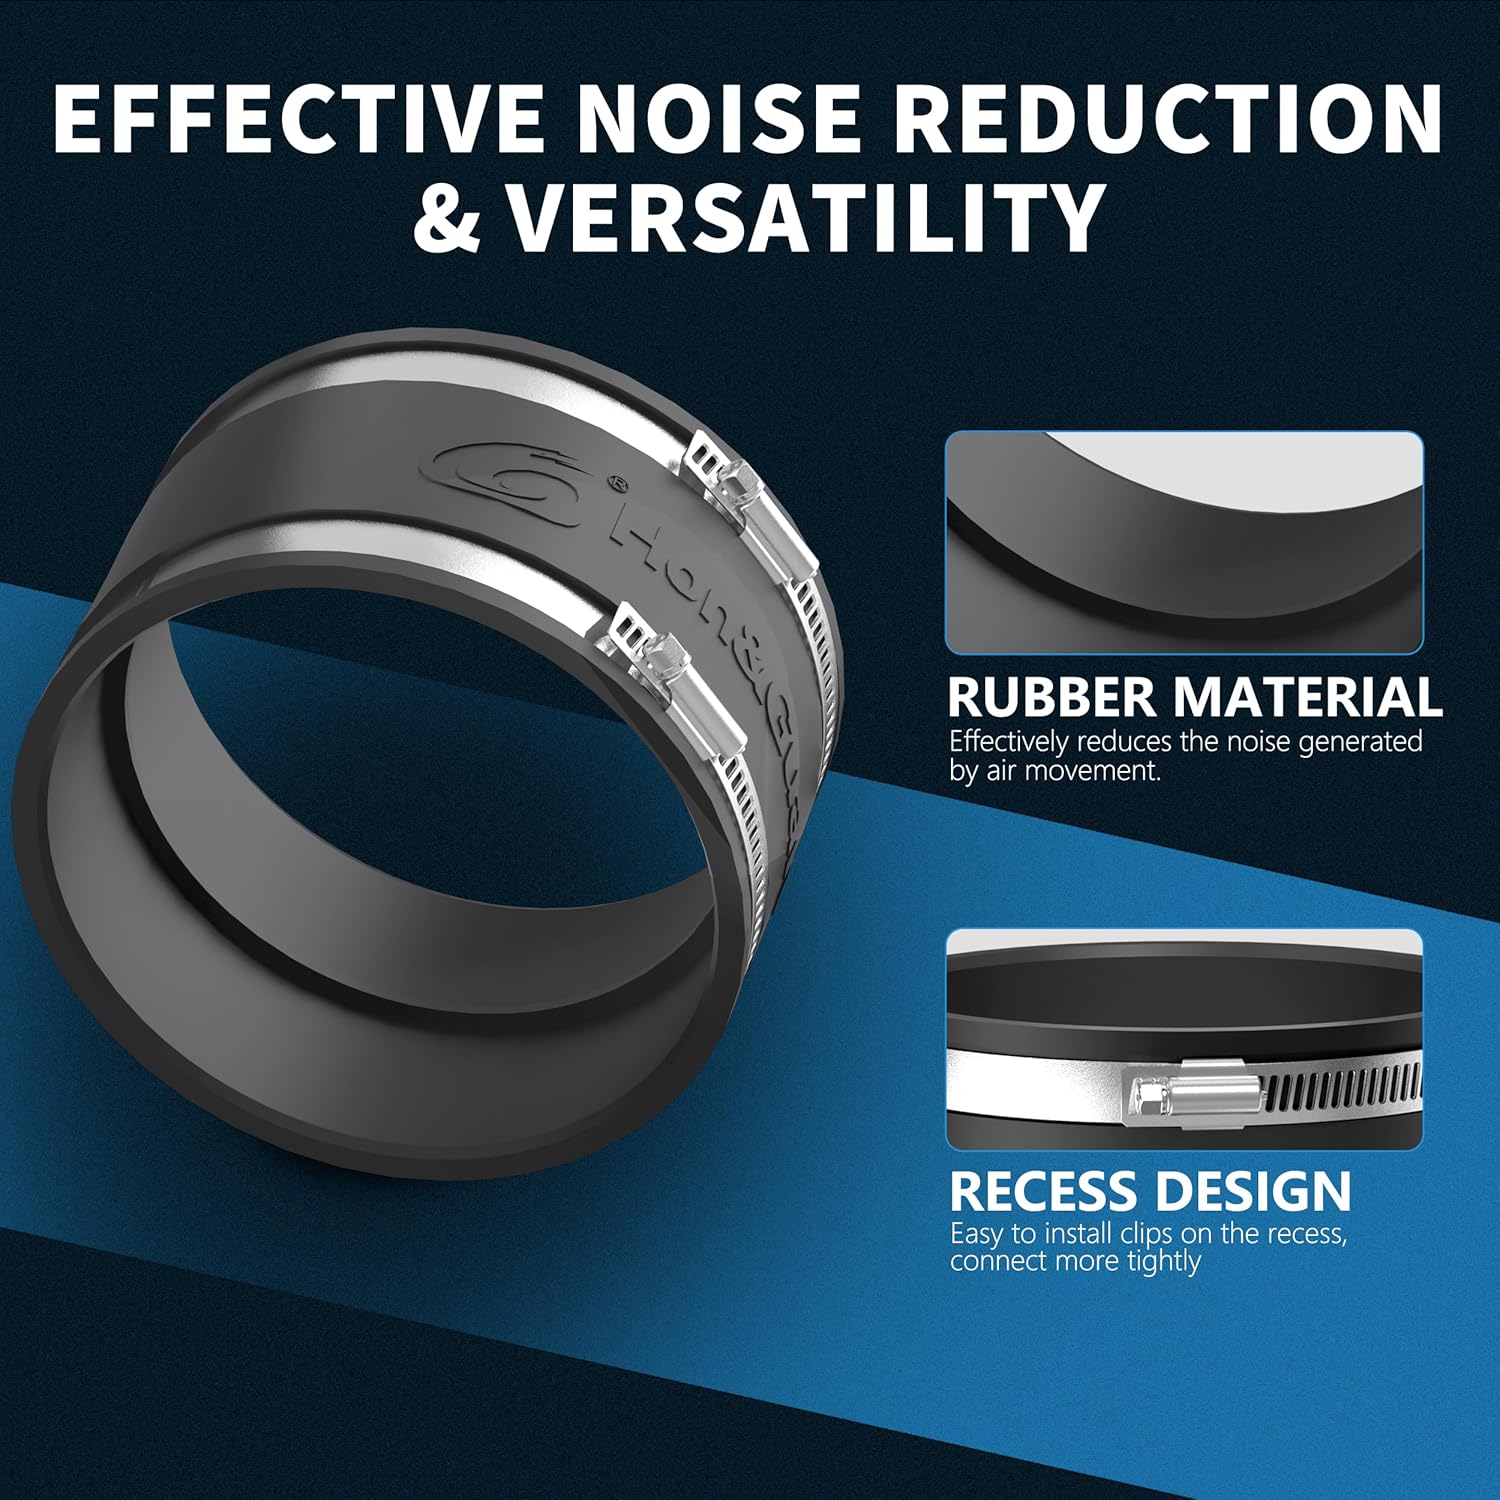
Image 3.4: Close-up of the rubber coupling, highlighting its material for noise reduction and recess design for secure clamp uppsetningu.
4. Notkunarleiðbeiningar
The intelligent controller allows for precise environmental management. Familiarize yourself with its functions for optimal system performance.
4.1 Virkni snjallstýringar
- Sjálfvirkur háttur: Automatically adjusts fan speed based on set temperature and humidity parameters.
- High Temp / Low Temp: Sets thresholds for temperature control.
- High Humid / Low Humid: Sets thresholds for humidity control.
- Tímamælir: Leyfir áætlaða virkni.
- Viðvörun: Notifies users when environmental conditions exceed set limits.
- 10 viftuhraði: Manually adjust the fan speed from 1 to 10 for precise airflow control.
- Environmental Probe: Continuously monitors temperature and humidity, feeding data to the controller for automatic adjustments.

Image 4.1: Detailed diagram of the smart controller interface, indicating buttons for mode, up/down adjustments, brightness, and display areas for probe temperature, probe humidity, fan speed, and set constant temperature/humidity.
4.2 EC Motor Benefits
The inline fan features a high-quality EC motor, offering significant advantages:
- Orkunýtni: Saves up to 50% on energy consumption compared to traditional AC motors.
- Lágur hávaði: Operates at a low noise level of 32dB, minimizing disruption.
- Öflugt loftflæði: Delivers up to 212 CFM, ensuring effective ventilation.
- Lengdur líftími: Designed for durability and long-term operation.
5. Viðhald
Regular maintenance ensures the longevity and optimal performance of your ventilation system.
5.1 Carbon Filter Maintenance
- The carbon filter utilizes RC 48 lightweight activated carbon with 1200+ IAV and a 38mm thick charcoal bed for effective odor absorption.
- Periodically check the carbon filter for signs of reduced odor absorption. The lifespan of the filter depends on usage and environmental conditions.
- Replace the carbon filter when odor control diminishes. Refer to the product specifications for compatible replacement filters.

Mynd 5.1: Þversnið view of the carbon filter, illustrating the activated carbon bed and its role in odor adsorption.

Image 5.2: Close-up of the carbon filter's inner and outer galvanized steel mesh, featuring a diamond-shaped design for maximum airflow.
5.2 Fan and Ducting Inspection
- Periodically check the inline fan blades for dust buildup. Disconnect power before cleaning. Use a soft brush or compressed air to remove debris.
- Inspect the ducting hose for any rips, pinholes, or blockages that could reduce airflow efficiency.
- Gakktu úr skugga um að allar slöngur clamps and connections remain tight and secure.
6. Bilanagreining
This section addresses common issues you might encounter with your Hon&Guan Air Filtration PRO Kit.
- No Power to Fan/Controller:
- Athugaðu hvort rafmagnssnúran sé vel tengd bæði við viftuna og rafmagnsinnstunguna.
- Staðfestu að innstungan virki með því að stinga í samband annað tæki.
- Ensure the fan-to-controller cord is properly connected.
- Lítið loftflæði:
- Check for blockages in the ducting or carbon filter.
- Ensure the fan speed setting on the controller is appropriate for your needs.
- Inspect ducting for kinks, tears, or loose connections that could cause air leaks.
- Clean fan blades if dust buildup is present.
- Mikill hávaði:
- Ensure the fan is securely mounted and not vibrating against surfaces.
- Check for loose components or debris inside the fan housing.
- Verify that the rubber coupling is correctly installed to reduce vibration noise.
- Ónákvæmar mælingar á hitastigi/raka:
- Ensure the environmental probe is correctly connected to the controller.
- Verify the probe is placed in an area representative of the environment you wish to monitor, away from direct heat or moisture sources.
- Odor Not Being Controlled:
- The carbon filter may be saturated and require replacement.
- Check for air leaks in the system, especially around the carbon filter and ducting connections.
7. Tæknilýsing
Detailed technical specifications for the Hon&Guan 4 Inch Air Filtration PRO Kit.
| Eiginleiki | Forskrift |
|---|---|
| Fyrirmynd | HG-US-ZH340 |
| Þvermál rásar | 4 tommur |
| Tegund mótor | EC-Motor |
| Loftflæði | 212 CFM |
| Hraði | 5700 snúninga á mínútu |
| Hávaðastig | 32dB |
| Vörumál | 6.3 x 5.6 x 5.5 tommur |
| Þyngd hlutar | 9.72 pund |
| Verndunareinkunn | IP42 (Dust and liquid resistance) |
| Carbon Filter Type | RC 48 Lightweight Activated Carbon (1200+ IAV, 38mm thick bed) |
| Ducting Hose Length | 8 fet |
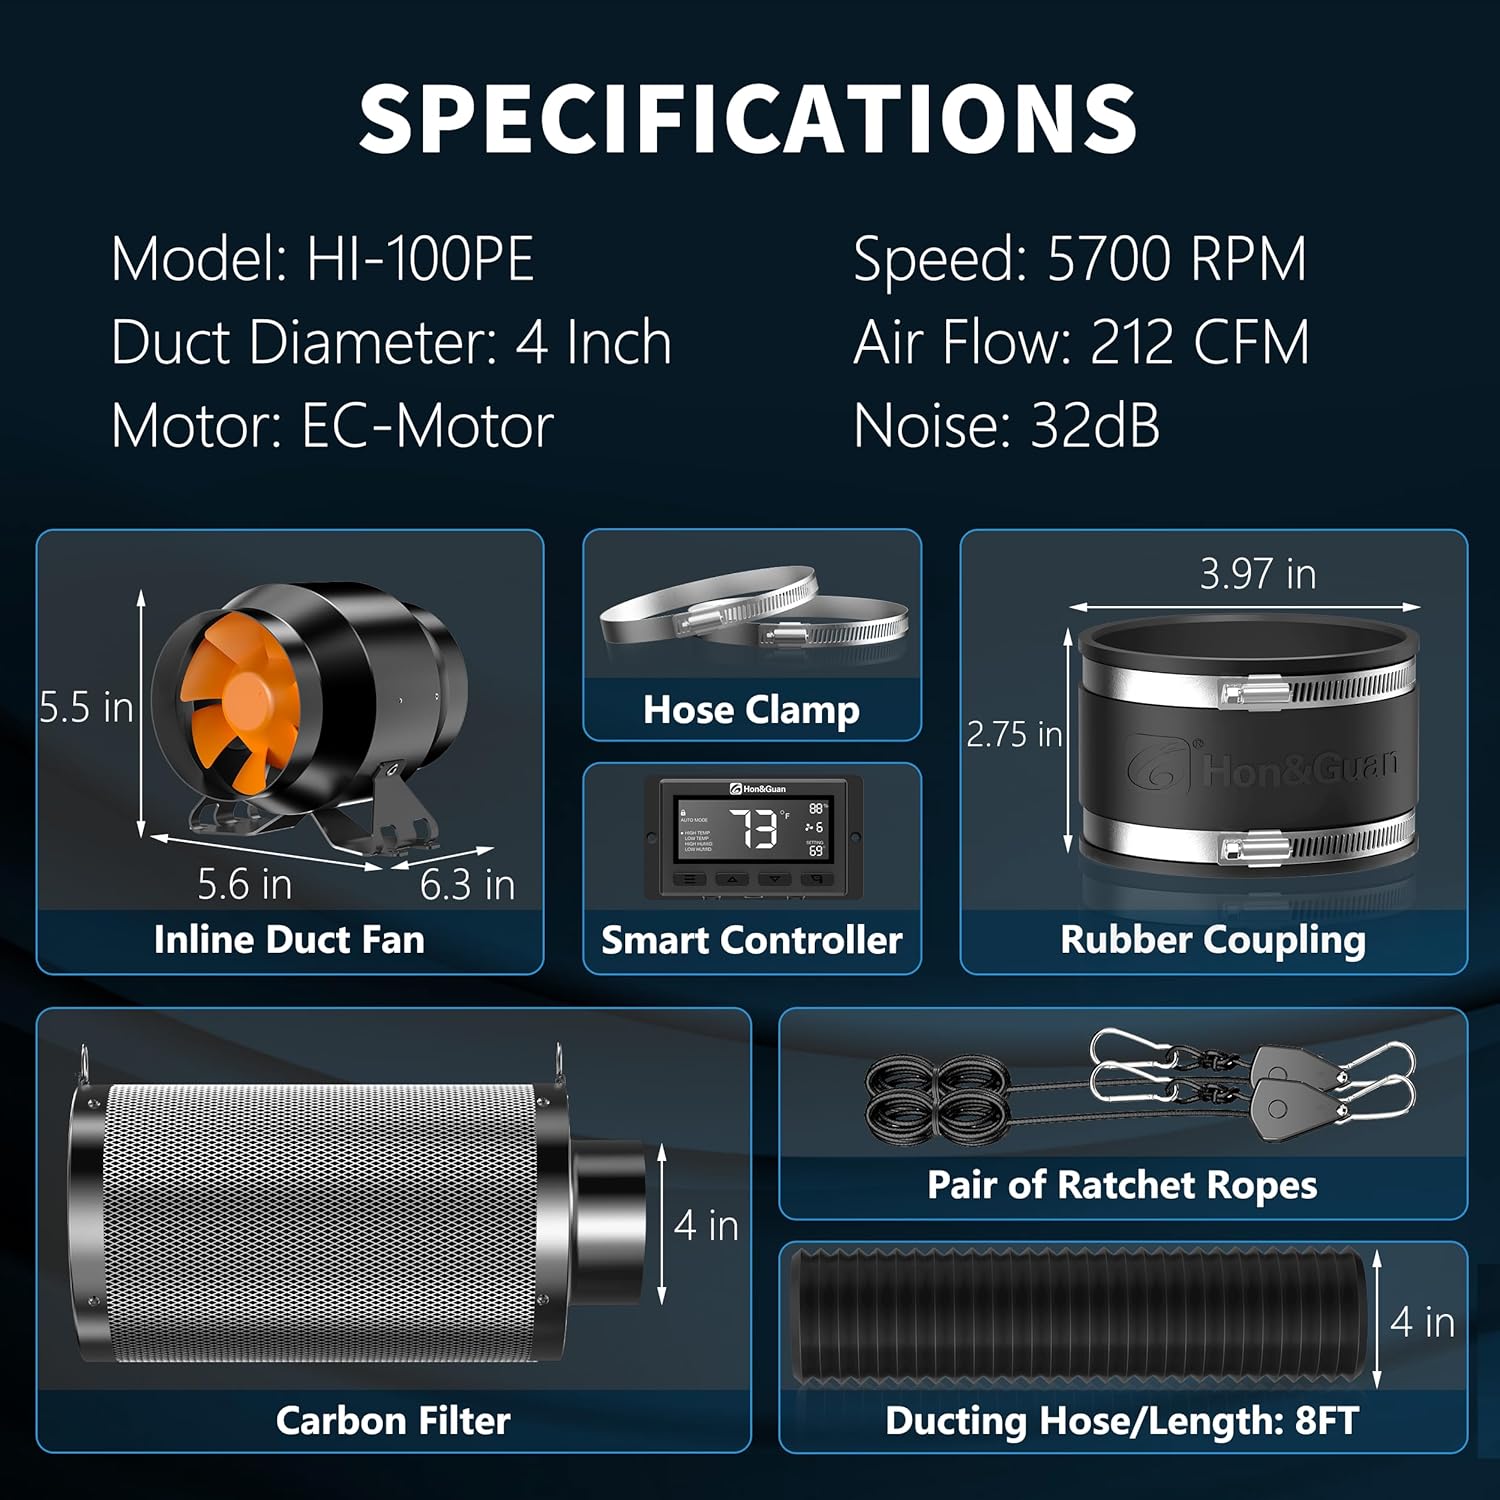
Image 7.1: Visual representation of key specifications and dimensions for the inline duct fan, smart controller, rubber coupling, carbon filter, and ducting hose.
8. Ábyrgð og stuðningur
Fyrir upplýsingar um ábyrgð eða tæknilega aðstoð, vinsamlegast vísið til opinberra upplýsinga framleiðanda. website or contact their customer service department. Additional protection plans may be available for purchase to extend coverage beyond the standard warranty period.
- Tveggja ára verndaráætlun: Fáanlegt til kaups.
- Tveggja ára verndaráætlun: Fáanlegt til kaups.
- Algjör vernd: Mánaðarleg áætlun sem nær yfir gjaldgeng kaup, bæði fyrri og framtíðarkaup.