1. Inngangur
The HITBOX MIG200III is a versatile multi-process welding machine designed for both beginners and professionals. It supports Gas MIG, Flux MIG, Stick (MMA), Lift TIG, and Spot Welding. This welder is suitable for various materials including carbon steel, iron, galvanized steel, stainless steel, and aluminum, providing precision and efficiency for DIY projects, agricultural repairs, and professional tasks.
Key features include an easy-to-read LED display for essential welding data, compatibility with a spool gun for aluminum welding, and 2T/4T/Spot Welding modes for precise control.
2. Öryggisupplýsingar
VIÐVÖRUN: Welding can be dangerous. Always follow safety precautions to prevent injury or damage.
- Notið viðeigandi persónuhlífar (PPE), þar á meðal suðuhjálm, hanska og hlífðarfatnað.
- Ensure adequate ventilation in the work area to avoid inhaling fumes.
- Haldið eldfimum efnum frá suðusvæðinu.
- Ekki snerta spennuhafa rafmagnshluta.
- Aftengdu alltaf rafmagnið áður en viðhald er framkvæmt eða aukabúnaður er skipt út.
- The HITBOX MIG200III is equipped with safety protections such as VRD (Voltage Reduction Device), overcurrent, overvoltage, overload, and overheating protection.

Mynd 1: Internal components and safety features of the HITBOX MIG200III welder. This image illustrates the machine's robust design, incorporating protections against overcurrent, overvoltage, overheating, overload, and a Voltage Reduction Device (VRD) for enhanced user safety.
3. Innihald pakka
Gakktu úr skugga um að allir hlutir sem taldir eru upp hér að neðan séu innifaldir í pakkanum þínum:
- Jarðvegur Clamp 1.5 m
- Electrode Holder 1.5 m
- MIG 15AK Torch 3.0 m
- Graphene Tube 3.5 m
- Gas Hose 2.0 m
- Flux Wire 0.8 mm 1 kg
- Contact Tips (0.8 mm * 2; 1.0 mm * 2)
- Rollers * 3 (V: 0.6 mm / 0.8 mm & 0.9 mm / 1.0 mm; U: 1.0 mm / 1.2 mm, Note: Max. 1.0 mm supported)
- skiptilykill
- Hamar
- Slönguna Clamps * 2
- Notendahandbók
4. Tæknilýsing
| Eiginleiki | Smáatriði |
|---|---|
| Framleiðandi | HITBOX |
| Gerðarnúmer | MIG200III (H1032035) |
| Vörumál (L x B x H) | 40 x 20 x 35 cm |
| Þyngd vél | 8.52 kg |
| Power Tegund | AC |
| Suðuferli | Flux MIG, Gas MIG, MMA (Stick), Lift TIG, Spot Welding |
| Gasless Welding Wire Sizes | 0.8 mm / 0.9 mm / 1.0 mm |
| Gas Welding Wire Sizes (Carbon Steel with CO2) | 0.6 mm / 0.8 mm / 0.9 mm / 1.0 mm |
| Gas Welding Wire Sizes (Aluminum with Argon) | 1.0 mm |
| TIG Electrode Sizes | 1.6 mm til 3.2 mm |
| Welding Thickness (TIG) | 1 mm til 4 mm |
| Welding Thickness (MIG) | 1 mm til 4 mm |
| Welding Thickness (MMA) | 2 mm til 10 mm |
| Wire Feed Speed Adjustment | 0 til 10 |
| Inductance Adjustment | -10 til +10 |
| Pre/Post Gas Flow Adjustment | 0 til 2 sekúndur |
5. Uppsetning
5.1 Rafmagnstenging
Connect the welder to a suitable 230V AC power supply. Ensure the power source meets the machine's requirements.
5.2 Wire Spool Installation and Feeding
Open the wire spool compartment. Place the welding wire spool onto the spindle, ensuring it rotates freely. Thread the wire through the guide tube and into the drive rollers. Adjust the tension of the drive rollers to prevent slipping or crushing the wire.
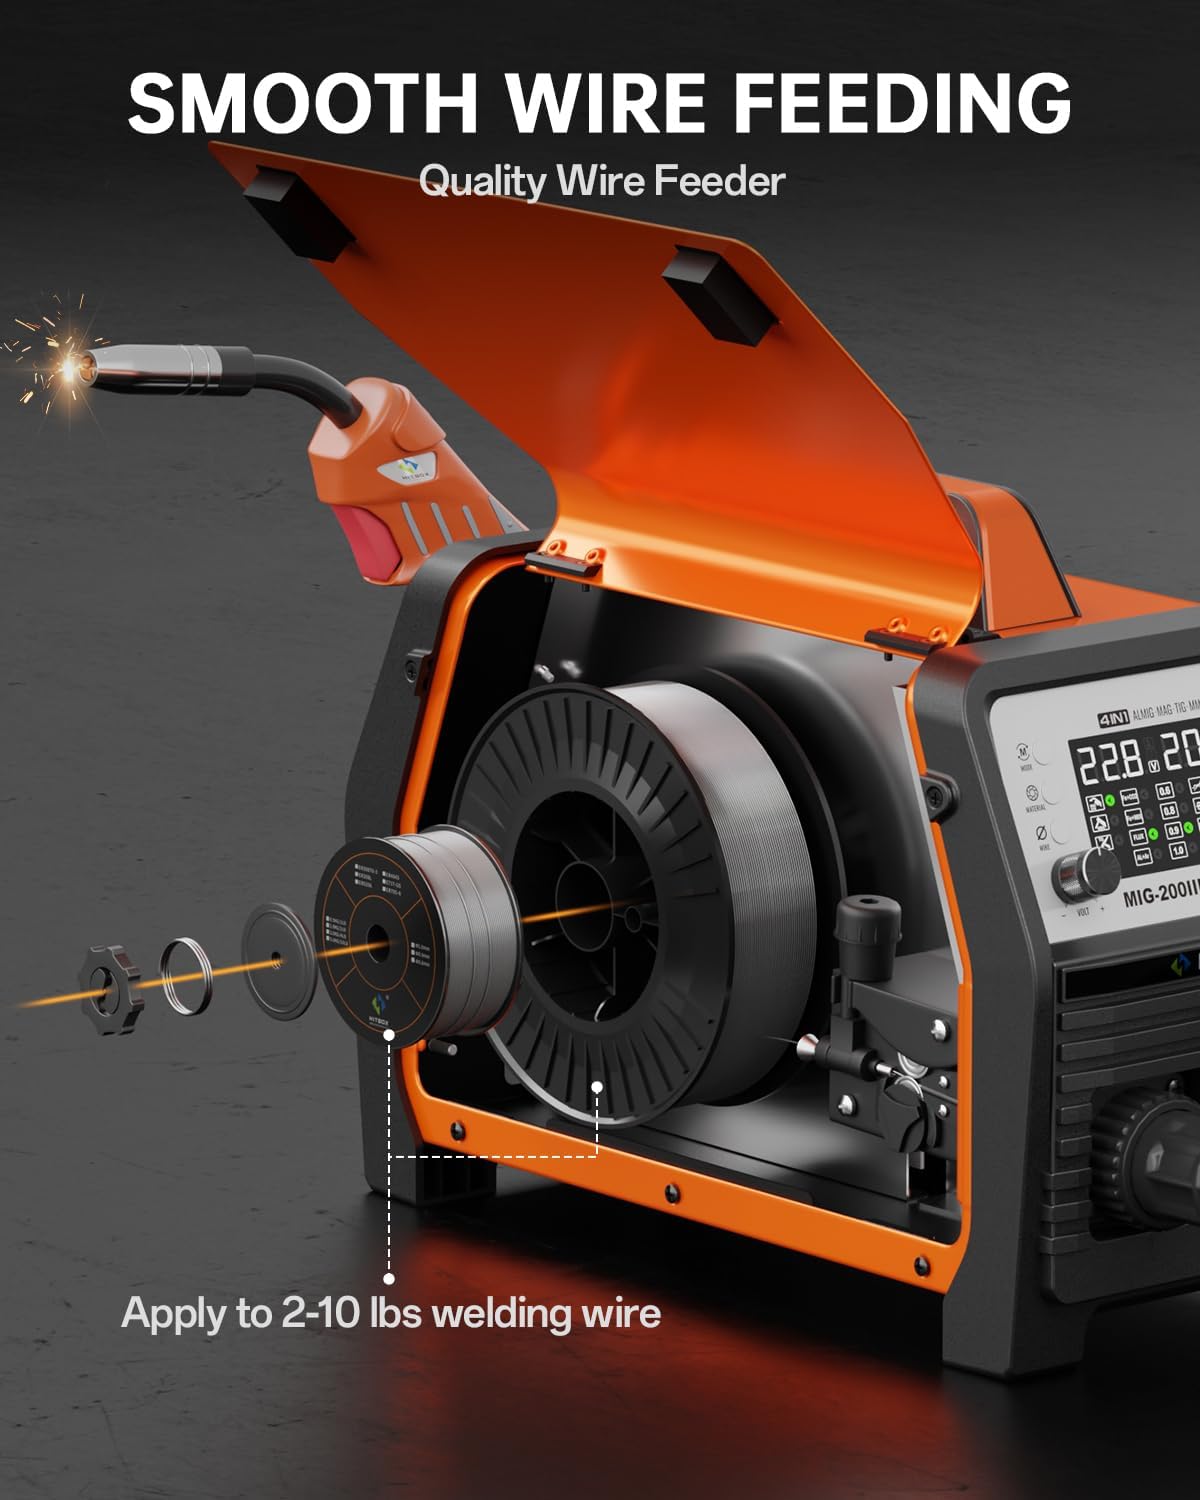
Mynd 2: Wire spool installation and feeding mechanism. This illustration shows how to correctly install the welding wire spool and thread it through the machine's smooth wire feeding system, compatible with 2-10 lbs spools.
5.3 Gastenging (fyrir gas MIG/TIG)
For Gas MIG or TIG welding, connect the gas hose (included) from your gas cylinder regulator to the gas inlet on the back of the welder. Ensure all connections are secure and leak-free.
5.4 Brennari og jarðtengingamp Tenging
- MIG/TIG without Gas (Flux Core MIG): Tengdu jörðina clamp að jákvæðu (+) skautinu.
- MIG/MMA with Gas: Tengdu jörðina clamp í neikvæða (-) terminal.
- Connect the MIG torch or TIG torch (sold separately for TIG) to the appropriate connectors on the front panel.
6. Notkunarleiðbeiningar
The HITBOX MIG200III offers multiple welding modes and synergic control for ease of use.

Mynd 3: Yfirview of welding processes. This image highlights the 7-in-1 multi-process capabilities of the welder, including Gas MIG, Flux MIG, Spool Gun compatibility, Lift TIG, Spot Welding, Single Pulse MIG, and MMA.
6.1 Synergic Control and Mode Selection
The synergic control feature simplifies parameter setting.
- Select SYN mode: Activate synergic mode on the control panel.
- Veldu efni: Choose the material type (e.g., Fe+CO2 for carbon steel with CO2 gas, AL+Ar for aluminum with Argon gas).
- Select Wire Size: Specify the diameter of your welding wire.
The machine will automatically suggest recommended current and wire feed speed settings. You can fine-tune these settings as needed.

Mynd 4: Synergic control panel. The LED display provides clear visual feedback for selecting welding modes, materials, and wire sizes, making setup straightforward for all skill levels.
6.2 Welding Modes and Adjustments
- 2T/4T/Spot Welding: Select between 2T (trigger held for weld), 4T (trigger press to start, press again to stop), or Spot Welding mode for precise control. Spot welding time is adjustable.
- Vírstraumshraði: Adjust the wire feed speed from 0 to 10 for optimal welding control.
- Inductance: Adjust inductance from -10 to +10 to control arc stability.
- Pre/Post Gas Flow: Customize pre-flow and post-flow gas times from 0 to 2 seconds for optimal weld protection.
6.3 Álsuðu
The MIG200III supports aluminum welding with argon gas using a 1.0 mm wire. For enhanced performance, a spool gun (sold separately) is recommended.

Mynd 5: Aluminum welding methods. This image demonstrates the use of both the standard MIG gun and an optional spool gun for effective aluminum welding.
7. Viðhald
Reglulegt viðhald tryggir endingu og bestu mögulegu afköst suðuvélarinnar.
- Þrif: Hreinsið reglulega ytra byrði og loftræstiop vélarinnar til að koma í veg fyrir uppsöfnun ryks og rusls. Notið þrýstiloft til að hreinsa innri íhluti ef nauðsyn krefur og gætið þess að vélin sé ekki tengd við rafmagn.
- Brennari og rekstrarvörur: Inspect the MIG torch, contact tips, nozzles, and electrode holder regularly. Replace worn or damaged consumables to maintain weld quality.
- Vírfóðrari: Keep the wire feeder rollers clean and free of debris. Check for proper wire tension.
- Kaplar og tengingar: Inspect all cables for damage and ensure connections are tight and secure.
- Geymsla: Geymið suðutækið á þurrum og hreinum stað þegar það er ekki í notkun.
8. Bilanagreining
Þessi hluti býður upp á lausnir á algengum vandamálum sem þú gætir lent í.
| Vandamál | Möguleg orsök | Lausn |
|---|---|---|
| Enginn kraftur | Power cable disconnected, circuit breaker tripped, machine switch off | Athugaðu rafmagnstengingar, endurstilltu rofann, kveiktu á vélinni |
| Poor arc start/unstable arc | Improper ground connection, incorrect settings, dirty workpiece, worn contact tip | Ensure good ground, adjust voltage/wire speed, clean workpiece, replace contact tip |
| Vandamál með vírfóðrun | Incorrect roller tension, clogged liner, wrong wire size, tangled wire spool | Adjust roller tension, clean/replace liner, verify wire size, untangle spool |
| Ofhitavörn virkjuð | Exceeded duty cycle, blocked ventilation | Allow machine to cool down, ensure clear ventilation paths |
Ef þú lendir í vandamálum sem ekki eru fjallað um hér, vinsamlegast hafðu samband við þjónustuver.
9. Ábyrgð og stuðningur
Each HITBOX MIG welding machine undergoes rigorous testing before leaving the factory to ensure it meets high industrial standards.
For specific warranty details and terms, please refer to the warranty card included with your product or contact HITBOX customer support directly.
Þjónustudeild: For technical assistance, troubleshooting, or parts inquiries, please visit the official HITBOX websíðuna eða hafðu samband við þjónustudeild þeirra.