1. Mikilvægar öryggisleiðbeiningar
Please read this manual carefully before operating your Daitsu Alisios Premium APD09FX2 portable air conditioner. Keep it for future reference.
- Gakktu úr skugga um að tækið sé staðsett á sléttu og stöðugu yfirborði til að koma í veg fyrir að það velti.
- Ekki loka fyrir loftinntak eða úttak. Haldið nægilegu bili í kringum tækið til að tryggja rétt loftflæði.
- Always use a grounded power outlet. Do not use extension cords or adapters.
- Ekki nota tækið með skemmda rafmagnssnúru eða kló.
- Haldið börnum og gæludýrum frá tækinu meðan það er í notkun.
- Before cleaning or maintenance, always unplug the unit from the power supply.
- If the unit has been tilted or laid on its side during transport, allow it to stand upright for at least 12-24 hours before plugging it in. This allows the refrigerant and oils to settle, preventing damage to the compressor.
- This appliance uses R290 refrigerant, which is flammable. Handle with care and ensure proper ventilation during installation and maintenance.
2. Vöru lokiðview
The Daitsu Alisios Premium APD09FX2 is a versatile portable air conditioner designed for cooling, dehumidifying, and ventilation in rooms up to 22 m². It features Wi-Fi connectivity for smart control and a compact design for easy portability.
Lykilhlutir
- Aðaleining (færanleg loftkæling)
- Útblástursslanga
- Window Kit (Adjustable Panel)
- Fjarstýring
- Frárennslisslanga
Vara Views


3. Uppsetning
3.1 Upptaka og staðsetning
- Takið tækið og allan fylgihluti varlega úr umbúðunum.
- Place the unit on a firm, level surface. The integrated wheels allow for easy movement.
- Ensure there is at least 30 cm of space around the unit for proper air circulation.
3.2 Uppsetning útblástursslöngu og gluggasetts
The exhaust hose is crucial for expelling hot air outside the room, ensuring efficient cooling.
- Attach the exhaust hose to the designated outlet on the back of the air conditioner.
- Assemble the adjustable window kit panels to fit your window opening.
- Setjið útblástursslöngumillistykkið í opið á gluggasettinu.
- Secure the window kit in your window frame, ensuring a tight seal to prevent hot air from re-entering the room.


3.3 Drainage Hose Connection
For continuous dehumidification or in high humidity environments, connect the drainage hose for continuous water removal.
- Locate the drainage outlet on the back of the unit.
- Connect the provided drainage hose to this outlet.
- Direct the other end of the hose to a suitable drain or collection container.
3.4 Visual Guide: Product Features and Setup
4. Notkunarleiðbeiningar
4.1 Stjórnborð
The intuitive control panel on top of the unit allows direct access to all functions. The LED display shows the current temperature and selected settings.
4.2 Fjarstýring
Use the remote control for convenient operation from a distance. It allows you to adjust temperature, mode, fan speed, and timer settings.
4.3 Rekstrarstillingar
- Kælistilling: Provides powerful cooling to maintain a comfortable room temperature.
- Rakahreinsunarstilling: Reduces excess humidity in the air, improving air quality and comfort.
- Aðdáandi háttur: Circulates air without cooling, providing a constant fresh breeze.
4.4 Smart Control (Wi-Fi)
The unit includes integrated Wi-Fi, allowing you to control it remotely via the Daitsu Connect application on your smartphone or tablet. Download the app to configure temperature, set the 24-hour timer, or select your preferred mode from anywhere.
4.5 Séraðgerðir
- 24 tíma tímamælir: Forritaðu tækið til að kveikja eða slökkva sjálfkrafa.
- Svefnhamur: Adjusts temperature and fan speed for quiet, comfortable sleep.
- Auto Fan: Automatically adjusts fan speed based on ambient temperature for energy efficiency.
- Sjálfvirk sveifla: Ensures uniform air distribution throughout the room.

5. Viðhald
Reglulegt viðhald tryggir bestu mögulegu afköst og endingu loftkælisins.
5.1 Þrif á loftsíu
- The unit features an easy-to-wash air filter.
- Periodically remove the air filter (located on the back or side of the unit).
- Clean it with warm water and a mild detergent. Rinse thoroughly and allow it to dry completely before reinserting.
5.2 Vatnsgeymir tæmd
- The unit has an internal water tank that collects condensed water.
- When the tank is full, the unit will stop operating and an indicator light will illuminate.
- To drain, place a shallow pan or container under the drainage outlet.
- Remove the rubber stopper from the drainage outlet to allow water to flow out.
- Replace the stopper once the tank is empty.
5.3 Geymsla
- Before long-term storage, ensure the water tank is completely drained.
- Clean the air filter and allow the unit to dry for a few hours in fan-only mode.
- Geymið tækið á köldum, þurrum stað, helst í upprunalegum umbúðum.
6. Bilanagreining
Ef þú lendir í vandræðum með tækið þitt skaltu skoða eftirfarandi algeng vandamál og lausnir:
| Vandamál | Möguleg orsök | Lausn |
|---|---|---|
| Eining kviknar ekki | No power supply; Water tank full | Check power connection; Empty water tank. |
| Ófullnægjandi kæling | Blocked air filter; Room too large; Doors/windows open | Clean air filter; Ensure room size is within unit capacity; Close all doors/windows. |
| Mikill hávaði við notkun | Tækið er ekki á sléttu yfirborði; hindrun í viftu | Setjið tækið á slétt yfirborð; Athugið hvort einhverjar hindranir séu til staðar og fjarlægið þær. |
| Vatnsleki | Drainage hose not properly connected or blocked | Check drainage hose connection; Clear any blockages. |
7. Tæknilýsing
Detailed technical information for the Daitsu Alisios Premium APD09FX2.
| Eiginleiki | Smáatriði |
|---|---|
| Gerðarnúmer | APD09FX2 |
| Kælingargeta | 2.6 kílóvatt |
| Umfangssvæði | Allt að 22 m² |
| Kælimiðill | R-290 |
| Orkunýting (SEER) | 3.5 |
| Hávaðastig | 53 desibel |
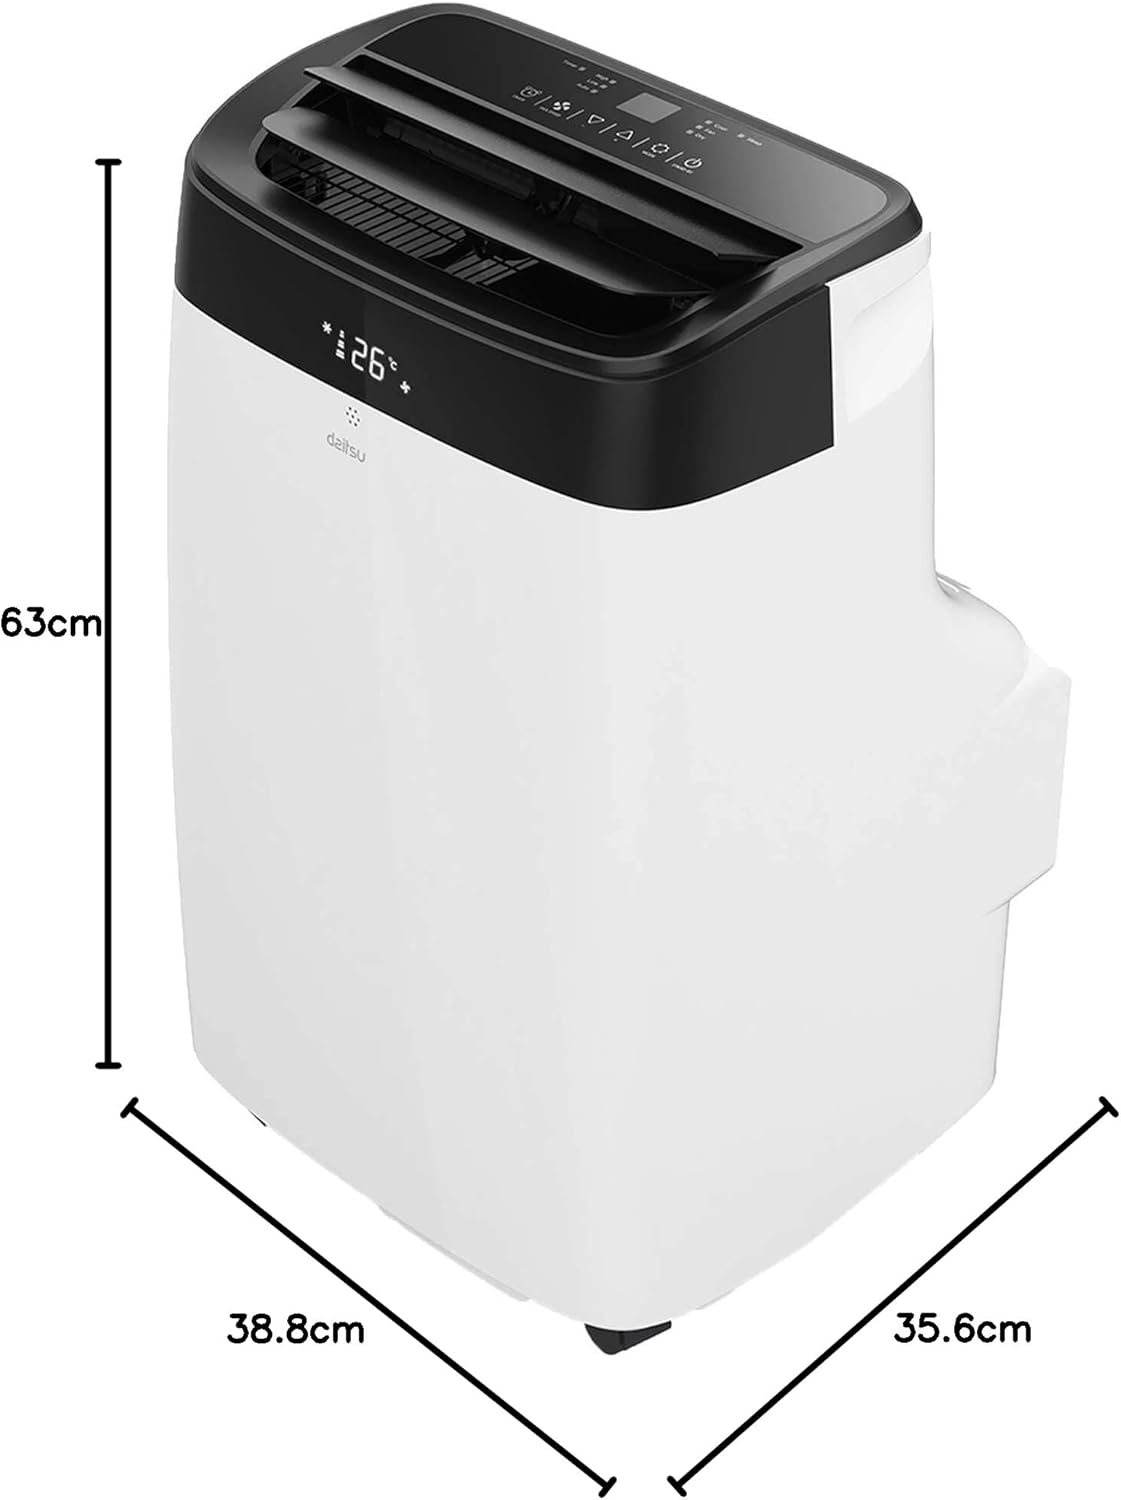
| Mál (D x B x H) | 35.6 x 38.8 x 63 cm |
| Þyngd | 25 kíló |
| Aflgjafi | 230 Volts (Wired Electric) |
| Eftirlitsaðferð | App, Remote Control, Touch |
| Sérstakir eiginleikar | Remote control, Dehumidifier, Silent mode, Wi-Fi enabled |
8. Ábyrgð og stuðningur
The Daitsu Alisios Premium APD09FX2 comes with a two-year manufacturer's warranty.
- For warranty claims or technical support, please contact Daitsu customer service or your retailer.
- Geymið kaupkvittunina til að staðfesta ábyrgðina.
- Refer to the full warranty terms and conditions provided in the separate warranty document.