
1. Inngangur
Thank you for choosing the Antec VCX300 ARGB ATX/M-ATX PC Case. This manual provides detailed instructions for the installation, operation, and maintenance of your new computer chassis. Please read this manual thoroughly before installation to ensure proper setup and optimal performance.
2. Öryggisupplýsingar
- Aftengdu alltaf rafmagnið áður en þú setur upp eða fjarlægir íhluti.
- Handle components with care to avoid damage from electrostatic discharge. Use an anti-static wrist strap if available.
- Keep the case away from water, moisture, and direct heat sources.
- Tryggið góða loftræstingu í kringum kassann til að koma í veg fyrir ofhitnun.
- Do not attempt to open or repair the power supply unit inside the case. Refer to qualified service personnel.
3. Innihald pakka
Vinsamlegast staðfestu að allir hlutir séu í pakkanum þínum:
- Antec VCX300 ARGB ATX/M-ATX PC Case
- Accessory Box (Screws, standoffs, cable ties)
- Notendahandbók (Þetta skjal)
4. Vöru lokiðview
Familiarize yourself with the various parts of your Antec VCX300 ARGB PC Case.
4.1 Framhlið I/O
- Aflhnappur
- Endurstilla hnappur
- USB 3.0 tengi
- USB 2.0 tengi
- Audio Jacks (Headphone/Microphone)
- LED Control Button (for ARGB lighting)
4.2 Internal Layout
The VCX300ARGB case supports ATX and Micro-ATX motherboards. It features multiple drive bays for storage and ample space for cooling solutions.
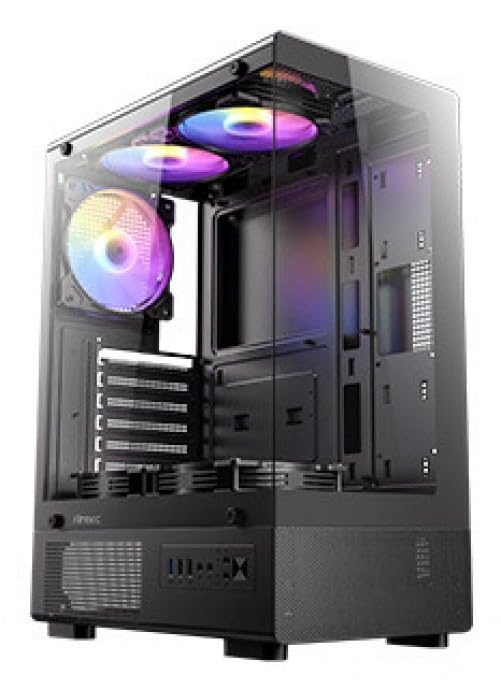
Mynd 1: Framan view of the Antec VCX300 ARGB PC Case, showcasing the ARGB lighting elements and front panel I/O ports.
5. Uppsetning og uppsetning
Follow these steps to install your components into the Antec VCX300 ARGB PC Case.
5.1 Undirbúningur málsins
- Place the case on a flat, stable surface.
- Remove the side panels by unscrewing the thumbscrews at the rear of the case and sliding the panels backward.
5.2 Uppsetning móðurborðs
- Setjið I/O skjöldinn í aftari opnun kassans.
- Align the motherboard with the pre-installed standoffs. Ensure the screw holes on the motherboard match the standoffs.
- Secure the motherboard with the provided screws from the accessory box.
5.3 Uppsetning aflgjafa
- Position the power supply unit (PSU) in the designated compartment at the bottom rear of the case.
- Secure the PSU with screws from the outside rear of the case.
5.4 Uppsetning geymsludrifs (HDD/SSD)
- Locate the drive bays. The VCX300ARGB typically features dedicated bays for 3.5" HDDs and 2.5" SSDs.
- For 3.5" HDDs, slide the drive into the bay and secure it with screws or tool-less clips if available.
- For 2.5" SSDs, mount the drive onto the designated brackets or trays and secure with screws.
5.5 Expansion Card Installation (GPU, etc.)
- Fjarlægðu nauðsynlegar hlífar fyrir útvíkkunarraufina af aftan á kassanum.
- Insert the expansion card (e.g., graphics card) into the appropriate PCIe slot on the motherboard.
- Secure the card with a screw.
5.6 Kapalstjórnun
Nýttu útskurðina fyrir kapalleiðslur og festingarpunktana fyrir aftan móðurborðsbakkann til að halda utan um snúrurnar. Þetta bætir loftflæði og útlit.
- Connect all power cables from the PSU to the motherboard and components.
- Connect front panel I/O cables (USB, audio, power/reset switches, LED) to the corresponding headers on the motherboard.
- Connect ARGB cables from the case fans/strips to the motherboard's ARGB header or the integrated ARGB controller.
6. Rekstur
6.1 Kveikt á
- Ensure all components are correctly installed and cables are connected.
- Close and secure the side panels.
- Tengdu rafmagnssnúruna við aflgjafann og innstungu.
- Flip the power switch on the PSU to the "ON" position.
- Press the Power Button on the front panel of the case.
6.2 ARGB lýsingarstýring
The Antec VCX300 ARGB case features customizable ARGB lighting. You can control the lighting effects in two ways:
- LED stjórnhnappur: Press the dedicated LED control button on the front panel to cycle through various pre-set ARGB lighting modes and colors. Hold the button for a few seconds to turn off/on the lighting.
- Hugbúnaður fyrir móðurborð: If the ARGB cables are connected to a compatible motherboard ARGB header, you can synchronize and customize lighting effects using your motherboard's proprietary software (e.g., ASUS Aura Sync, MSI Mystic Light Sync, Gigabyte RGB Fusion, ASRock Polychrome Sync). Refer to your motherboard manual for specific instructions.
7. Viðhald
Reglulegt viðhald hjálpar til við að tryggja bestu mögulegu afköst og endingu íhluta tölvunnar.
- Ryksíur: The VCX300ARGB includes dust filters. Regularly remove and clean these filters to prevent dust buildup inside the case, which can impede airflow and cooling performance. Use compressed air or a soft brush.
- Innri þrif: Periodically open the case and use compressed air to remove dust from fans, heatsinks, and other components. Ensure the system is powered off and unplugged before cleaning.
- Þrif að utan: Þurrkið ytra byrði hulstursins með mjúkum klút.amp klút. Forðist sterk efni eða slípiefni.
8. Bilanagreining
| Vandamál | Möguleg orsök | Lausn |
|---|---|---|
| Tölvan kveikir ekki á sér. | Power cable disconnected, PSU switch off, front panel power button not connected, faulty PSU. | Check power cable connections. Ensure PSU switch is ON. Verify front panel power button cable is correctly connected to motherboard. Test PSU if possible. |
| ARGB lighting not working. | ARGB cables disconnected, incompatible motherboard header, LED control button issue. | Ensure ARGB cables are securely connected to the motherboard or controller. Try cycling modes with the LED control button. Verify motherboard ARGB header compatibility. |
| Léleg loftflæði/ofhitnun. | Dust buildup, incorrect fan orientation, obstructed vents. | Clean dust filters and internal components. Ensure fans are oriented correctly for optimal airflow (intake/exhaust). Check for any obstructions. |
9. Tæknilýsing
| Eiginleiki | Smáatriði |
|---|---|
| Nafn líkans | VCX300ARGB |
| Tegund máls | Mid Tower |
| Stuðningur móðurborðs | ATX, Micro-ATX |
| Mál (D x B x H) | 14.57"D x 8.07"W x 17.72"H (370mm x 205mm x 450mm approx.) |
| Þyngd hlutar | 3.6 kíló |
| Innri drifflöt | 5 (combination of 3.5" HDD and 2.5" SSD) |
| Fram / I / O höfn | USB 3.0, USB 2.0, Audio In/Out, Power, Reset, LED Control Button |
| Sérstakir eiginleikar | Built-In Fan, Dust Filter, LED Control Button, Noise Reduction Technology, Partition Plate Cooling Technology, ARGB Lighting |
| Litur | Svartur |
10. Ábyrgð og stuðningur
Antec products come with a limited warranty. Please refer to the official Antec website or your regional distributor for specific warranty terms and conditions applicable to your product.
For technical support, product registration, or further inquiries, please visit the official Antec support page: www.antec.com/support
Tengiliðaupplýsingar innflytjanda: Ariisto House, 5th Floor, Junction of N.S.Phadke Road, Telli Gali, Andheri (E), Mumbai- 400 069 Maharashtra, India