
1. Inngangur
Thank you for choosing the CROSSIO Mid Century Modern Chandelier. This manual provides essential information for the safe installation, operation, and maintenance of your new lighting fixture. Please read these instructions thoroughly before beginning installation and retain them for future reference.

Image 1.1: The CROSSIO Mid Century Modern Chandelier with green glass shades.
2. Öryggisupplýsingar
VIÐVÖRUN: Til að draga úr hættu á eldsvoða, raflosti eða líkamstjóni skal alltaf fylgja þessum öryggisráðstöfunum:
- Aftengdu rafmagn: Always turn off the electrical supply at the main fuse box or circuit breaker before beginning installation or performing any maintenance.
- Löggiltur rafvirki: Installation should be performed by a qualified electrician or a person with adequate electrical knowledge.
- Jarðtenging: Ensure the fixture is properly grounded to avoid potential electrical shocks.
- Meðhöndlaðu með varúð: Glass components are fragile. Handle them carefully to prevent breakage.
- Kröfur um peru: Use only G9 bulbs as specified. Do not exceed the maximum wattage tilgreint á innréttingunni.
- Forðastu vatn: Do not install this fixture in damp or wet locations. It is designed for indoor use only.
- Örugg festing: Gakktu úr skugga um að festingarflöturinn geti borið þyngd festingarbúnaðarins.
3. Innihald pakka
Verify that all components are present before discarding packaging materials. If any parts are missing or damaged, contact customer support.
- Chandelier Frame Assembly
- Green Glass Shades (16 pieces + 1 replacement)
- Festingarbúnaður (hlíf, festingarplata, skrúfur, vírmúffur)
- Adjustable Downrods (2 x 11.8 inches, 2 x 23.62 inches)
- Leiðbeiningarhandbók

Image 3.1: The package includes one replacement lampskugga.
4. Tæknilýsing
| Eiginleiki | Smáatriði |
|---|---|
| Vörumerki | CROSSIO |
| Nafn líkans | GLS-HLP084GR |
| Litur | Gold+Green |
| Efni | Gler, málmur |
| Stíll | Mid Century Modern / Art Deco |
| Vörumál | 39"L x 10"B x 70.87"H (Hámark) |
| Aflgjafi | Rafmagn með snúru |
| Gerð uppsetningar | Hálf innfelld festing |
| Tegund ljósgjafa | LED (G9 bulbs recommended, not included) |
| Fjöldi ljósgjafa | 16 |
| Bulb Base | G9 |
| Sérstakir eiginleikar | Adjustable Height, Dimmable, 180° Rotatable for Sloped Ceilings |
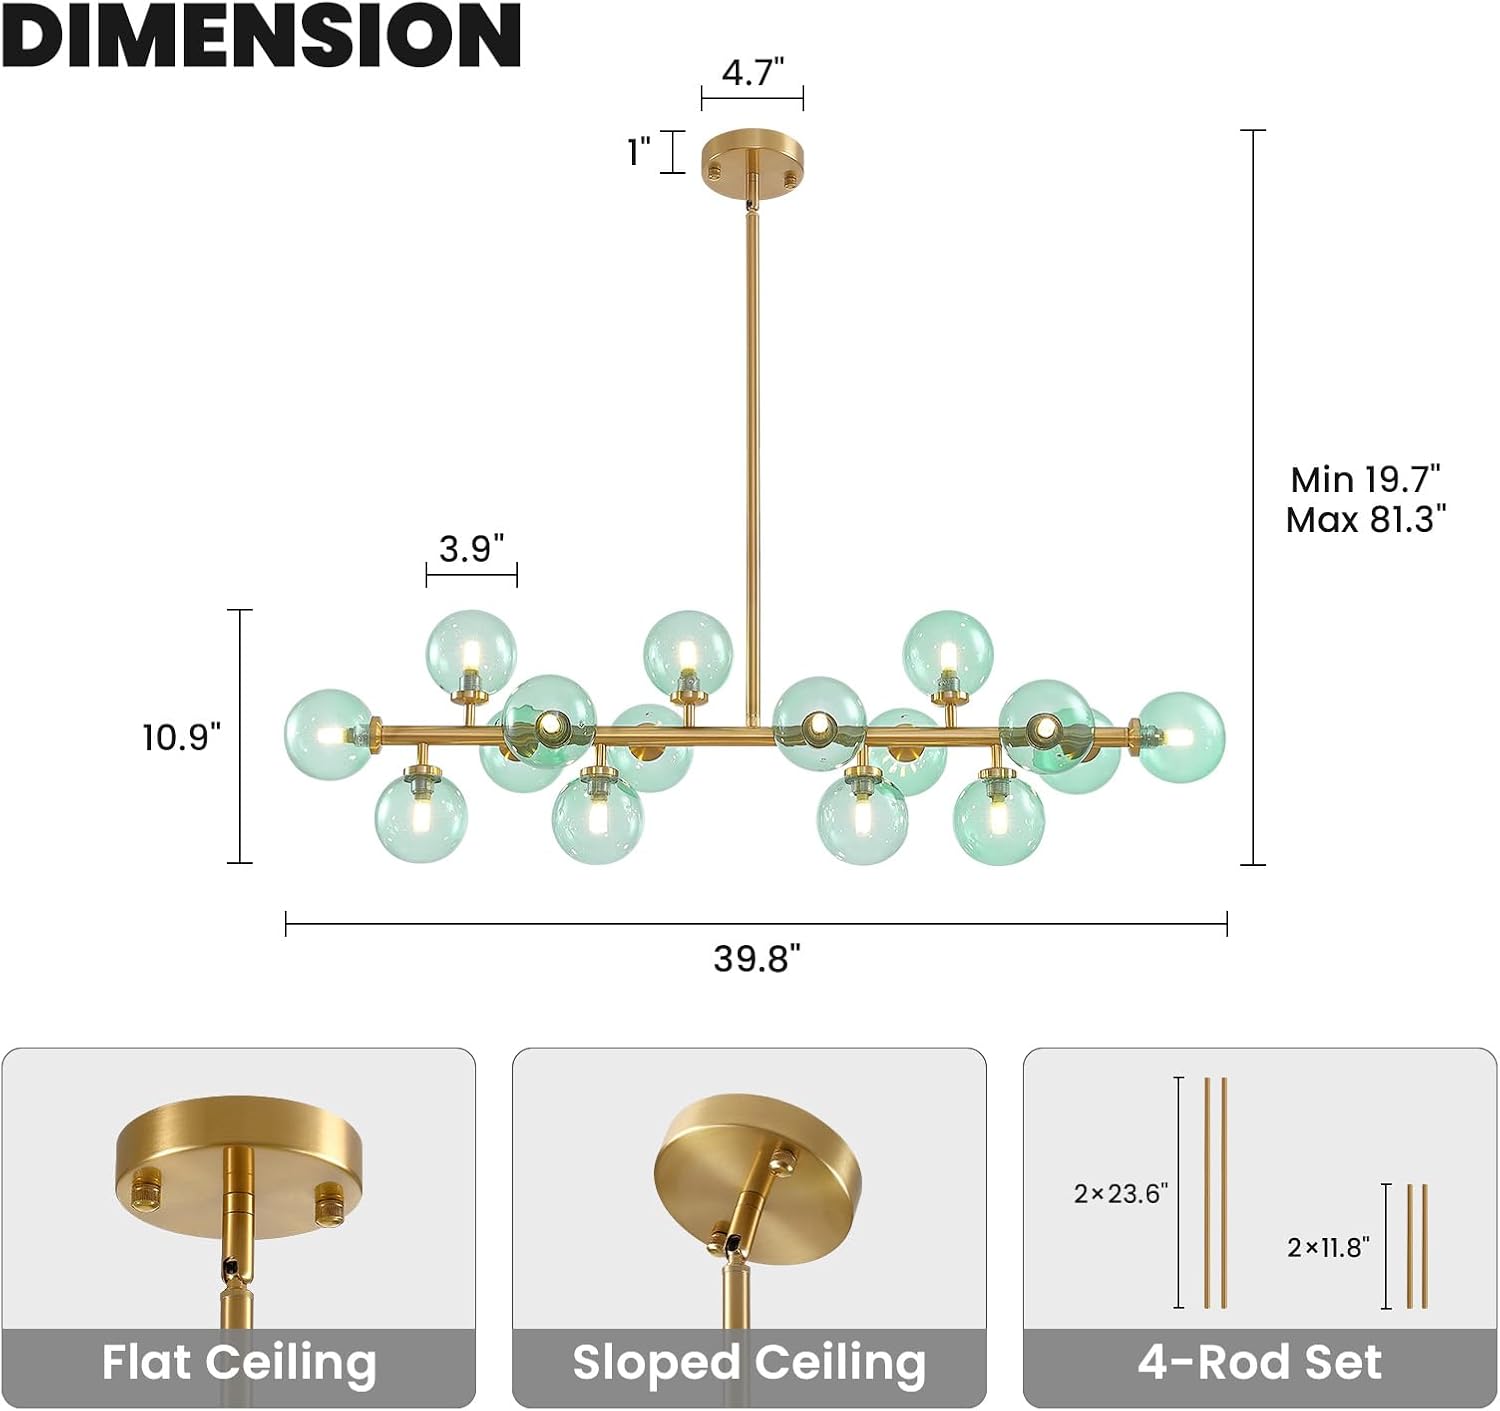
Image 4.1: Chandelier dimensions and adjustable downrod options.
5. Uppsetning og uppsetning
Follow these steps for proper installation. It is recommended to have two people for installation due to the size and weight of the fixture.
- Undirbúa uppsetningu: Slökkvið á straumnum við rofann. Hreinsið vinnusvæðið.
- Uppsetning uppsetningarplötu: Secure the mounting plate to the junction box in the ceiling using the provided screws. Ensure it is firmly attached.
- Stilla hæð: Select the appropriate combination of downrods (11.8" x 2, 23.62" x 2) to achieve your desired hanging height. The fixture can be adjusted from a minimum of 19.7" to a maximum of 81.3". For sloped ceilings, the canopy is 180° rotatable.
- Vírtengingar: Connect the fixture's wires to the household electrical wires according to local electrical codes. Typically, black to black (live), white to white (neutral), and green/bare copper to green/bare copper (ground). Secure connections with wire nuts.
- Viðhengi við tjaldhiminn: Carefully push the wires into the junction box and secure the canopy to the mounting plate with the provided screws.
- Settu upp perur: Insert 16 G9 bulbs (not included) into the lamp holders. Ensure bulbs are securely seated.
- Festið glerskjái: Carefully screw each green glass shade onto its respective lamp holder. Avoid overtightening.
- Endurheimta kraft: Þegar uppsetningu er lokið skal kveikja aftur á rafmagninu við rofann.

Image 5.1: Equipped with four downrods for adjustable hanging height.

Image 5.2: The 180° rotatable canopy allows for installation on sloped ceilings.

Image 5.3: G9 LED light socket for easy bulb installation.
6. Rekstur
The CROSSIO Chandelier is designed for ease of use and offers versatile lighting options.
6.1 Kveikt/slökkt
Operate the chandelier using a standard wall switch. Flip the switch to turn the light fixture on or off.

Image 6.1: Chandelier in a room, demonstrating on and off states.
6.2 Dimmable Functionality
This chandelier is fully dimmable when used with compatible G9 dimmable bulbs and a suitable dimmer switch (both not included). This allows you to adjust the light intensity to create the desired ambiance.

Image 6.2: The chandelier is fully dimmable with compatible bulbs and dimmer switch.
6.3 Light Color Effects
If you use color-changing G9 bulbs (not included), you can achieve different light color effects (Cool White, Neutral White, Warm White) by quickly toggling your standard ON/OFF wall switch. This feature depends entirely on the capabilities of the bulbs you install.

Mynd 6.3: Dæmiample of 3 light color effects achievable with compatible bulbs.
7. Viðhald
Reglulegt viðhald tryggir langlífi og útlit ljósakrónunnar.
- Þrif: Always turn off the power before cleaning. Use a soft, dry cloth to wipe the metal frame and glass shades. Do not use abrasive cleaners, solvents, or polishes as they may damage the finish.
- Skipt um peru: Ensure the fixture is cool before attempting to replace bulbs. Follow the safety instructions for disconnecting power.
- Skoðun: Athugið reglulega allar tengingar og festingarbúnað til að tryggja að þeir séu öruggir.

Image 7.1: Product details including durable ceiling plate, sleek iron body, and G9 light socket.
8. Bilanagreining
Ef þú lendir í vandræðum með ljósakrónuna þína skaltu skoða eftirfarandi algeng vandamál og lausnir:
| Vandamál | Möguleg orsök | Lausn |
|---|---|---|
| Ljós kviknar ekki | Enginn rafmagn, lausar raflagnir, biluð pera, bilaður rofi. | Check circuit breaker. Ensure all wire connections are secure. Replace bulbs. Test the wall switch. |
| Ljós flökta | Laus pera, ósamhæfur ljósdeyfir, laus raflögn. | Tighten bulbs. Ensure dimmer switch and bulbs are compatible. Check wire connections. |
| Bulbs burn out frequently | Röng perutegund/vatntage, binditage fluctuations, poor quality bulbs. | Ensure G9 bulbs are used and wattage is not exceeded. Consider higher quality LED G9 bulbs. Consult an electrician for voltage mál. |
| Glass shades fall off | Shades not tightened properly, damaged threads. | Ensure shades are securely screwed onto the lamp holders. Do not overtighten. If threads are damaged, contact support for replacement parts. |
9. Ábyrgð og stuðningur
CROSSIO is committed to providing quality products and customer satisfaction.
- 1 ára ábyrgð: This product is covered by a 1-year warranty. Contact us for free replacement if any quality issues arise within this period.
- Gæðaþjónusta: If you have any questions or require assistance, our customer service team is available to provide a solution within 24 hours.
- Customization Service: For specific product customization inquiries, please feel free to contact us for consultation.

Image 9.1: CROSSIO Warranty and Service Information.
Til að fá aðstoð, vinsamlegast farðu á CROSSIO Store on Amazon or contact us directly through your purchase platform.