1. Inngangur
The Velleman DVM810 is a compact and economical 3 1/2 digit digital multimeter designed for measuring DC and AC voltages, DC currents, resistance, and for performing diode and transistor (hFE) tests. It features overload protection and automatic polarity indication, making it suitable for hobbyists, field use, and workshops. This manual provides essential information for the safe and effective operation of your DVM810 multimeter.
2. Vörueiginleikar
- Automatic polarity indication
- Voltage measurements: AC 500V and DC 500V maximum
- Current measurements: DC 10A maximum (0.2A fused, 10A unfused)
- Resistance measurements: Up to 2MΩ
- Diode and transistor (hFE) test functions
- Yfirálagsvörn
- Compact design with 3 1/2 digit LCD display
3. Innihald pakka
Vinsamlegast athugið innihald pakkans til að ganga úr skugga um að allir hlutir séu til staðar:
- Velleman DVM810 stafrænn margmælir
- Prófunarleiðslur (ein rauð, ein svört)
- Leiðbeiningarhandbók
4. Mikilvægar öryggisupplýsingar
Read all safety warnings and instructions carefully before using this product. Failure to follow these instructions may result in electric shock, fire, or serious injury.
- Always ensure the multimeter is set to the correct function and range before making any measurements.
- Never exceed the maximum input limits for any range. The maximum voltage for AC/DC is 500V.
- Ekki reyna að mæla straum á rásum með volum.tages yfir 250V.
- Inspect test leads for damaged insulation or exposed metal before each use. Replace damaged leads immediately.
- Ekki nota fjölmælirinn ef hann virðist skemmdur eða ef hylki hans er opið.
- Exercise extreme caution when working with live circuits. Use appropriate personal protective equipment.
- Always disconnect power to the circuit and discharge high-voltage capacitors before measuring resistance or performing diode/transistor tests.
- Replace the battery when the low battery indicator appears on the display to ensure accurate readings.
5. Vöru lokiðview
Familiarize yourself with the components of your Velleman DVM810 multimeter:
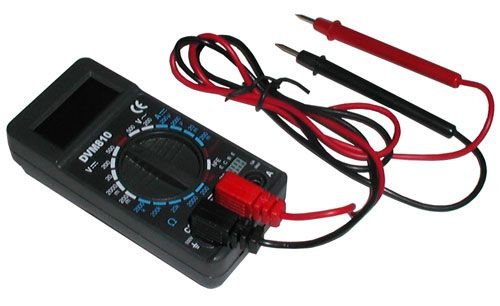
Figure 1: Velleman DVM810 Digital Multimeter. This image displays the front view of the compact multimeter, highlighting its liquid crystal display (LCD), the central rotary function switch, and the input jacks for test leads at the bottom.
- LCD skjár: Shows measurement readings, units, and polarity.
- Snúningsrofi: Notað til að velja æskilegt mælisvið og virkni.
- Inntakstengi:
- COM Jack: Common (negative) input for all measurements. Connect the black test lead here.
- VΩmA tengi: Jákvætt inntak fyrir rúmmáltage, resistance, and current measurements up to 200mA. Connect the red test lead here.
- 10A tengi: Positive input for high current measurements (up to 10A). Connect the red test lead here for 10A measurements.
- Prófunarleiðir: Red and black leads used to connect the multimeter to the circuit under test.
6. Uppsetning
6.1 Uppsetning rafhlöðu
The DVM810 multimeter requires a 9V battery (not always included). To install or replace the battery:
- Ensure the multimeter is turned OFF (rotary switch set to OFF).
- Finndu rafhlöðulokið aftan á tækinu.
- Remove the screw(s) securing the cover and carefully lift it off.
- Connect a new 9V battery to the battery clip, observing correct polarity.
- Settu rafhlöðuna í hólfið og settu lokið aftur á og festu það með skrúfunni/skrúfunum.
6.2 Tenging prófunarleiðslu
Always connect the test leads correctly for accurate and safe measurements:
- Settu svörtu prófunarsnúruna í COM (algengur) tengill.
- Fyrir flestar mælingar (rúmmáltage, resistance, diode, hFE, and current up to 200mA), insert the red test lead into the VΩmA tjakkur.
- Fyrir mælingar á miklum straumi (allt að 10A), stingið rauða prófunarsnúrunni í 10A tjakkur.
7. Notkunarleiðbeiningar
Before making any measurement, ensure the test leads are correctly connected and the rotary switch is set to the appropriate function and range.
7.1 Mæling á DC Voltage (V=)
- Settu rauðu leiðsluna í VΩmA jack and the black lead into the COM tjakkur.
- Stilltu snúningsrofann á óskaða jafnstraumsspennutage (V=) range. Start with the highest range if the voltage er óþekkt.
- Connect the test leads across the component or circuit to be measured (in parallel).
- Lestu binditage value on the LCD display. The display will show the correct polarity.
7.2 Mæling á AC Voltage (V~)
- Settu rauðu leiðsluna í VΩmA jack and the black lead into the COM tjakkur.
- Stilltu snúningsrofann á óskaða AC-styrkleikatage (V~) range. Start with the highest range if the voltage er óþekkt.
- Connect the test leads across the component or circuit to be measured (in parallel).
- Lestu binditage gildi á LCD skjánum.
7.3 Measuring DC Current (A=)
Caution: Never connect the multimeter in parallel with a voltagstraumgjafans þegar straumur er mældur, þar sem það getur sprungið öryggið eða skemmt mælinn.
- Determine the expected current. For currents up to 200mA, insert the red lead into the VΩmA jack. For currents up to 10A, insert the red lead into the 10A jack. Always insert the black lead into the COM tjakkur.
- Set the rotary switch to the appropriate DC Current (A=) range. Start with the highest range if the current is unknown.
- Turn off power to the circuit. Open the circuit where the current is to be measured.
- Tengdu fjölmælirinn í röð við rafrásina.
- Restore power to the circuit and read the current value on the LCD display.
7.4 Mæling á viðnámi (Ω)
Caution: Ensure the circuit is completely de-energized and all capacitors are discharged before measuring resistance.
- Settu rauðu leiðsluna í VΩmA jack and the black lead into the COM tjakkur.
- Set the rotary switch to the desired Resistance (Ω) range. Start with a higher range if the resistance is unknown.
- Tengdu prófunarleiðslurnar yfir íhlutinn sem á að mæla.
- Lesið viðnámsgildið á LCD skjánum.
7.5 Díóða próf
Caution: Ensure the diode is disconnected from the circuit or the circuit is de-energized before testing.
- Settu rauðu leiðsluna í VΩmA jack and the black lead into the COM tjakkur.
- Set the rotary switch to the Diode symbol (→|).
- Tengdu rauða leiðarann við anóðuna og svarta leiðarann við katóðu díóðunnar. Skjárinn mun sýna framhliðina.tage drop (typically 0.5V to 0.8V for silicon diodes).
- Reverse the leads. The display should show 'OL' (Overload) for a good diode. If it shows a reading in both directions or 'OL' in both directions, the diode may be faulty.
7.6 Transistor (hFE) Test
Caution: Ensure the transistor is disconnected from the circuit before testing.
- Settu rauðu leiðsluna í VΩmA jack and the black lead into the COM tjakkur.
- Stilltu snúningsrofann á hFE stöðuna.
- Identify if the transistor is NPN or PNP. Insert the transistor's emitter, base, and collector leads into the corresponding holes in the hFE socket on the multimeter.
- Read the hFE (DC current gain) value on the LCD display.
8. Tæknilýsing
| Parameter | Gildi |
|---|---|
| Vörumerki | Velleman |
| Gerðarnúmer | DVM810 |
| Tegund mælingar | Margmælir |
| DC binditage Svið | Allt að 500V |
| AC Voltage Svið | Allt að 500V |
| DC núverandi svið | Up to 10A (0.2A fused, 10A unfused) |
| Viðnámssvið | Allt að 2MΩ |
| Díóða próf | Já |
| Prófun á smára (hFE) | Já |
| Skjár | 3 1/2 Digit LCD |
| Aflgjafi | 9V rafhlaða (ekki innifalin) |
| Mál | Um það bil 3.70" x 1.81" x 1.03" |
| Þyngd hlutar | Approximately 3.2 ounces (0.2 lbs) |
| UPC | 836479002272 |
9. Viðhald
9.1 Skipt um rafhlöðu
When the low battery indicator appears on the LCD, replace the 9V battery as described in Section 6.1. A weak battery can lead to inaccurate readings.
9.2 Þrif
Til að þrífa fjölmælirinn skaltu þurrka húsið með auglýsingu.amp cloth and a mild detergent. Do not use abrasives or solvents. Ensure the unit is completely dry before use.
9.3 Skoðun á prófunarleiðslum
Regularly inspect the test leads for any signs of damage, such as cracked insulation, exposed wires, or loose connections. Replace damaged leads immediately to prevent electric shock hazards.
10. Bilanagreining
- Engin eða dauf birting: Athugaðu rafhlöðuna. Skiptu um hana ef þörf krefur.
- Rangar mælingar:
- Ensure the rotary switch is set to the correct function and range.
- Athugaðu rúmmál rafhlöðunnartage; replace if low.
- Gakktu úr skugga um að prófunarleiðslur séu rétt tengdar og ekki skemmdar.
- Til að mæla viðnám skal ganga úr skugga um að rafrásin sé spennulaus.
- 'OL' (Ofhleðsla) birtist: The measured value exceeds the selected range. Select a higher range or ensure the circuit is within the meter's capabilities.
- Fuse blown (during current measurement): If the meter stops measuring current, the internal fuse may have blown. Refer to a qualified technician for fuse replacement.
11. Ábyrgð og stuðningur
Warranty information for the Velleman DVM810 Digital Multimeter is typically provided with your purchase documentation or can be found on the official Velleman website. For technical support, service, or further inquiries, please refer to the contact information provided by your retailer or the manufacturer's official support channels.


