1. Inngangur
This manual provides detailed instructions for the installation, operation, and maintenance of your Gewiss GW10701 Programmable Thermostat. This device is designed to control heating and air conditioning systems, allowing you to manage room temperature efficiently and comfortably. Please read this manual thoroughly before installation and use to ensure proper functionality and safety.
2. Öryggisupplýsingar
Fylgið alltaf eftirfarandi öryggisráðstöfunum til að koma í veg fyrir meiðsli á fólki eða skemmdir á tækinu:
- Uppsetning skal aðeins framkvæmd af hæfu starfsfólki í samræmi við gildandi rafmagnsreglugerðir og reglugerðir.
- Disconnect power to the heating/cooling system at the main circuit breaker before installing or servicing the thermostat.
- Ekki láta hitastillinn verða fyrir vatni eða miklum raka.
- Notið aðeins tilgreinda rafhlöðutegund og gætið þess að pólunin sé rétt við uppsetningu.
- Keep batteries out of reach of children. Do not dispose of batteries in fire.
- Do not attempt to open or repair the thermostat yourself. Contact qualified service personnel.
3. Vöru lokiðview
The Gewiss GW10701 is a wall-mounted programmable thermostat featuring an LCD display and intuitive controls for temperature management.
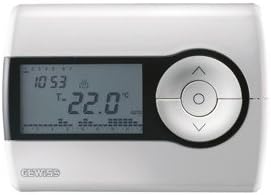
Mynd 1: Framan view of the Gewiss GW10701 Thermostat. It features a clear LCD screen displaying time and temperature, alongside a circular control panel with directional buttons and a central confirmation button for easy navigation and setting adjustments.
3.1. Íhlutir
- LCD skjár: Shows current time, temperature, operating mode, and programming settings.
- Stjórnhnappar: Typically include UP/DOWN arrows for temperature adjustment, MODE button for selecting operating modes (e.g., Heat, Cool, Auto, Off), and a SET/PROG button for accessing programming menus. (Note: Specific button functions may vary slightly; refer to on-screen prompts.)
- Rafhlöðuhólf: Located on the rear or side, houses the power supply batteries.
- Festingarplata: Fyrir örugga uppsetningu á vegg.
4. Uppsetning
4.1. Að velja staðsetningu
Select a central location on an interior wall, approximately 1.5 meters (5 feet) above the floor. Avoid locations near heat sources (lamps, direct sunlight, fireplaces), drafts (windows, doors), or areas with poor air circulation.
4.2. Uppsetning hitastillisins
- Aftengdu rafmagn: Turn off the power to your heating/cooling system at the main circuit breaker.
- Aðskilin botnplata: Carefully detach the front cover of the thermostat from its base plate.
- Merkja og bora: Hold the base plate against the wall at your chosen location. Mark the drilling points. Drill holes and insert wall anchors if necessary.
- Öruggur botnplata: Fasten the base plate to the wall using the provided screws.
- Rafmagnstenging (ef við á): Connect the system wires to the appropriate terminals on the base plate. Refer to the wiring diagram provided with your heating/cooling system or consult a qualified electrician. Note: While the thermostat is battery-powered, it controls a 230V system. Ensure correct wiring.
- Settu rafhlöður upp: Insert the required batteries into the battery compartment, observing correct polarity (+/-).
- Festa hitastillir: Carefully reattach the thermostat front cover to the base plate, ensuring it clicks securely into place.
- Endurheimta kraft: Turn on the power to your heating/cooling system at the main circuit breaker.
5. Rekstur
5.1. Upphafsuppsetning
Upon first power-up or after battery replacement, you may need to set the current time and date. Follow the on-screen prompts or refer to the programming section.
5.2. Stilling á hitastigi
Notaðu UP og NIÐUR arrow buttons to adjust the desired temperature. The display will show the set temperature temporarily, then revert to the current room temperature.
5.3. Rekstraraðferðir
Ýttu á MODE button (or similar) to cycle through available operating modes:
- HITI: Hitastillirinn virkjar hitakerfið þegar stofuhitastigið fer niður fyrir stillt hitastig.
- KOLI: The thermostat will activate the air conditioning system when the room temperature rises above the set temperature.
- SJÁLFvirkt: Hitastillirinn skiptir sjálfkrafa á milli hitunar og kælingar til að viðhalda stilltu hitastigi.
- SLÖKKT: Hita- og kælikerfin eru slökkt.
6. Forritun
The Gewiss GW10701 allows you to create custom heating/cooling schedules for different times of the day and days of the week. This feature helps optimize energy consumption and comfort.
6.1. Stilling á tíma og dagsetningu
- Ýttu á SETJA or PROG hnappinn til að fara í stillingavalmyndina.
- Navigate using the arrow buttons to find "Time" or "Date" settings.
- Use the arrow buttons to adjust the values (hour, minute, day, month, year).
- Staðfestu hverja stillingu með SETJA or central button.
6.2. Creating a Program Schedule
The thermostat typically offers daily or weekly programming options. You can set different temperatures for various periods (e.g., Wake, Day, Evening, Sleep).
- Ýttu á PROG hnappinn til að fara í forritunarham.
- Veldu daginn eða hópinn af dögum sem þú vilt forrita (t.d. mán-fös, lau-sun eða einstaka daga).
- For each period (e.g., "Wake"), set the desired start time and temperature using the arrow buttons.
- Advance to the next period and repeat the process.
- Save your program and exit programming mode.
Consult the on-screen menu and specific button labels on your device for precise programming steps, as interfaces can vary.
7. Viðhald
7.1. Skipt um rafhlöðu
The thermostat is powered by batteries. When the battery indicator appears on the display, replace the batteries promptly to ensure continuous operation. Typically, 2x AA or AAA alkaline batteries are required.
- Carefully remove the front cover of the thermostat.
- Fjarlægðu gömlu rafhlöðurnar og fargaðu þeim á ábyrgan hátt.
- Settu nýjar rafhlöður í og tryggðu rétta pólun.
- Festu afturhlífina aftur.
7.2. Þrif
Clean the thermostat's exterior with a soft, dry cloth. Do not use abrasive cleaners, solvents, or spray cleaners directly onto the device, as this can damage the display or internal components.
8. Bilanagreining
| Vandamál | Möguleg orsök | Lausn |
|---|---|---|
| Skjárinn er auður eða dimmur. | Lítil eða dauðar rafhlöður. | Skiptu um rafhlöður fyrir nýjar. |
| Hita-/kælikerfið svarar ekki. |
|
|
| Hitamælingar virðast ónákvæmar. | Staðsetning hitastillis verður fyrir áhrifum af trekk eða hitagjöfum. | Gakktu úr skugga um að hitastillirinn sé ekki í beinu sólarljósi, trekk eða tækjum sem gefa frá sér hita. |
9. Tæknilýsing
- Framleiðandi: Gewiss
- Gerðarnúmer: GW10701 (Chorus)
- Mál (L x B x H): 13 x 2.3 x 9.2 cm
- Þyngd: 9.07 g
- Litur: Hvítur
- Efni: Plast
- Aflgjafi: Rafhlöðuknúinn
- Switching Voltage: 230 Volt (for controlled system)
- Skjár Tegund: LCD eða LED
- Gerð festingar: Veggfestur
- Stjórnareiginleikar: Programmable, Button control
- Notkun: Heating systems, Air conditioning systems
10. Ábyrgð og stuðningur
For warranty information, technical support, or service inquiries regarding your Gewiss GW10701 Thermostat, please refer to the warranty card included with your product or visit the official Gewiss website. You may also contact your local Gewiss distributor or retailer for assistance.
Gewiss Official Websíða: www.gewiss.com


