1. Inngangur
This manual provides detailed instructions for the installation, operation, and maintenance of the Supermicro MBD-X10SLH-F-O uATX Server Motherboard. Please read this manual thoroughly before beginning installation to ensure proper setup and to maximize the performance and longevity of your system. This motherboard is designed for server applications, supporting Intel LGA1150 processors and DDR3 memory.
2. Vöru lokiðview
The Supermicro MBD-X10SLH-F-O is a high-performance uATX server motherboard featuring the Intel C226 chipset. It is engineered for reliability and efficiency in server environments.
Helstu eiginleikar:
- CPU innstunga: LGA1150, supporting Intel Xeon E3-1200 v3/v4 series, 4th/5th Gen Core i3, Pentium, Celeron processors.
- Minni: 4x 204-pin DDR3-1600 SODIMM slots, supporting up to 32GB ECC/non-ECC Unbuffered memory.
- Útvíkkun rifa: 1x PCI-Express 3.0 x16, 1x PCI-Express 2.0 x8, 1x PCI-Express 2.0 x4.
- Geymsla: 6x SATA3 (6Gbps) ports.
- Tengingar: Dual Gigabit Ethernet LAN ports (2x RJ45) and 1x Dedicated IPMI LAN port (RJ45).
- USB tengi: 4x USB 3.0 ports, 6x USB 2.0 ports.
- Myndbandsúttak: 1x VGA port.
- Formþáttur: uATX (9.6" x 9.6").
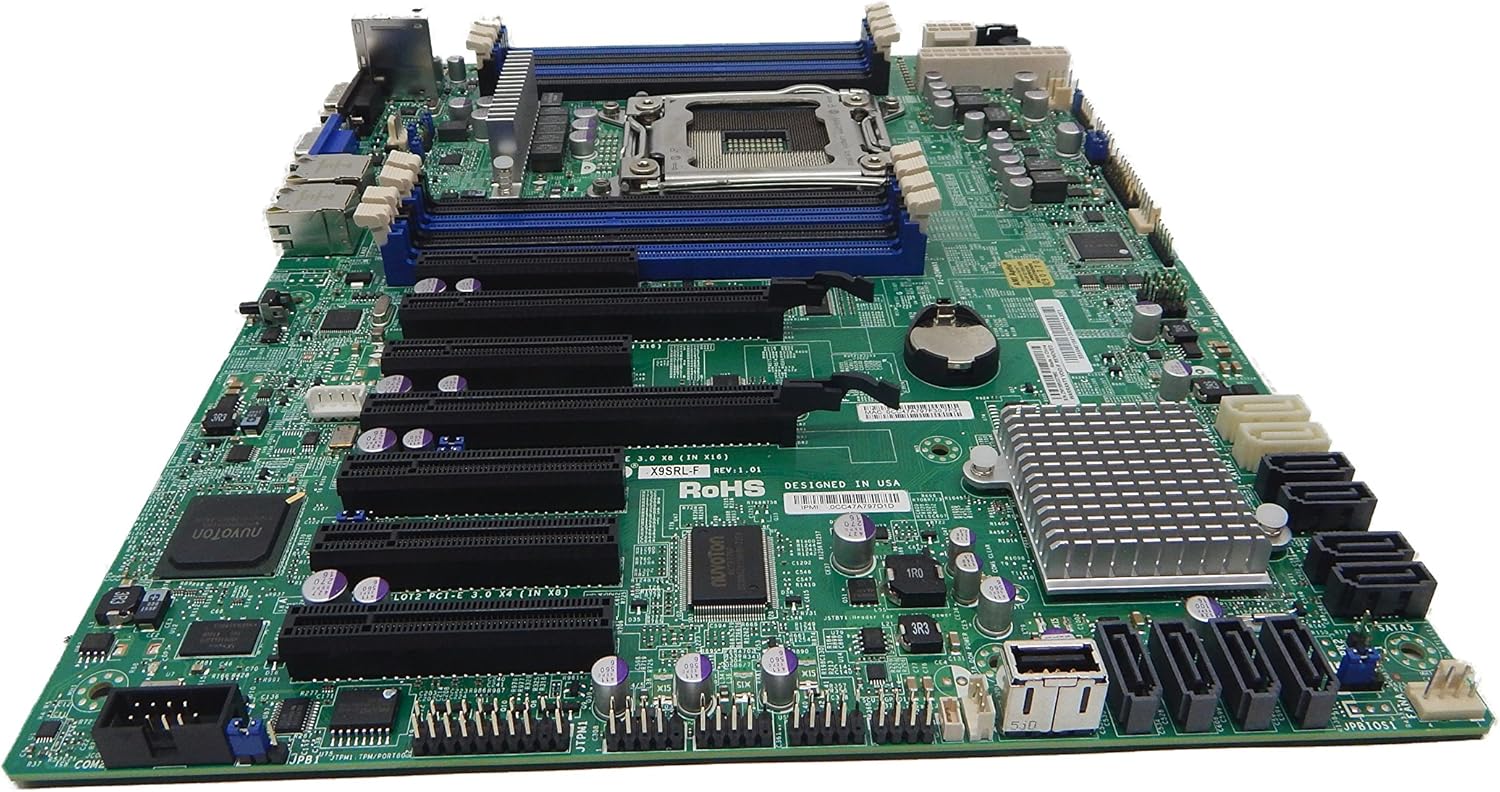
Mynd 2.1: Að ofan view of the Supermicro MBD-X10SLH-F-O motherboard, showing the CPU socket, RAM slots, and various expansion slots.

Mynd 2.2: Hornað view of the motherboard, highlighting the LGA1150 CPU socket and the four DDR3 SODIMM memory slots.

Mynd 2.3: Aftan view of the Supermicro MBD-X10SLH-F-O motherboard, displaying the I/O panel with USB, VGA, LAN, and IPMI ports.

Mynd 2.4: Nærmynd view of the motherboard, showing the six SATA3 ports and other onboard connectors.
3. Tæknilýsing
| Eiginleiki | Forskrift |
|---|---|
| Vörumerki | Supermicro |
| Nafn líkans | MBD-X10SLH-F-O |
| CPU fals | LGA 1150 |
| Tegund flísasetts | Intel C226 |
| Samhæfðir örgjörvar | Intel Core i3-4xxx, i5-4xxx, i7-4xxx, i3-5xxx, i5-5xxx, i7-5xxx, Intel Xeon E3-1200 v3/v4 series |
| RAM minni tækni | DDR3 |
| Minnishraði | 1600 MHz |
| Hámarks vinnsluminni sem stutt er | 32 GB |
| Fjöldi USB 2.0 tengi | 6 |
| Fjöldi USB 3.0 tengi | 4 |
| SATA tengi | 6x SATA3 (6Gbps) |
| Útvíkkun rifa | 1x PCIe 3.0 x16, 1x PCIe 2.0 x8, 1x PCIe 2.0 x4 |
| Form Factor | uATX |
| Mál (LxBxH) | 14 x 11 x 3.5 tommur |
| Þyngd hlutar | 3.52 aura |
4. Uppsetning
Before beginning installation, ensure your system is powered off and disconnected from the power source. Always handle the motherboard by its edges to avoid static discharge.
4.1. Uppsetning örgjörva
- Gently lift the CPU socket lever.
- Align the CPU with the socket, ensuring the gold triangle on the CPU matches the triangle on the socket.
- Settu örgjörvann varlega í innstunguna án þess að þvinga hann.
- Lower the socket lever and secure it.
- Berið á hitapasta og setjið upp kælirinn fyrir örgjörvann samkvæmt leiðbeiningum framleiðanda.
4.2. Uppsetning minnis
- Opnaðu klemmurnar á báðum endum DIMM-raufarinnar.
- Stilltu hak minniseiningarinnar saman við lykilinn í DIMM-raufinni.
- Ýttu fast niður á báða enda minniseiningarinnar þar til klemmurnar smellpassa.
4.3. Uppsetning stækkunarkorts
- Fjarlægðu samsvarandi raufarhlífina af undirvagninum þínum.
- Stilltu útvíkkunarkortinu saman við viðkomandi PCIe rauf.
- Ýttu fast niður þar til kortið situr alveg á sínum stað.
- Secure the card with a screw or retention clip.
4.4. Tenging við geymslutæki
- Tengdu annan endann á SATA gagnasnúru við SATA tengi á móðurborðinu.
- Tengdu hinn endann á SATA gagnasnúrunni við geymslutækið þitt (HDD/SSD).
- Tengdu SATA rafmagnssnúru frá aflgjafanum þínum við geymslutækið.
4.5. Rafmagnstengingar
- Tengdu 24 pinna ATX aðalrafmagnstengið frá aflgjafanum við móðurborðið.
- Connect the 8-pin (or 4-pin) ATX 12V CPU power connector to the motherboard.
4.6. Tengingar á framhliðinni
Connect the front panel headers (Power LED, HDD LED, Power Switch, Reset Switch, USB, Audio) to the corresponding pins on the motherboard. Refer to the motherboard's silkscreen labels for correct pin orientation.
5. Notkunarleiðbeiningar
5.1. Upphafleg ræsing
- After all components are installed and connected, connect the power cord to your power supply and turn on the power switch.
- Ýttu á rofann á undirvagninum þínum.
- Kerfið ætti að kvikna á og þú ættir að sjá tilkynningu á skjánum þínum.
5.2. Aðgangur að BIOS/UEFI
To enter the BIOS/UEFI setup utility, press the designated key (commonly DEL or F2) during the initial boot sequence. The exact key may vary; observe the on-screen prompts.
5.3. IPMI Remote Management
This motherboard features a dedicated IPMI LAN port for remote management. To access the IPMI interface, connect the IPMI LAN port to your network. Obtain the IP address assigned to the IPMI interface (either from BIOS or a network scan) and access it via a web browser from another computer on the same network. Java may be required for remote console functionality.
6. Viðhald
Regular maintenance helps ensure the stability and longevity of your motherboard and system.
- Rykhreinsun: Hreinsið reglulega ryk af móðurborðinu og íhlutum þess með þrýstilofti. Gangið úr skugga um að kerfið sé slökkt og aftengt áður en það er hreinsað.
- Kapalstjórnun: Gakktu úr skugga um að allar kaplar séu snyrtilega lagðir og festir til að koma í veg fyrir loftstreymi og óviljandi aftengingu.
- BIOS/vélbúnaðaruppfærslur: Athugaðu Supermicro website for the latest BIOS and IPMI firmware updates. Follow the provided instructions carefully. Note that IPMI BIOS upgrades may require a separate license. Always update BIOS before IPMI firmware.
- Íhlutaeftirlit: Occasionally inspect all connections (power, data, expansion cards) to ensure they are securely seated.
7. Bilanagreining
Þessi hluti fjallar um algeng vandamál sem þú gætir rekist á.
7.1. System Fails to Boot
- Athugaðu rafmagnstengingar: Ensure the 24-pin ATX and 8-pin CPU power connectors are securely attached.
- Setjið íhluti aftur á sinn stað: Remove and re-install the CPU, memory modules, and any expansion cards to ensure they are properly seated.
- Hreinsa CMOS: Refer to your motherboard's detailed manual for instructions on how to clear the CMOS, which can resolve boot issues caused by incorrect BIOS settings.
- Lágmarksstillingar: Try booting with only essential components (CPU, one RAM stick, power supply, and display) to isolate the problem.
7.2. Fan Speed Issues
Some low RPM, high-efficiency fans may not be accurately detected by the motherboard's fan controller, leading to erratic fan speed behavior (e.g., fans spinning up to max RPM). This is often due to the controller expecting server-grade fans with higher RPM ranges.
- BIOS stillingar: Check BIOS settings for fan control options. Adjust fan curves or modes if available.
- 3-Pin vs. 4-Pin Fans: If using 4-pin PWM fans that exhibit this behavior, consider using 3-pin adapters if available with your fans. This can sometimes provide a more stable, albeit less precise, fan control.
- IPMI Fan Control: While IPMI offers fan control, it may have limitations for low RPM fans.
7.3. SATA Port Obstruction
When installing a full-size graphics processing unit (GPU), some SATA ports may become physically blocked or difficult to access.
- Áætlun framundan: Connect SATA cables to the necessary ports before installing large expansion cards.
- Angled SATA Cables: Use SATA cables with angled connectors if straight connectors are obstructed.
- Alternative Ports: Utilize any unblocked SATA ports first.
8. Upplýsingar um ábyrgð og stuðning
For detailed warranty information, including terms, conditions, and duration, please refer to the official Supermicro website or the warranty card included with your product. For technical support, driver downloads, and additional documentation, visit the Supermicro support portal.
Supermicro opinbert Websíða: www.supermicro.com


