1. Inngangur
This manual provides detailed instructions for the installation, configuration, and operation of your ASRock H81 PRO BTC Motherboard. Designed for reliable performance, this ATX motherboard supports Intel LGA 1150 processors and DDR3 memory, featuring multiple PCI Express slots suitable for various computing applications, including multi-GPU setups. Please read this manual thoroughly before beginning the installation process to ensure proper setup and to maximize the stability and longevity of your system.
2. Innihald pakka
Gakktu úr skugga um að allir hlutir sem taldir eru upp hér að neðan séu til staðar í umbúðum móðurborðsins. Ef einhver hluti vantar eða er skemmdur skaltu hafa samband við söluaðila.
- ASRock H81 PRO BTC Motherboard
- Fljótleg uppsetningarleiðbeiningar
- Stuðnings-CD (Reklar og hjálpartæki)
- I / O skjöldur
- 2 x SATA gagnasnúrur
3. Kerfisuppsetning
3.1. Uppsetning örgjörva
The ASRock H81 PRO BTC motherboard uses an LGA 1150 socket. Handle the CPU and socket with extreme care to avoid damaging the pins.
- Locate the CPU socket on the motherboard. Lift the load lever and open the metal load plate.
- Carefully align the CPU with the socket, ensuring the gold triangle on the CPU matches the triangle on the socket. Gently place the CPU into the socket without forcing it.
- Close the load plate and press down the load lever until it locks into place.
- Berið hitapasta á örgjörvann og setjið upp kælinn samkvæmt leiðbeiningum framleiðanda.
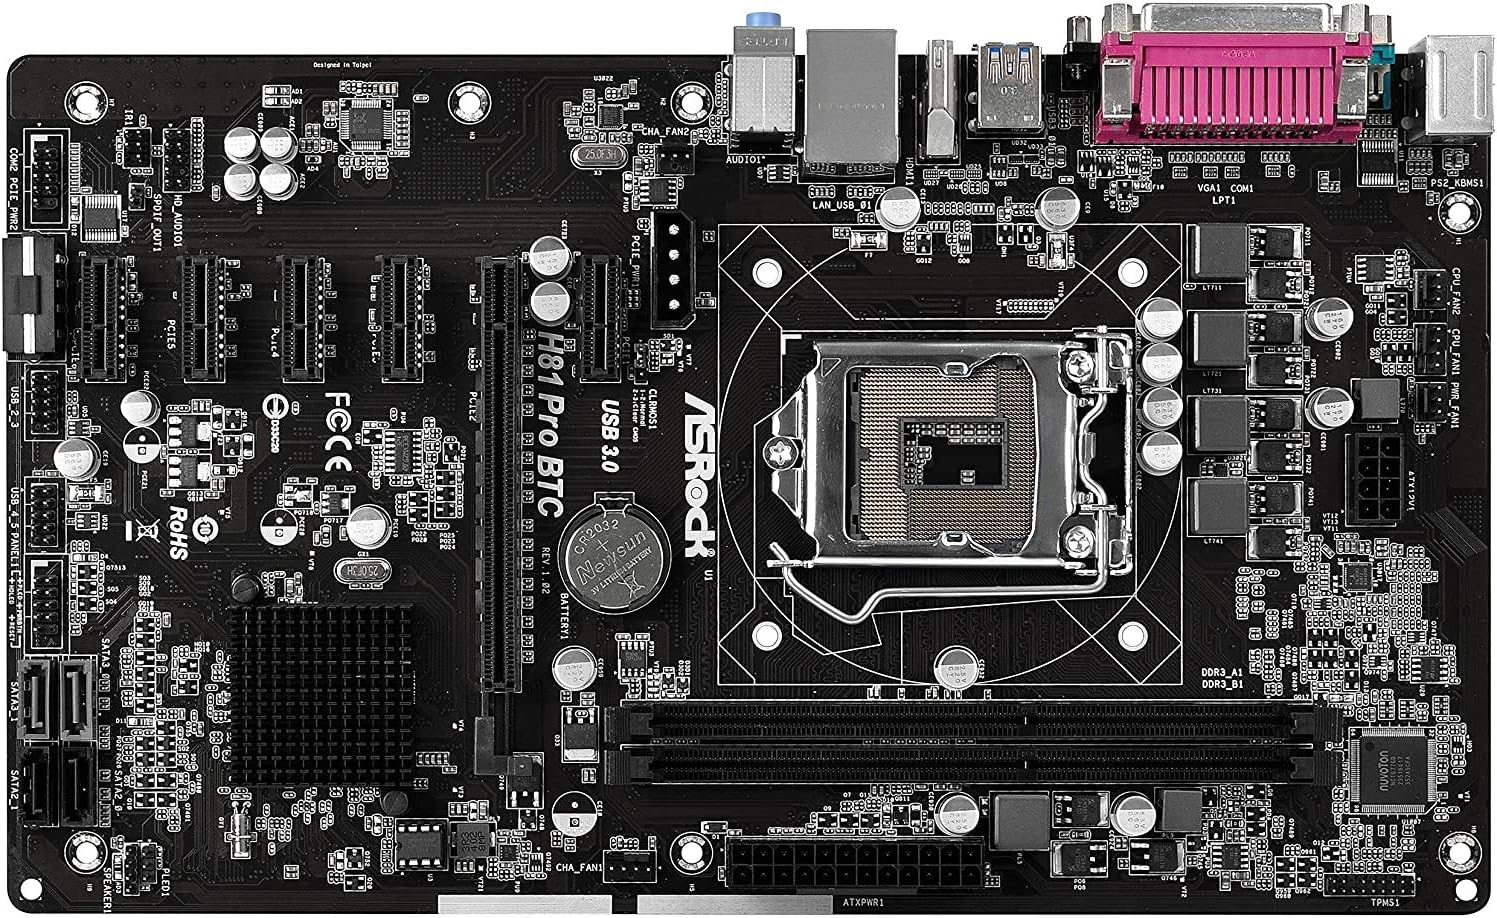
Mynd 1: Ofan frá og niður view of the ASRock H81 PRO BTC Motherboard. This image displays the LGA 1150 CPU socket at the center, flanked by two DDR3 DIMM slots on the right and multiple PCI Express slots below.
3.2. Uppsetning minnis
This motherboard supports DDR3 DIMM modules. Ensure the memory modules are compatible with the motherboard's specifications (DDR3-1600/1333/1066).
- Opnaðu klemmurnar á báðum endum DIMM-raufarinnar.
- Stilltu hakinu á DDR3 minniseiningunni saman við lykilinn í DIMM raufinni.
- Settu minniseininguna vel inn í raufina þar til klemmurnar smellpassa. Gakktu úr skugga um að báðar klemmurnar séu alveg lokaðar.
3.3. Motherboard Installation into Chassis
Install the motherboard into a compatible ATX chassis.
- Install the I/O shield into the rear opening of your chassis.
- Align the motherboard with the standoffs in the chassis.
- Festið móðurborðið með skrúfum og gætið þess að það sitji vel á sínum stað.
3.4. Tenging jaðartækja og aflgjafa
Connect all necessary components and power cables to the motherboard.
- Rafmagnstengi: Connect the 24-pin ATX power connector and the 8-pin EPS power connector from your power supply to the motherboard. For multi-GPU configurations, connect the two additional Molex power connectors for PCIe stability.
- SATA tæki: Connect your storage drives (HDDs/SSDs) to the SATA3 (6Gb/s) or SATA2 (3Gb/s) ports.
- Tengi að framan: Connect the chassis's front panel cables (power button, reset button, USB ports, audio jacks, LED indicators) to the corresponding headers on the motherboard. Refer to the motherboard diagram for exact locations.
- USB tæki: Connect USB 2.0 and USB 3.0 devices to the rear I/O ports or internal headers.
- PCI Express Cards: Install graphics cards or other expansion cards into the PCI Express 2.0 x16 slot or the five PCI Express 2.0 x1 slots.
- Skjár úttak: Connect your monitor to the VGA or HDMI port on the rear I/O panel if using integrated graphics, or to your dedicated graphics card.

Mynd 2: Hornlaga view of the ASRock H81 PRO BTC Motherboard. This image highlights the various internal connectors such as SATA ports, USB headers, and the arrangement of PCI Express slots.

Figure 3: Side-angled view of the ASRock H81 PRO BTC Motherboard. This perspective shows the main 24-pin ATX power connector, the 8-pin EPS power connector, and the two Molex power connectors designed to provide stable power to multiple PCI Express devices.

Figure 4: Close-up of the ASRock H81 PRO BTC Motherboard's rear I/O panel. This detailed view displays the PS/2 keyboard and mouse ports, a serial port, VGA and HDMI display outputs, two USB 3.0 ports, four USB 2.0 ports, an RJ45 LAN port, and audio input/output jacks.
4. Notkunarleiðbeiningar
4.1. Fyrsta ræsing og BIOS/UEFI uppsetning
Eftir að þú hefur sett kerfið saman skaltu kveikja á því. Ýttu á Del or F2 key during startup to enter the BIOS/UEFI setup utility. Here you can configure system settings such as boot order, date/time, and advanced hardware parameters.
- Ræsipöntun: Stilltu upp ræsibúnaðinn þinn (t.d. USB-drif fyrir uppsetningu stýrikerfis, SSD/HDD).
- Kerfisupplýsingar: Verify CPU, memory, and storage device detection.
- Ítarlegar stillingar: Adjust settings for integrated peripherals, power management, and CPU features as needed.
- Vista og hætta: Save your changes and exit the BIOS/UEFI to proceed with operating system installation.
4.2. Uppsetning bílstjóra
After installing your operating system, install the necessary drivers from the provided support CD or download the latest versions from the ASRock official website. This includes chipset drivers, LAN drivers, audio drivers, and any other specific device drivers.
5. Tæknilýsing
| Flísasett | Intel H81 |
| CPU fals | LGA 1150 |
| Samhæfðir örgjörvar | Intel Core i3/i5/i7 (4th and 5th Gen) |
| Minni | 2x DDR3 DIMM Slots, Dual Channel, Non-ECC, Buffered, Max 16GB, DDR3-1600/1333/1066 MHz |
| Útvíkkun rifa | 1x PCI-Express 2.0 x16, 5x PCI-Express 2.0 x1 |
| Geymsla | 2x SATA3 (6Gb/s) Ports, 2x SATA2 (3Gb/s) Ports |
| LAN | Realtek RTL8111GR Gigabit Ethernet Controller |
| USB tengi | 2x USB 3.0 (rear), 6x USB 2.0 (2 rear, 4 via headers) |
| I/O tengi að aftan | 1x PS/2 Keyboard, 1x PS/2 Mouse, 1x VGA, 1x HDMI, 1x Serial Port, 1x RJ45 LAN, Audio I/O Jacks |
| Innri tengi | 1x Parallel Port Header, 1x Serial Port Header, 2x SLI/Xfire Molex Power Connectors |
| Form Factor | ATX |
| Mál | 13.2 x 3 x 10 tommur (u.þ.b.) |
| Stuðningur við stýrikerfi | Microsoft Windows 10/8.1/8/7 (32-bit/64-bit) |
6. Bilanagreining
Ef þú lendir í vandræðum skaltu skoða eftirfarandi algengar úrræðaleitarskref:
- Enginn kraftur: Ensure all power cables (24-pin ATX, 8-pin EPS, Molex for PCIe) are securely connected. Check the power supply unit (PSU) and wall outlet.
- Enginn skjár: Verify that the monitor is connected to the correct display output (integrated graphics or dedicated GPU). Reseat the graphics card and memory modules.
- System Fails to POST (Power-On Self-Test): Listen for beep codes (if a speaker is connected) which can indicate specific hardware issues. Reseat CPU, memory, and expansion cards. Clear CMOS by removing the CMOS battery for a few minutes or using the clear CMOS jumper.
- Stýrikerfi ræsist ekki: Check boot order in BIOS/UEFI. Ensure the storage drive with the OS is properly connected and detected.
- Jaðartæki ekki greint: Ensure the device is properly connected to the correct port/slot. Install or update relevant drivers.
For more advanced troubleshooting, consult the ASRock official websíðuna eða hafið samband við tæknilega aðstoð þeirra.
7. Viðhald
Reglulegt viðhald hjálpar til við að tryggja endingu og hámarksafköst móðurborðsins.
- Rykhreinsun: Hreinsið reglulega ryk af móðurborðinu og íhlutum þess með þrýstilofti. Gangið úr skugga um að kerfið sé slökkt og aftengt áður en það er hreinsað.
- BIOS/UEFI uppfærslur: Athugaðu ASRock webvefsíða fyrir BIOS/UEFI uppfærslur. Uppfærslur geta bætt eindrægni, stöðugleika og afköst. Fylgdu leiðbeiningum um uppfærslur vandlega.
- Bílstjóri uppfærslur: Keep your system drivers updated to ensure compatibility and optimal performance with your operating system and peripherals.
8. Ábyrgð og stuðningur
This ASRock H81 PRO BTC Motherboard is covered by the manufacturer's warranty. For specific warranty terms and conditions, please refer to the warranty card included in your package or visit the official ASRock websíða.
For technical assistance, driver downloads, or further support, please visit the ASRock official support page: