1. Inngangur
This manual provides essential information for the proper installation, configuration, and operation of your GIGABYTE B550 AORUS ELITE AX motherboard. This motherboard is designed to support 3rd Gen AMD Ryzen Processors and offers advanced features for high-performance computing.

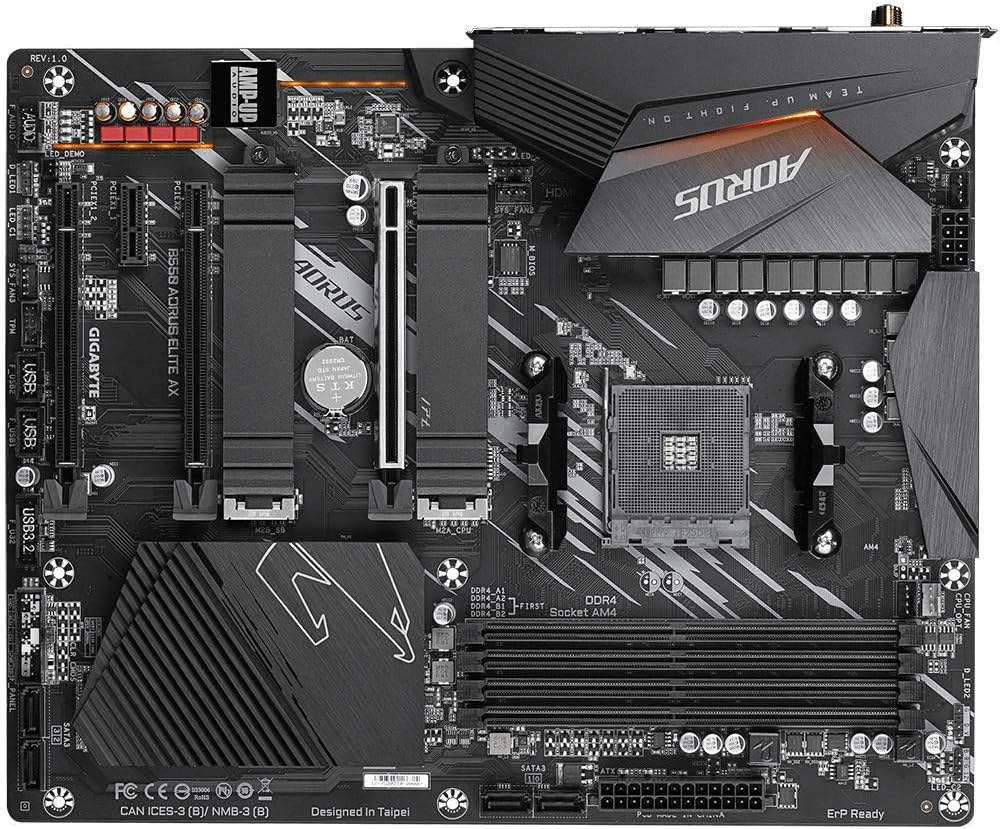
Mynd 1.1: Lokiðview of the GIGABYTE B550 AORUS ELITE AX Motherboard. This image displays the full motherboard with its various components, including the CPU socket, RAM slots, PCIe slots, and heatsinks.
Key features include a True 12+2 Phases Digital VRM Solution, advanced thermal design with enlarged surface heatsinks, an Ultra Durable PCIe 4.0 x16 Slot, dual ultra-fast NVMe PCIe 4.0/3.0 x4 M.2 slots with dual thermal guards, and integrated Intel WiFi 6 802.11ax with Bluetooth 5.
2. Uppsetning og uppsetning
Áður en uppsetning hefst skaltu ganga úr skugga um að kerfið sé slökkt og aftengt úr innstungunni. Haltu alltaf á brúnunum á móðurborðinu til að forðast stöðurafmagn.
2.1. Auðkenning íhluta
Mynd 2.1: Ofan frá og niður view of the GIGABYTE B550 AORUS ELITE AX Motherboard. This image highlights the layout of the CPU socket, four DDR4 DIMM slots, multiple PCIe slots, and two M.2 slots with their thermal guards.
2.2. Uppsetning örgjörva
- Locate the AM4 CPU socket. Lift the load lever to open the socket.
- Carefully align the triangular mark on the CPU with the mark on the socket. Gently place the CPU into the socket without forcing it.
- Lower the load lever back into place to secure the CPU.
2.3. Uppsetning vinnsluminnis
This motherboard supports Dual Channel ECC/Non-ECC Unbuffered DDR4 memory across 4 DIMM slots.
- Opnaðu klemmurnar á báðum endum DIMM-raufarinnar.
- Align the notch on the DDR4 memory module with the key on the DIMM slot.
- Ýttu fast niður á báða enda minniseiningarinnar þar til klemmurnar smellpassa.
2.4. Uppsetning M.2 SSD disks
The motherboard features dual ultra-fast NVMe PCIe 4.0/3.0 x4 M.2 slots with dual thermal guards.
- Unscrew and remove the M.2 thermal guard from the desired slot.
- Settu M.2 SSD diskinn í raufina á ská.
- Ýttu SSD disknum varlega niður og festu hann með meðfylgjandi skrúfu.
- Festið M.2 hitahlífina aftur til að tryggja bestu mögulegu kælingu.
2.5. Uppsetning PCIe-korts
Install graphics cards or other expansion cards into the PCIe slots. The top slot is an Ultra Durable PCIe 4.0 x16 slot.
- Align the PCIe card with the chosen slot.
- Ýttu fast niður þar til kortið situr alveg á sínum stað og festingarklemman smellpassar.
2.6. Rafmagnstengingar
Tengdu 24 pinna ATX aðalrafmagnstengið og 8 pinna örgjörvans aflgjafann við móðurborðið.
2.7. Tengi á framhlið
Connect the power button, reset button, HDD LED, and USB/audio headers from your PC case to the corresponding pins on the motherboard. Refer to the motherboard diagram for exact pin locations.
2.8. Aftari inntaks-/úttaksspjald

Image 2.2: Rear I/O Panel of the GIGABYTE B550 AORUS ELITE AX Motherboard. This image shows the various ports available, including USB 3.2 Gen 1, USB 3.2 Gen 2, DisplayPort, HDMI, 2.5GbE LAN, Wi-Fi antenna connectors, and audio jacks. The pre-installed I/O shield is visible.
The motherboard features a pre-installed I/O shield for easy and quick installation. Connect your peripherals such as monitor, keyboard, mouse, and network cable to the appropriate ports on the rear I/O panel.
3. Notkunarleiðbeiningar
3.1. Fyrsta ræsing
After assembling all components and connecting power, press the power button on your PC case. The system should power on and display the GIGABYTE splash screen.
3.2. Aðgangur að BIOS/UEFI
Til að fara inn í BIOS/UEFI uppsetningarforritið skaltu ýta á DEL key repeatedly during the initial boot process when the GIGABYTE logo appears. The BIOS allows you to configure system settings, boot order, and enable features like XMP for memory profiles.
3.3. Uppsetning bílstjóra
After installing your operating system, install the necessary drivers for the motherboard's components. These include chipset drivers, LAN drivers, Wi-Fi/Bluetooth drivers, and audio drivers. Drivers can typically be found on the GIGABYTE official websíðu fyrir þína tilteknu móðurborðsgerð.
4. Viðhald
4.1. Þrif á kerfinu
Hreinsið reglulega innra byrði tölvunnar til að koma í veg fyrir rykuppsöfnun, sem getur leitt til ofhitnunar og minnkaðrar afköstar. Notið þrýstiloft til að fjarlægja ryk af viftum, kælikerfi og öðrum íhlutum. Gakktu úr skugga um að kerfið sé slökkt og aftengt áður en það er hreinsað.
4.2. BIOS uppfærslur
GIGABYTE provides BIOS updates to improve system stability, add support for new hardware, and fix bugs. The B550 AORUS ELITE AX supports Q-Flash Plus, allowing you to update the BIOS without installing the CPU, memory, or graphics card. Refer to the GIGABYTE website for detailed instructions on using Q-Flash Plus and for the latest BIOS versions.
5. Bilanagreining
Þessi hluti fjallar um algeng vandamál sem þú gætir rekist á.
5.1. Engin rafmagn / Engin ræsing
- Gakktu úr skugga um að allir rafmagnssnúrur (24 pinna ATX, 8 pinna örgjörvi) séu vel tengdir við móðurborðið og aflgjafann.
- Gakktu úr skugga um að rofinn á aflgjafanum sé í 'ON' stöðu.
- Gakktu úr skugga um að tengið á rofanum á framhliðinni sé rétt tengt við móðurborðið.
- Prófaðu með annarri aflgjafa ef mögulegt er.
5.2. Engin skjáúttak
- Ensure your monitor is connected to the graphics card (if installed) or the motherboard's HDMI/DisplayPort (if using an APU with integrated graphics).
- Settu skjákortið og minniseiningarnar aftur í.
- Prófaðu að ræsa með aðeins einum vinnsluminni ísettum.
5.3. Bluetooth / Wi-Fi Connectivity Issues
- Ensure the external Wi-Fi antenna is securely connected to the rear I/O panel.
- Update your Wi-Fi and Bluetooth drivers to the latest version from the GIGABYTE websíða.
- If Bluetooth devices disconnect after sleep mode, try disabling USB selective suspend settings in Windows Power Options or updating the BIOS to the latest version, as this has resolved similar issues in some cases.
5.4. Endurstilling BIOS
If you encounter issues after changing BIOS settings, you may need to reset the BIOS to default settings. This motherboard does not feature a dedicated BIOS reset button. To clear CMOS (BIOS settings), power off your system, unplug it, and remove the small circular battery (CMOS battery) from the motherboard for a few minutes. Reinsert the battery and power on the system.
6. Tæknilýsing
Below are the key technical specifications for the GIGABYTE B550 AORUS ELITE AX Motherboard:
| Eiginleiki | Forskrift |
|---|---|
| Vörumerki | GIGABYTE |
| Nafn líkans | B550 AORUS ELITE ÖX |
| CPU fals | Innstunga AM4 |
| Samhæfðir örgjörvar | AMD 3. kynslóð Ryzen |
| Tegund flísasetts | AMD B550 |
| RAM minni tækni | DDR4 |
| Minnishraði | 2133 MHz (Base), up to 4733MHz (OC) |
| Geymslugeta minni | 128 GB (hámark) |
| Þráðlaus gerð | 802.11ax (Intel WiFi 6) |
| LAN | 2.5 Gigabit Ethernet |
| PCIe Slots | 1x PCIe 4.0 x16, 2x PCIe 3.0 x16 (x4 stilling), 1x PCIe 3.0 x1 |
| M.2 rifa | 2x NVMe PCIe 4.0/3.0 x4 with Thermal Guards |
| USB 2.0 tengi | 2 (aftan) |
| USB 3.2 Gen 1 tengi | 4 (aftan) |
| USB 3.2 Gen 2 tengi | 2 (Rear, Type-A) |
| Myndbandsúttak | HDMI, DisplayPort |
| Hljóð | Realtek ALC1200 merkjamál, AMP-UP hljóð |
| Form Factor | ATX |
| Þyngd hlutar | 4.07 pund |
| Vörumál | 13.18 x 10.62 x 3.14 tommur |
7. Upplýsingar um ábyrgð
GIGABYTE products are covered by a limited warranty. The specific terms and duration of the warranty may vary by region and product type. Please retain your proof of purchase for warranty claims. For detailed warranty information, including coverage, limitations, and the claims process, please visit the official GIGABYTE websíðuna eða hafið samband við næsta söluaðila.
8. Tæknileg aðstoð
If you encounter issues that cannot be resolved using this manual or require further assistance, please contact GIGABYTE technical support. You can find support resources, FAQs, driver downloads, and contact information on the official GIGABYTE websíða:
When contacting support, please have your motherboard model (B550 AORUS ELITE AX) and a detailed description of your issue ready.


