1. Inngangur
The Sygonix SY-4504968 Digital Timer is designed for automated control of electrical devices, such as lighting, in homes or offices. This versatile timer offers 15 programmable configurations, including weekly settings, allowing for up to 20 switching times per day, totaling 140 switching points per week. It features automatic summer and winter time adjustment, a countdown function, and a random mode. The timer supports both flush and surface mounting.
Please read this manual thoroughly before installation and operation to ensure correct usage and to prevent damage.

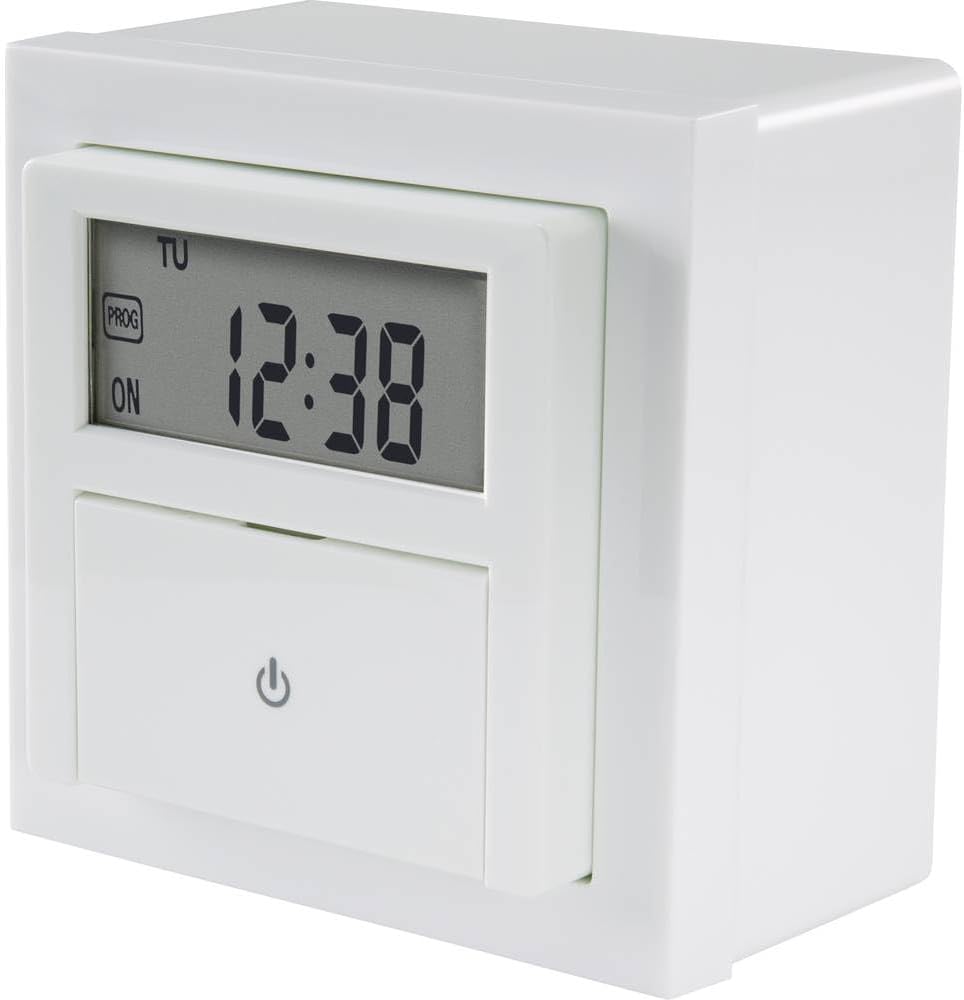
Mynd 1: Framan view of the Sygonix SY-4504968 Digital Built-in Timer, showing the digital display and the main power button.
2. Öryggisleiðbeiningar
- Uppsetning verður að vera framkvæmd af löggiltum rafvirkja í samræmi við gildandi rafmagnsreglugerðir og reglugerðir á hverjum stað.
- Ensure the power supply is disconnected before installation, maintenance, or any wiring work.
- The device requires a neutral wire for operation. Verify its presence in your electrical box.
- Ekki fara yfir hámarksálagsgetu sem er 1800 W.
- Ekki láta tækið verða fyrir raka, miklum hita eða beinu sólarljósi.
- Ekki reyna að taka tækið í sundur eða breyta því. Látið hæft starfsfólk sjá um alla þjónustu.
3. Innihald pakka
Gakktu úr skugga um að allir hlutir séu til staðar í pakkanum:
- Sygonix SY-4504968 Digital Built-in Timer
- Surface mount frame
- Festingarskrúfur og veggtappar
- Leiðbeiningarhandbók
4. Vöru lokiðview
The timer features a digital display and control buttons located behind a protective cover.

Mynd 2: Nærmynd view of the timer's digital display, showing time, day (TU for Tuesday), and 'PROG' and 'ON' indicators.

Mynd 3: The timer with its protective cover open, revealing the control buttons for programming and settings.
4.1. Sýna Vísar
- Tímaskjár: Shows current time in HH:MM format.
- Day Indicator: Displays the current day of the week (e.g., MO, TU, WE).
- PROG: Indicates that a program is active or being set.
- ON/OFF: Indicates the current switching state of the connected device.
4.2. Control Buttons (behind cover)
- Clock/Set Button: Notað til að stilla núverandi tíma og dag.
- PROG hnappur: Fer í stillingarham forritsins.
- RND (Random) Button: Activates/deactivates random switching mode.
- CD (Countdown) Button: Activates/deactivates countdown function.
- +/- Hnappar: Used to adjust values (time, program settings).
- R (Endurstillingarhnappur): Endurstillir tímastillinn á verksmiðjustillingar.
5. Uppsetning
The timer can be installed either flush-mounted into a wall box or surface-mounted using the provided frame.
5.1. Raflið
Mikilvægt: Ensure the main power supply is switched off before proceeding with any wiring. This device requires a neutral wire connection.
Connect the Live (L), Neutral (N), and Switched Live (L') wires according to the diagram provided with the product. The neutral wire is essential for the timer's internal clock and display to function.
5.2. Flush Mounting
- Prepare a standard wall box (minimum depth of 50mm recommended for easier wiring).
- Connect the electrical wires to the terminals on the back of the timer as per the wiring diagram.
- Carefully push the timer into the wall box, ensuring wires are not pinched.
- Festu tímamælirinn við veggkassann með því að nota meðfylgjandi skrúfur.
- Attach the front cover plate.

Mynd 4: The digital timer flush-mounted into a wall, blending with the room's decor.
5.3. Surface Mounting
- Attach the surface mount frame to the wall using the provided screws and wall plugs.
- Connect the electrical wires to the terminals on the back of the timer.
- Insert the timer into the surface mount frame, ensuring a secure fit.
- Attach the front cover plate.
Mynd 5: Hlið view of the timer, illustrating its depth for installation considerations.
6. Uppsetning
6.1. Initial Power-On and Reset
After installation and restoring power, the display will light up. If the display is erratic or shows incorrect values, press the R (Endurstilla) button with a pointed object (e.g., a pen tip) to clear all settings and restore factory defaults.
6.2. Stilling á núverandi tíma og degi
- Open the protective cover to access the control buttons.
- Ýttu á og haltu inni Clock/Set hnappinn í um það bil 3 sekúndur þar til tímaskjárinn blikkar.
- Notaðu +/- hnappar til að stilla klukkustundina. Ýttu á Clock/Set aftur til að staðfesta og fara yfir í mínútur.
- Notaðu +/- hnappana til að stilla mínúturnar. Ýttu á Clock/Set again to confirm and move to day.
- Notaðu +/- buttons to select the current day of the week (MO, TU, WE, TH, FR, SA, SU).
- Ýttu á Clock/Set one last time to save the settings and exit the time setting mode.
6.3. Automatic Summer/Winter Time Adjustment
The timer is equipped with an automatic summer/winter time adjustment feature. This function typically activates automatically based on pre-programmed dates. No manual intervention is usually required for this feature.
7. Rekstur
7.1. Forritun vikulegra tímaáætlana
The timer allows for up to 15 different program configurations, with 20 switching times per day, totaling 140 switching points per week.
- Ýttu á PROG button to enter program setting mode. The display will show '1 ON' (for program 1, switch-on time).
- Notaðu +/- buttons to set the desired switch-on hour. Press PROG til að staðfesta og fara yfir í fundargerð.
- Notaðu +/- buttons to set the desired switch-on minutes. Press PROG to confirm and move to day selection.
- Notaðu +/- buttons to select the day(s) for this program. You can choose individual days, blocks of days (e.g., MO-FR), or all days. Press PROG að staðfesta.
- The display will now show '1 OFF' (for program 1, switch-off time). Repeat steps 2-4 to set the switch-off time and day(s) for this program.
- After setting the 'OFF' time, press PROG again to move to the next program ('2 ON') or to exit program setting mode if no more programs are needed.
- To exit program mode at any time, press the Clock/Set hnappinn.
7.2. Niðurtalning
The countdown function allows you to set a specific duration after which the connected device will switch ON or OFF.
- Ýttu á CD (Countdown) button. The display will show 'CD' and a default countdown time.
- Notaðu +/- buttons to adjust the desired countdown duration (hours and minutes).
- Ýttu á CD again to start the countdown. The device will switch its state (ON to OFF, or OFF to ON) once the countdown finishes.
- Til að hætta við niðurtalningu, ýttu á CD button again during the countdown.
7.3. Random Mode
The random mode switches the connected device ON and OFF at irregular intervals, simulating presence for security purposes.
- Ýttu á RND (Random) button. The display will show 'RND'.
- The timer will now activate and deactivate the connected device at random times within a predefined period (e.g., 30 minutes to 2 hours).
- To deactivate random mode, press the RND button again. The 'RND' indicator will disappear.
8. Viðhald
- Þrífið tækið með mjúkum, þurrum klút. Notið ekki slípiefni eða leysiefni.
- The internal battery (if present for memory backup) is typically long-lasting and not user-replaceable. If the timer loses settings during power outages, the battery may need professional replacement.
9. Bilanagreining
| Vandamál | Möguleg orsök | Lausn |
|---|---|---|
| Tímamælirinn er auður. | Engin straumgjafi; innri rafhlaðan tæmd. | Check power connection. If power is present, the internal battery may need replacement (professional service recommended). |
| Timer does not switch connected device. | Incorrect wiring; program not activated; device faulty. | Verify wiring (especially neutral connection). Ensure programs are correctly set and activated. Test the connected device independently. |
| Stillingar glatast eftir að rafmagnið er slökkttage. | Internal backup battery depleted. | The internal battery needs replacement. Contact customer support or a qualified technician. |
| Cannot set time/program. | Incorrect button sequence; device frozen. | Refer to the 'Setup' and 'Operating' sections. Press the R (Endurstilla) button to clear and try again. |
10. Tæknilýsing
- Gerð: SY-4504968
- Framleiðandi: Sygonix
- Voltage: 230 volt
- Hámark Hlaða: 1800 W
- Vörumál (L x B x H): 12 x 9 x 8 cm
- Þyngd: 230 grömm
- Skjár Tegund: Stafræn
- Fjöldi forrita: 15
- Switching Points: Up to 140 per week (20 per day)
- Rafhlöður nauðsynlegar: Yes (for internal clock/memory backup, typically not user-replaceable)
11. Ábyrgð og stuðningur
Sygonix products are manufactured to high-quality standards. For warranty information, please refer to the warranty card included with your purchase or visit the official Sygonix website. For technical support, troubleshooting assistance, or spare parts, please contact your retailer or the Sygonix customer service department.