1. Inngangur
This manual provides detailed instructions for the installation, operation, and maintenance of the SINOTIMER TM919A-2 LCD Digital Programmable Timer Switch. This device is designed for automatic control of electrical appliances based on programmed time schedules, offering daily and weekly programming options.
2. Vörueiginleikar
- Weekly 7-day programmable digital time switch.
- Margfalt binditage options (5V, 12V, 24V, 110V, 220V, 85-265V). This specific model is 220V.
- Detachable battery design for backup power.
- 35mm DIN rail mounting for easy installation.
- LCD display for clear time and program viewing.
- 16 ON/OFF programs per day or week.
- Manual override function.
- High capacity 16A switching contact.
3. Öryggisupplýsingar
WARNING: Risk of electric shock. Installation should only be performed by a qualified electrician or competent person.
- Gakktu úr skugga um að rafmagn sé aftengt fyrir uppsetningu eða viðhald.
- Ekki fara yfir hámarksálagsgetu 16A.
- Staðfestu rétta binditage supply for the specific model (220V for TM919A-2).
- Haldið tækinu frá raka og miklum hita.
4. Vöru lokiðview og íhlutir
The SINOTIMER TM919A-2 features an LCD display, control buttons, and wiring terminals for power input and load control.

Mynd 4.1: Framan view of the SINOTIMER TM919A-2 Digital Timer Switch, showing the LCD display, control buttons (P, D+, H+, M+, RESET, MANUAL), and wiring terminals.

Mynd 4.2: The timer switch with its transparent protective cover opened, revealing the control buttons for programming and manual operation.
Stjórnhnappar:
- P (Forrit): Fer í stillingarham forritsins.
- D+ (Dagur): Adjusts day of the week or program day.
- H+ (Klukkustund): Adjusts hour or program hour.
- M+ (mínúta): Adjusts minute or program minute.
- Endurstilla: Núllstillir allar stillingar í sjálfgefnar verksmiðjur.
- HANDBOK: Toggles output ON/AUTO/OFF.
5. Uppsetning og uppsetning
5.1 Raflagnamynd
Refer to the wiring diagram on the side of the device and the illustration below for correct connection. Ensure all connections are secure.

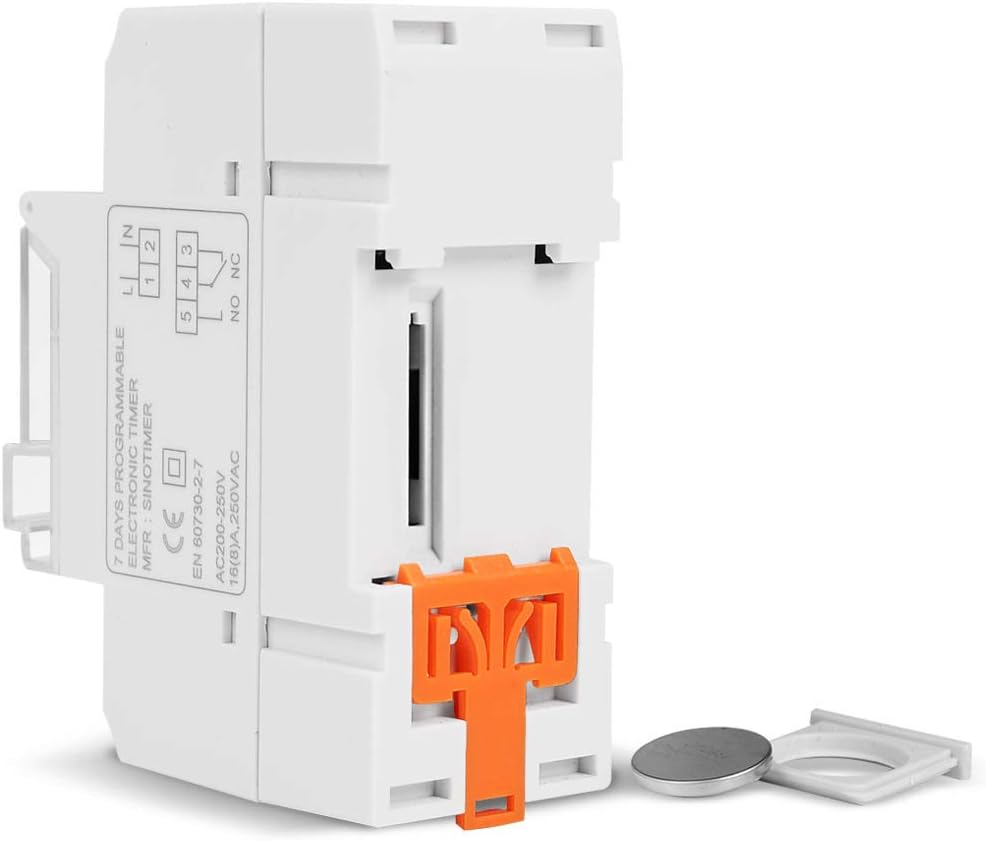
Mynd 5.1: Hlið view of the timer switch displaying the wiring diagram. Terminals 1 and 2 are for power input (L and N). Terminals 3, 4, and 5 are for the relay output (Common, Normally Open, Normally Closed).
- Terminals 1 & 2 (L, N): Connect to the main power supply (220V AC for this model).
- Terminal 3 (NO - Normally Open): Connects to the load when the timer is ON.
- Terminal 4 (COM - Common): Connects to one side of the load and the power supply.
- Terminal 5 (NC - Normally Closed): Connects to the load when the timer is OFF (less common for typical applications).
5.2 Initial Power-up and Reset
Upon first power-up or after a long period without power, the LCD display may be blank. The internal battery provides backup for settings. If the display is unresponsive or shows garbled characters, press the ENDURSTILLA button using a pointed object (e.g., a pen tip). This will clear all settings and restore the timer to its default state.
5.3 Stilling á núverandi tíma og degi
- Ýttu á P button once. The display will show the current time setting.
- Ýttu á D+ til að stilla núverandi vikudag.
- Ýttu á H+ til að stilla núverandi klukkustund.
- Ýttu á M+ til að stilla núverandi mínútu.
- Ýttu á P button again to exit time setting mode and return to normal operation.
6. Notkunarleiðbeiningar
6.1 Forritun á kveikju-/slökkvunarlotum
Tímastillirinn styður allt að 16 KVEIKJA/SLÖKKA forrit. Hvert forrit samanstendur af KVEIKJA tíma og SLÖKKA tíma.
- Ýttu á P button repeatedly until "1 ON" appears on the display. This is the first ON program.
- Ýttu á D+ til að velja dag(a) fyrir þetta forrit. Valkostirnir eru meðal annars einstakir dagar, virkir dagar, helgar eða allir 7 dagarnir.
- Ýttu á H+ to set the desired hour for the "ON" event.
- Ýttu á M+ to set the desired minute for the "ON" event.
- Ýttu á P again. "1 OFF" will appear. This is the first OFF program.
- Repeat steps 2-4 to set the day(s), hour, and minute for the "OFF" event.
- Haltu áfram að ýta á P to cycle through "2 ON", "2 OFF", up to "16 ON", "16 OFF". If you do not need all 16 programs, simply press P until the display returns to the current time.
- To save and exit programming mode, press the P button until the current time is displayed.
6.2 Handvirk hnekking
The HANDBÓK button allows you to override the programmed settings temporarily or permanently.
- Ýttu á HANDBÓK once: Toggles between ON/AUTO/OFF modes.
- Kveikt: The output is continuously ON, ignoring programs.
- SLÖKKT: The output is continuously OFF, ignoring programs.
- SJÁLFvirkt: Tímastillirinn virkar samkvæmt forrituðum KVEIKINGU/SLÖKKUN hringrásum. Þetta er staðlaður rekstrarhamur.
7. Viðhald
7.1 Skipt um rafhlöðu
The timer includes a detachable CR2032 lithium battery to maintain time and program settings during power outages. If the display becomes dim or resets frequently, the battery may need replacement.

Mynd 7.1: The timer switch shown with its battery compartment open and a CR2032 lithium battery, indicating the detachable battery design.
- Disconnect power to the timer before attempting battery replacement.
- Locate the battery compartment, typically on the side or back of the unit.
- Fjarlægðu gömlu CR2032 rafhlöðuna varlega.
- Settu nýja CR2032 rafhlöðu í og gætið þess að hún snúi rétt (plúsinn upp).
- Lokaðu rafhlöðuhólfinu.
- Reconnect power and reset the current time and day if necessary.
8. Bilanagreining
- Skjárinn er auður:
- Check power supply connections (Terminals 1 & 2).
- Ensure the internal battery is charged or replaced if old.
- Ýttu á ENDURSTILLA hnappinn.
- Forrit eru ekki í gangi:
- Gakktu úr skugga um að tímastillirinn sé í gangi AUTO mode (check the display for "AUTO"). Press HANDBÓK að hjóla stillingar.
- Gakktu úr skugga um að núverandi tími og dagur séu rétt stilltir.
- Check that the ON/OFF programs are correctly entered and enabled for the desired days.
- Confirm wiring to the load (Terminals 3, 4, 5) is correct.
- Timer resets unexpectedly:
- The internal battery may be low or depleted. Replace the CR2032 battery.
- Ensure stable power supply to the unit.
9. Tæknilýsing
| Eiginleiki | Forskrift |
|---|---|
| Fyrirmynd | TM919A-2 |
| Aflgjafi | 220V AC (as per model) |
| Orkunotkun | 4.5 VA (MAX) |
| Hitastig | -20°C til +50°C |
| Skjár | LCD |
| Switching Contact | 1 skiptirofi |
| Forrit | 16 ON/OFF per day or week |
| Hysteresis | 2 sec/day (at 25°C) |
| Getu | 16A |
| Tímamælirsvið | 1 mínúta til 168 klst |
| Lágmarksbil | 1 mínútu |
| Svartaút minni | 60 days (with internal battery) |
| Þyngd hlutar | 0.15 kg (5.3 únsur) |
| Uppsetning | 35mm DIN tein |
| Skjástærð | 1.2 tommur |
Mynd 9.1: Dimensional drawing of the SINOTIMER TM919A-2, showing measurements in centimeters for height, width, and depth.
10. Ábyrgð og stuðningur
Specific warranty information for the SINOTIMER TM919A-2 is not provided in the product details. For warranty claims or technical support, please contact your retailer or the manufacturer directly. Keep your purchase receipt as proof of purchase.


