1. Inngangur
This manual provides detailed instructions for the safe and efficient operation of your InFocus P120 INL412 Multimedia Projector (Model INL4128). Please read this manual thoroughly before using the projector and keep it for future reference. This projector is designed for high-quality image projection, suitable for various applications including presentations, home entertainment, and gaming.
2. Öryggisupplýsingar
Fylgið eftirfarandi öryggisráðstöfunum til að koma í veg fyrir skemmdir á skjávarpanum og tryggja öryggi notanda:
- Loftræsting: Ensure adequate ventilation around the projector. Do not block ventilation openings. Maintain a minimum distance of 30 cm (12 inches) from walls or other objects.
- Aflgjafi: Notið aðeins tilgreindan aflgjafa og hljóðstyrktage. Connect the power cord securely.
- Hiti: The projector generates heat during operation. Do not touch the projector's vents or exhaust areas directly after use.
- Ljósafleiðsla: Ekki horfa beint í linsuna á skjávarpanum þegar ...amp er kveikt, þar sem sterkt ljós getur valdið augnskaða.
- Staðsetning: Setjið skjávarpann á stöðugt og slétt yfirborð. Forðist að setja hann í beinu sólarljósi, nálægt hitagjöfum eða á svæðum með mikilli raka eða ryki.
- Þrif: Aftengdu rafmagnssnúruna áður en þú þrífur. Notið mjúkan, þurran klút. Notið ekki fljótandi hreinsiefni eða úðabrúsa.
- Þjónusta: Reynið ekki að gera við skjávarpann sjálfur. Látið hæft þjónustufólk sjá um alla þjónustu.
3. Vöru lokiðview
3.1 Top Panel and Lens Area
The top panel features the control buttons for basic operation and the lens area with focus and zoom adjustments.

Mynd 3.1: Efst view of the InFocus P120 INL412 projector, highlighting the control panel on the right and the lens adjustment area on the left. The InFocus logo is visible on the top surface.
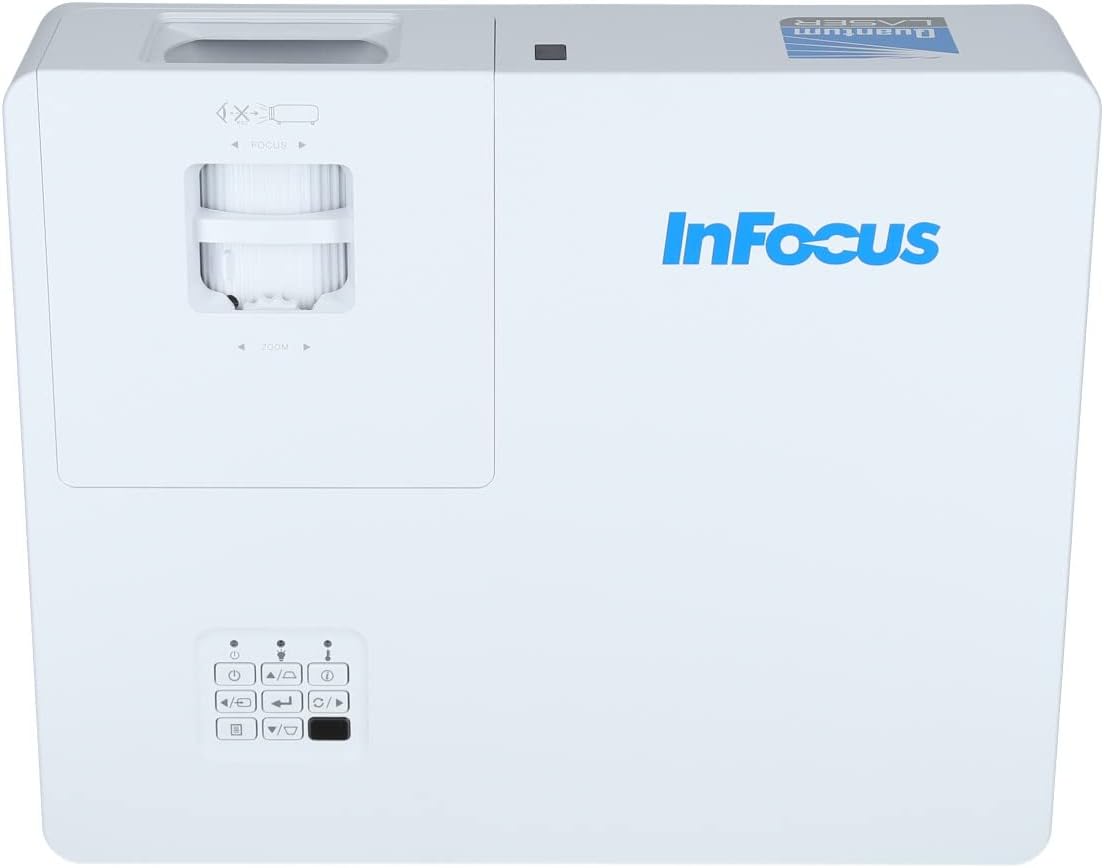
Mynd 3.2: Lokari view of the projector's top panel, showing the focus and zoom rings near the lens opening and the array of control buttons for power, menu, source selection, and navigation.
3.2 Tengingar að aftan
The rear panel provides various input and output ports for connecting external devices.

Figure 3.3: Rear panel of the InFocus P120 INL412 projector, displaying a comprehensive array of connectivity options including HDMI (x2), USB, S-Video, Ethernet (LAN), VGA In (x2), VGA Out, RS232, and Audio In/Out ports. The power input is located on the bottom left.
Helstu höfnir eru meðal annars:
- HDMI 1 og 2: For connecting high-definition digital video and audio sources.
- USB: For connecting USB devices, potentially for media playback or firmware updates.
- S-myndband: For connecting older video sources.
- VGA IN 1 & 2: For connecting computers or other devices with VGA output.
- VGA ÚTGANGUR: For connecting to an external monitor.
- Ethernet (LAN): Fyrir nettengingu og stjórnun.
- Audio IN 1 & 2 / Audio OUT: Fyrir hliðrænar hljóðtengingar.
- RS232: Fyrir raðstýringu.
- Rafmagnsinntak: Til að tengja rafmagnssnúruna.
3.3 Front and Side Panels
The front panel houses the projection lens and front ventilation, while the side panels feature additional ventilation grilles.

Mynd 3.4: Framan view of the InFocus P120 INL412 projector, displaying the main projection lens on the right and the extensive front ventilation grille on the left, crucial for heat dissipation.

Mynd 3.5: Hlið view of the InFocus P120 INL412 projector, illustrating the side ventilation grilles that contribute to maintaining optimal operating temperature.
4. Uppsetning
4.1 Staðsetning skjávarpa
Position the projector on a stable, flat surface or mount it securely. Ensure the projector is within the optimal projection distance for your screen size. Maintain clear space around the projector for proper ventilation.
4.2 Tæki tengd
Before connecting any cables, ensure the projector and all source devices are powered off.
- HDMI tenging: Connect an HDMI cable from your source device (e.g., laptop, Blu-ray player, gaming console) to either the HDMI 1 or HDMI 2 port on the projector.
- VGA tenging: Connect a VGA cable from your computer to either VGA IN 1 or VGA IN 2. For audio, connect a separate audio cable from your computer's audio output to the corresponding Audio IN port on the projector.
- USB tenging: Insert a USB drive into the USB port for media playback (if supported by firmware) or service functions.
- Ethernet (LAN) tenging: Connect an Ethernet cable to the LAN port for network control or updates.
- Hljóðúttak: If using external speakers, connect an audio cable from the Audio OUT port on the projector to your audio system.
4.3 Rafmagnstenging
Connect the power cord to the projector's power input and then plug the other end into a grounded electrical outlet.
5. Notkunarleiðbeiningar
5.1 Kveikt/slökkt
- Kveikt á: Ýttu á Kraftur button on the projector's control panel or the remote control. The power indicator light will change.
- Slökkva á: Ýttu á Kraftur button again. A confirmation message may appear. Press the button a second time to confirm shutdown. Allow the projector to cool down before unplugging it.
5.2 Að stilla fókus og aðdrátt
Rotate the focus ring around the lens until the image appears sharp and clear. Use the zoom ring to adjust the image size to fit your screen.
5.3 Val á inntaksgjafa
Ýttu á Heimild button on the control panel or remote control to cycle through available input sources (HDMI 1, HDMI 2, VGA 1, VGA 2, S-Video, USB). Select the input corresponding to your connected device.
5.4 Valmyndarleiðsögn
Notaðu Matseðill button to access the on-screen display (OSD) menu. Use the arrow buttons to navigate through menu options and the Sláðu inn hnappinn til að velja. Ýttu á Matseðill aftur til að hætta.
6. Viðhald
6.1 Þrif á linsunni
Gently wipe the lens with a soft, lint-free cloth specifically designed for optical surfaces. Do not use abrasive cleaners or excessive force, as this can scratch the lens.
6.2 Cleaning the Projector Exterior
Notið mjúkan, þurran klút til að þrífa skjávarpann.asing. For stubborn dirt, dampen the cloth slightly with water, then wipe dry immediately. Avoid getting liquids into the projector's openings.
6.3 Ventilation Care
Regularly check the projector's ventilation grilles for dust accumulation. Use a soft brush or a vacuum cleaner with a brush attachment to gently remove dust from the vents to ensure proper airflow and prevent overheating.
7. Bilanagreining
7.1 Engin mynd birtist
- Gakktu úr skugga um að skjávarpinn sé kveikt á og að aflgjafaljósið sé stöðugt.
- Verify that the video cable (HDMI, VGA, etc.) is securely connected to both the projector and the source device.
- Gakktu úr skugga um að rétt inntaksgjafi sé valinn á skjávarpanum.
- Confirm that the source device (laptop, player) is powered on and outputting a signal.
7.2 Image is Blurry or Out of Focus
- Stilltu fókushringinn á linsunni á skjávarpanum þar til myndin er skörp.
- Gakktu úr skugga um að skjávarpinn sé í réttri fjarlægð frá skjánum.
- Hreinsið linsuna á skjávarpanum ef hún virðist óhrein.
7.3 Ekkert hljóð
- If using HDMI, ensure the source device's audio output is set to HDMI.
- If using VGA, ensure a separate audio cable is connected from the source to the projector's Audio IN port.
- Athugaðu hljóðstyrksstillingarnar bæði á skjávarpanum og upprunatækinu.
- If using external speakers, ensure they are properly connected to the Audio OUT port and powered on.
8. Tæknilýsing
| Eiginleiki | Smáatriði |
|---|---|
| Vörumerki | InFocus |
| Framleiðandi | Í fókus |
| Nafn líkans | P120 INL412 |
| Gerðarnúmer | INL4128 |
| Ár | 2023 |
| Vélbúnaðarviðmót | Ethernet, HDMI, S-Video, USB |
| Fjöldi hluta | 1 |
| Hlutfall | 16:9 |
| Hvaðtage | 341 vött |
| Rafhlöður fylgja | Nei |
| Rafhlöður nauðsynlegar | Nei |
| Form Factor | Skrifborð |
| Gerð uppsetningar | Borðfesting |
| Fjarstýring fylgir | Já |
| Vörumál | 56.13 x 46.48 x 25.15 cm |
| Þyngd hlutar | 5.5 kg |
| Hámarksmyndastærð | 308.28 tommur |
| Lágmarksmyndastærð | 910.63 millimetrar |
| Fyrsti laus dagsetning | 5. janúar 2022 |
9. Ábyrgð og stuðningur
For warranty information and technical support, please refer to the documentation included with your purchase or visit the official InFocus webGeymið kaupkvittunina vegna ábyrgðarkröfu.