1. Inngangur
Thank you for choosing the GardenJoy 21V Cordless Power Drill Kit. This manual provides essential information for the safe and efficient operation, maintenance, and care of your new tool. Please read these instructions thoroughly before first use and keep them for future reference.

Figure 1: GardenJoy 21V Cordless Power Drill Kit components.
2. Öryggisleiðbeiningar
Fylgið alltaf grunnöryggisráðstöfunum til að draga úr hættu á eldsvoða, raflosti og meiðslum á fólki þegar rafmagnsverkfæri eru notuð.
- Öryggi vinnusvæðis: Haldið vinnusvæðinu hreinu og vel upplýstu. Rúm eða dimm svæði geta leitt til slysa. Notið ekki rafmagnsverkfæri í sprengifimu andrúmslofti, svo sem þar sem eldfimir vökvar, lofttegundir eða ryk eru til staðar.
- Rafmagnsöryggi: Forðist snertingu við jarðtengda fleti. Ekki láta rafmagnsverkfæri verða fyrir rigningu eða bleytu.
- Persónulegt öryggi: Notið alltaf augnhlífar. Notið heyrnarhlífar þegar unnið er í langan tíma. Klæðið ykkur vel; forðist laus föt eða skartgripi. Festið sítt hár.
- Notkun verkfæra og umhirða: Ekki þvinga rafmagnsverkfærið. Notið rétt rafmagnsverkfæri fyrir notkunina. Aftengdu rafhlöðuna frá rafmagnsverkfærinu áður en þú gerir stillingar, skiptir um fylgihluti eða geymir rafmagnsverkfæri.
- Notkun og umhirða rafhlöðupakka: Hleðjið aðeins með hleðslutækinu sem framleiðandi tilgreinir. Notið ekki rafhlöður með öðrum rafmagnsverkfærum.
3. Vöru lokiðview
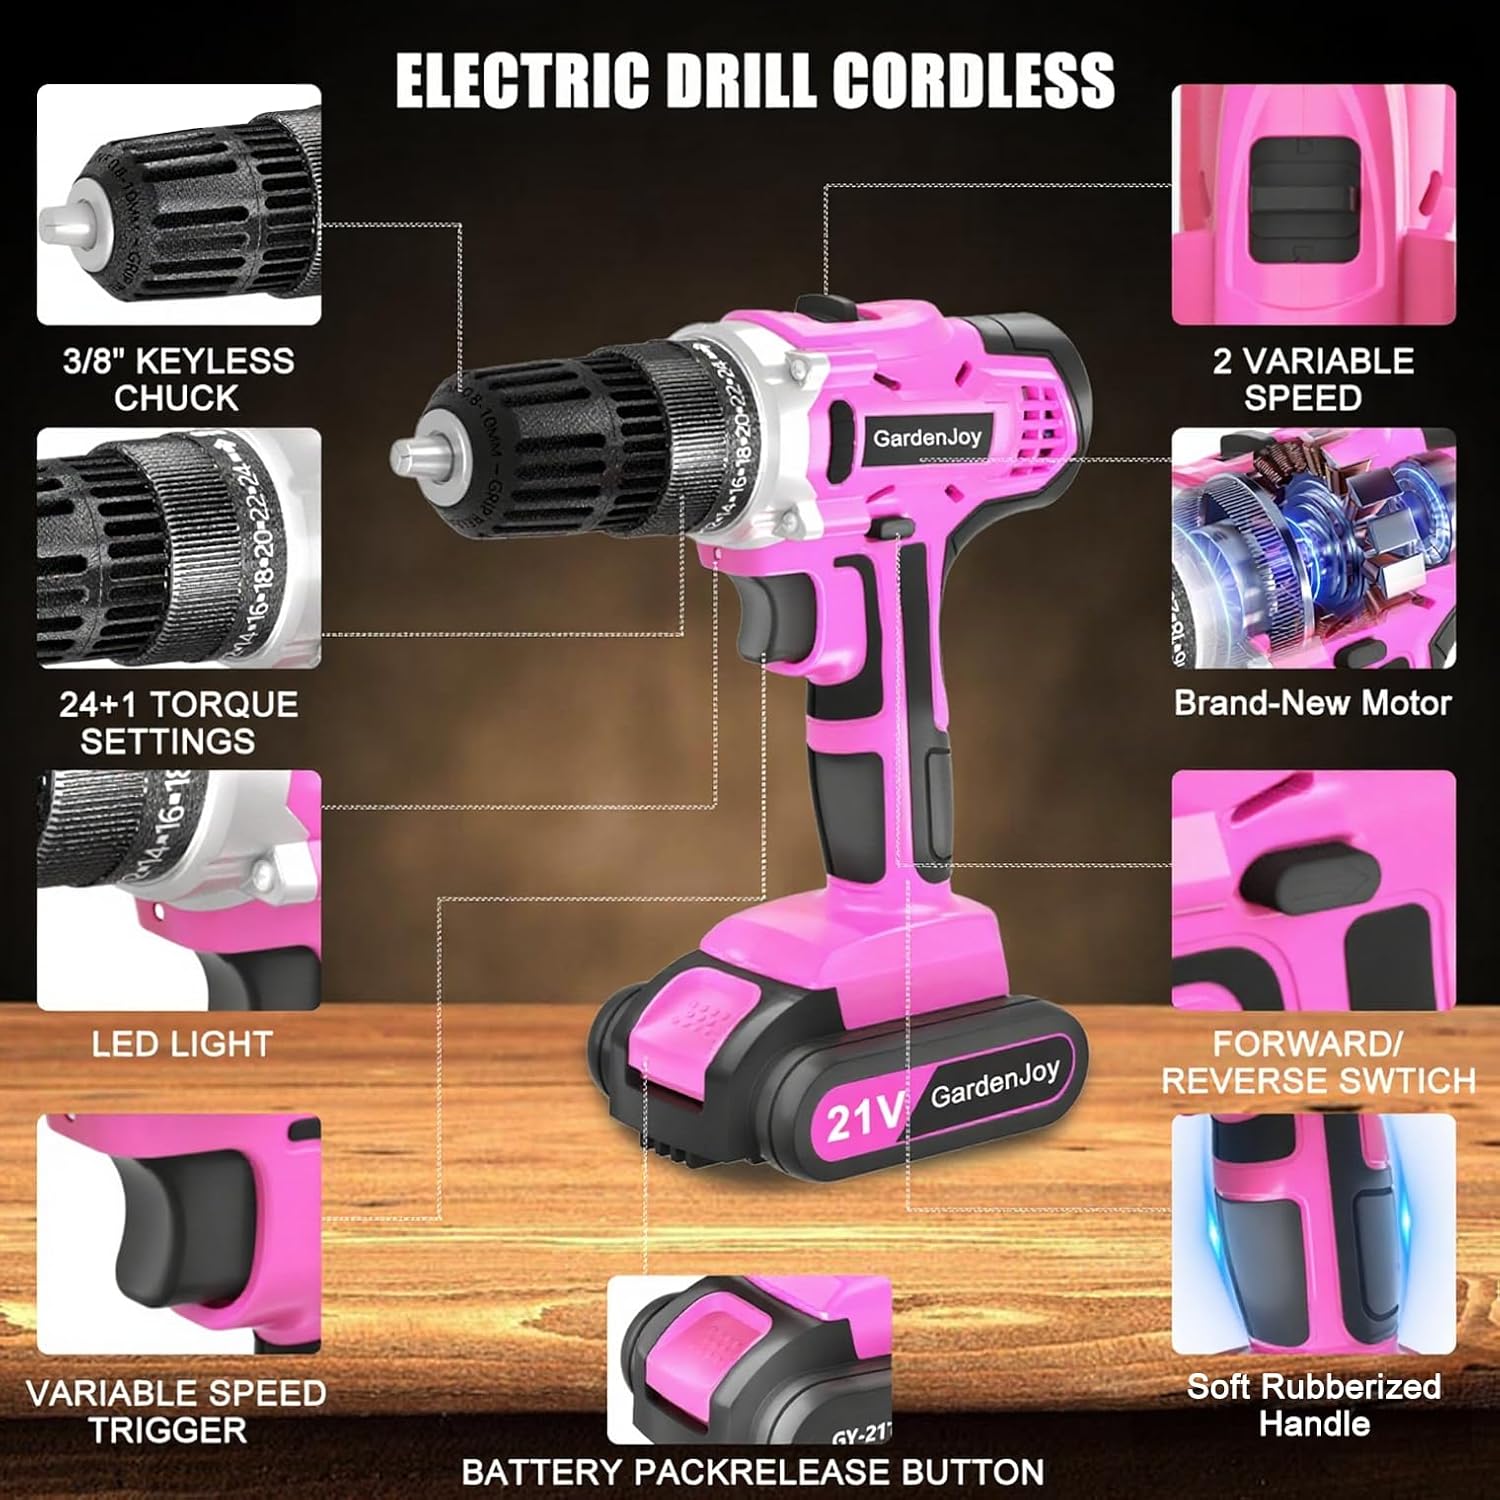
Familiarize yourself with the various parts of your GardenJoy 21V Cordless Power Drill.

Figure 2: Key components of the GardenJoy 21V Cordless Power Drill.
- 3/8" lyklalaus chuck: For quick and easy bit changes without tools.
- 2 breytilegar hraðastillingar: (0-450 RPM and 0-1500 RPM) for precise control.
- 24+1 togstillingar: Allows for precise torque adjustment for various materials and tasks.
- LED vinnuljós: Illuminates dark work areas for improved visibility and accuracy.
- Breytilegur hraði kveikja: Veitir stjórn á borhraða.
- Hnappur til að losa rafhlöðuna: For easy removal and installation of the battery.
- Rofi fyrir fram/aftur: Determines the direction of rotation and acts as a lock-off button.
- Soft Rubberized Handle: Hannað fyrir þægilegt grip og minni þreytu.
- Segulbitahaldari: Conveniently holds screws and bits for one-handed operation.
4. Uppsetning
4.1 Hleðsla rafhlöðunnar
The 21V 1500mAh Lithium-Ion battery requires charging before first use. A full charge typically takes 1-2 hours.
- Remove the battery pack from the drill by pressing the battery pack release button and sliding the battery out.
- Tengdu hleðslutækið við venjulega rafmagnsinnstungu.
- Insert the battery pack into the charger. The indicator light on the charger will show the charging status (e.g., red for charging, green for fully charged).
- Once fully charged, disconnect the battery from the charger and the charger from the power outlet.

Figure 3: Battery charging process and indicators.
4.2 Uppsetning og fjarlæging bora/aukahluta
The 3/8-inch keyless chuck allows for quick and easy changes.
- Ensure the drill is off and the forward/reverse switch is in the center (locked) position.
- Snúðu klemmunni rangsælis til að opna kjálkana.
- Insert the desired drill bit or accessory into the chuck, ensuring it is centered.
- Snúðu klemmunni réttsælis til að herða kjálkana vel utan um borinn. Herðið vel með höndunum.
- To remove, rotate the chuck counter-clockwise until the jaws open, then pull the bit out.
5. Notkunarleiðbeiningar
5.1 Selecting Rotation Direction (Forward/Reverse)
The forward/reverse switch controls the direction of the chuck rotation.
- Push the switch to the left for forward rotation (for drilling and driving screws).
- Push the switch to the right for reverse rotation (for removing screws or backing out bits).
- Place the switch in the center position to lock the trigger and prevent accidental starting.

Figure 4: Forward/Reverse switch operation.
5.2 Að stilla hraða og tog
The drill features two-speed settings and 24+1 torque settings for optimal performance across various applications.
- Hraðaval: Use the slide switch on top of the drill to select between low speed (0-450 RPM) for high torque applications (e.g., driving large screws) and high speed (0-1500 RPM) for faster drilling.
- Breytilegur hraði kveikja: The trigger allows for fine-tuning of the speed within the selected range. Pressing the trigger further increases the speed.
- Stillingarhringur fyrir tog: Rotate the numbered ring behind the chuck to select the desired torque setting (1-24). Higher numbers provide more torque. The '+1' setting (drill icon) bypasses the clutch for maximum torque, ideal for drilling.

Figure 5: Torque settings and material application guide.
5.3 Notkun LED vinnuljóssins
The integrated LED light automatically activates when the trigger is pressed, illuminating your work surface.

Figure 6: LED work light in action.
5.4 Borun og akstur
Always ensure the correct bit and torque setting are selected for the material you are working with.
- For drilling, select the drill icon on the torque ring and the appropriate speed. Apply steady, even pressure.
- For driving screws, select a torque setting that prevents stripping the screw head or damaging the workpiece. Start with a lower torque and increase if necessary.
- The flexible shaft accessory can be used to reach difficult angles.
Mynd 7: Borun í tré.
6. Viðhald
6.1 Þrif
Regular cleaning ensures optimal performance and extends the life of your tool.
- Aftengdu alltaf rafhlöðupakkann áður en þú þrífur hann.
- Notaðu hreint, damp klút til að þurrka af ytra byrði borvélarinnar. Notið ekki sterk efni eða slípiefni.
- Hreinsið allt ryk eða rusl úr loftræstiopum til að koma í veg fyrir ofhitnun.
- Hreinsið kjálkana á klemmunni reglulega til að tryggja gott grip á bitunum.
6.2 Geymsla
When not in use, store the drill and accessories in a dry, secure location out of reach of children.
- Ensure the battery is fully charged before long-term storage.
- Store the drill with the forward/reverse switch in the center (locked) position.
- Forðist að geyma við mikinn hita eða beint sólarljós.
7. Bilanagreining
| Vandamál | Möguleg orsök | Lausn |
|---|---|---|
| Borvélin byrjar ekki | Battery not charged; Battery not properly inserted; Forward/reverse switch in locked position. | Charge battery; Re-insert battery firmly; Move switch to forward or reverse. |
| Rafmagnsleysi við notkun | Battery low; Overload. | Recharge battery; Reduce pressure or use a lower speed/higher torque setting. |
| Bitinn rennur í klemmu | Festingarbúnaðurinn er ekki nægilega hertur; Bitskaftið er óhreint eða skemmd. | Tighten chuck firmly; Clean or replace bit. |
| Ofhitnun | Blocked ventilation; Prolonged heavy use. | Clear vents; Allow tool to cool down. |
8. Tæknilýsing
| Eiginleiki | Forskrift |
|---|---|
| Vörumerki | GardenJoy |
| Gerðarnúmer | FH-6918S |
| Voltage | 21V |
| Rafhlöðugeta | 1500mAh litíumjón |
| Hámarks snúningshraði | 1500 snúninga á mínútu |
| Stillingar með breytilegum hraða | 0-450 RPM (Low), 0-1500 RPM (High) |
| Hámarks tog | 280 in-lbs (30 NM) |
| Togstillingar | 24+1 kúplingsstillingar |
| Chuck Stærð | 3/8-Inch Keyless |
| Þyngd hlutar | 2.2 pund (1 kíló) |
| Vörumál | 7.5" L x 2.9" B x 8.3" H |
| Sérstakir eiginleikar | LED Work Light, Magnetic Bit Holder, Flexible Shaft compatibility |
9. Stuðningur
For further assistance, technical support, or inquiries regarding your GardenJoy 21V Cordless Power Drill Kit, please refer to the contact information provided with your purchase or visit the official GardenJoy websíða.
Please retain your proof of purchase for any warranty claims or service requests.


