1. Inngangur
The AeroCool Blade is an ATX semi-tower PC case designed for optimal airflow and aesthetic appeal. It features an RGB front panel with preset lighting modes, a full tempered glass side window, and ample space for component installation. This manual provides essential information for the proper setup, operation, and maintenance of your PC case.
Öryggisupplýsingar: Always disconnect power from your system before performing any installation or maintenance. Handle components with care to avoid damage. Refer to individual component manuals for specific installation instructions.
2. Innihald pakka
- AeroCool Blade ATX Semi-Tower PC Case
- 1 x 120mm RGB Rear Fan (pre-installed)
- 3 x 120mm Front Fans (pre-installed)
- Accessory Kit (screws, standoffs, cable ties)
3. Uppsetning og uppsetning
3.1 Undirbúningur málsins
Carefully remove the case from its packaging. Place it on a stable, flat surface. Remove the tempered glass side panel by unscrewing the thumb screws at the rear of the case and gently pulling the panel away.

Mynd 3.1: Innri view of the AeroCool Blade PC case, illustrating the layout for component installation.
3.2 Uppsetning móðurborðs
- Install the necessary motherboard standoffs into the motherboard tray according to your motherboard's form factor (ATX, Micro-ATX, Mini-ITX).
- Setjið I/O skjöldinn í aftari opnun kassans.
- Settu móðurborðið varlega á standfestingarnar og jafnaðu skrúfugötin.
- Festið móðurborðið með meðfylgjandi skrúfum.
3.3 Uppsetning aflgjafa (PSU).
The AeroCool Blade supports bottom-mounted PSUs. Slide your PSU into the dedicated compartment at the bottom rear of the case. Secure it with screws from the rear of the case.
3.4 Uppsetning geymsludrifs
- 3.5" harðir diskar: Install 3.5" hard drives into the drive cage located beneath the PSU shroud.
- 2.5" SSDs/HDDs: Install 2.5" drives onto the dedicated mounting points on the motherboard tray or behind it.

Mynd 3.2: Innra lag að aftan view, highlighting cable management routes and 2.5-inch drive mounting locations.
3.5 Expansion Card (GPU) Installation
Remove the necessary expansion slot covers from the rear of the case. Insert your graphics card or other expansion cards into the PCIe slots on your motherboard and secure them with screws.
3.6 Fan and Cooling Installation
The case comes with one 120mm RGB fan pre-installed at the rear and three 120mm fans pre-installed at the front. Ensure all fan cables are connected to appropriate headers on your motherboard or fan controller.

Figure 3.3: A 120mm RGB fan, similar to those pre-installed in the AeroCool Blade case.
3.7 Front Panel I/O Connections
Connect the front panel cables (USB 3.0, USB 2.0, HD Audio, Power Switch, Reset Switch, LED Switch, Power LED, HDD LED) to the corresponding headers on your motherboard. Refer to your motherboard manual for exact pin configurations.
4. Notkunarleiðbeiningar
4.1 Kveikt á
Once all components are installed and connected, replace the side panel. Connect your monitor, keyboard, mouse, and power cable to the PSU. Press the Power button located on the top panel of the case to turn on your system.

Mynd 4.1: Efst að framan view of the case, indicating the location of the power button and front I/O ports.
4.2 RGB lýsingarstýring
The AeroCool Blade features an RGB front panel. Use the dedicated LED button on the top panel to cycle through various preset lighting modes and effects. Pressing the button will change the lighting pattern or color.

Mynd 4.2: Framan view of the AeroCool Blade case with its distinctive RGB lighting.
4.3 Tengi á framhliðinni
The top panel provides convenient access to:
- 1 x USB 3.0 tengi
- 2 x USB 2.0 tengi
- HD Audio output
- Hljóðnemainntak
Connect your USB devices, headphones, and microphone to these ports as needed.
5. Viðhald
5.1 Þrif á ryksíu
Regularly check and clean the dust filters to maintain optimal airflow and prevent dust buildup inside the case. Dust filters are typically located at the top, front, and bottom (under the PSU). Gently remove them and clean with compressed air or rinse with water (ensure they are completely dry before re-installation).
5.2 Hreinsun að utan
Þurrkið ytra byrði kassans með mjúkum, þurrum klút.amp klút. Forðist að nota sterk efni eða slípiefni sem gætu skemmt áferðina eða hertu glerið.
6. Bilanagreining
- Kerfið kveikir ekki á sér:
Ensure the PSU is switched on and properly connected to the wall outlet. Verify all power cables from the PSU are correctly connected to the motherboard and components. Check the front panel power switch connection to the motherboard. - RGB lýsing virkar ekki:
Ensure the RGB controller (if applicable) and fan RGB cables are securely connected. Press the LED button on the top panel to cycle through modes. If connected to a motherboard header, check motherboard software settings. - Viftur snúast ekki:
Verify that all fan power cables are securely connected to the motherboard fan headers or a fan controller. Check BIOS/UEFI settings for fan speed control. - USB/hljóð á framhliðinni virkar ekki:
Ensure the USB and HD Audio cables from the front panel are correctly connected to the corresponding headers on your motherboard.
7. Tæknilýsing
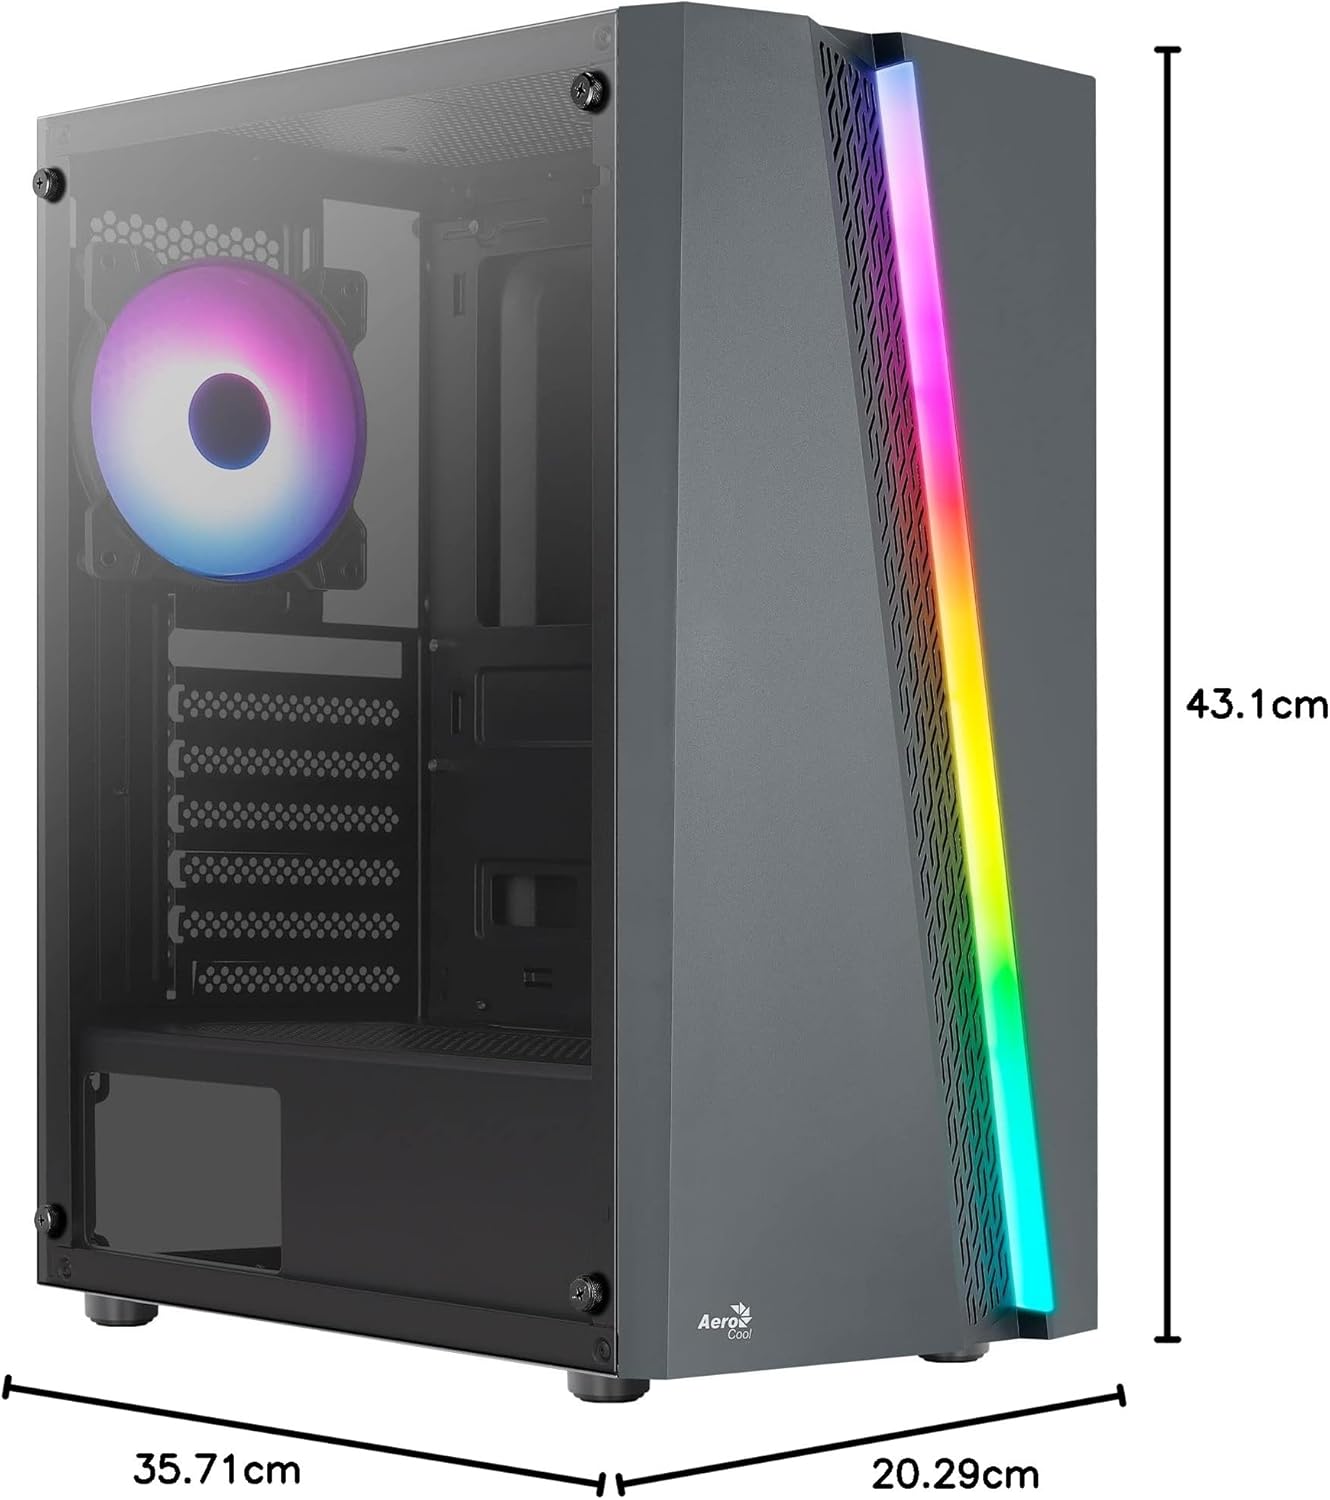
Figure 7.1: Dimensions of the AeroCool Blade PC Case.
| Eiginleiki | Forskrift |
|---|---|
| Vörumerki | AeroCool |
| Nafn líkans | BLADEBK |
| Tegund máls | Semi-Tower |
| Samhæfni móðurborðs | ATX, Micro ATX, Mini ITX |
| Efni | Tempered Glass (Side Panel) |
| Vörumál (L x B x H) | 43.1 x 20.3 x 35.7 cm |
| Þyngd hlutar | 4 kg |
| Drive Bays | 2 x 3.5", 2 x 2.5" |
| GPU úthreinsun | Allt að 307 mm |
| Hæð CPU kælir | Allt að 155 mm |
| Fram / I / O höfn | 1 x USB 3.0, 2 x USB 2.0, HD Audio, Mic, LED Control, Power |
| Foruppsettir viftur | 1 x 120mm RGB Rear, 3 x 120mm Front |
| Kæliaðferð | Loft |
8. Ábyrgð og stuðningur
For warranty information and technical support, please refer to the official AeroCool webeða hafið samband við næsta söluaðila. Geymið kaupkvittunina vegna ábyrgðarkröfu.
Samskiptaupplýsingar: Fyrir frekari aðstoð, vinsamlegast farðu á www.aerocool.io.