Inngangur
Thank you for choosing the Epson EB-L210SF projector. This manual provides essential information for the safe and efficient use of your projector. Please read it thoroughly before operating the device and keep it for future reference.
The Epson EB-L210SF is a 3LCD Full-HD projector designed for clear and vibrant image projection. It features a laser light source for long-lasting performance.
Mikilvægar öryggisupplýsingar
- Laser öryggi: Do not look directly into the projector lens when the laser light source is active. Avoid direct eye exposure to the laser beam.
- Loftræsting: Ensure adequate ventilation around the projector. Do not block ventilation openings. Overheating can cause damage.
- Aflgjafi: Notið aðeins aflgjafann sem tilgreindur er fyrir þennan skjávarpa.
- Meðhöndlun: Farðu varlega með skjávarpann. Forðastu að láta hann detta eða verða fyrir hörðum höggum.
- Þrif: Aftengdu rafmagnssnúruna áður en þú þrífur. Notið mjúkan, þurran klút. Notið ekki fljótandi hreinsiefni eða úðabrúsa.
Uppsetning
1. Upptaka og staðsetning
Carefully remove the projector and all accessories from the packaging. Place the projector on a stable, level surface. Ensure there is sufficient space around the projector for proper ventilation.

Mynd 1: Framan og hliðin view of the Epson EB-L210SF projector, showing the lens and ventilation grilles.
2. Tengja máttur
- Tengdu meðfylgjandi rafmagnssnúruna við riðstraumsinntak skjávarpans.
- Stingdu hinum enda rafmagnssnúrunnar í jarðtengda rafmagnsinnstungu.
3. Tenging inntaksgjafa
The projector supports various input sources. Connect your device (computer, Blu-ray player, etc.) to the appropriate port on the projector's rear panel.

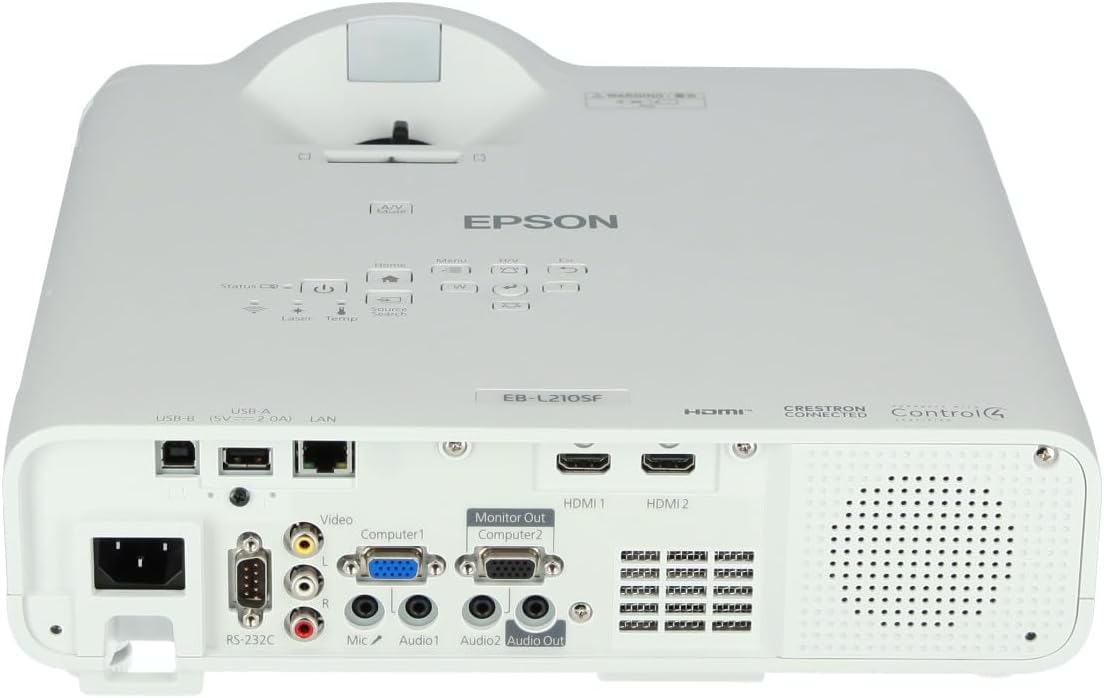
Figure 2: Rear panel of the projector, displaying various input and output ports including HDMI, Computer (VGA), Video, USB, and Audio connections.
- HDMI: Connect an HDMI cable from your device to one of the HDMI ports (HDMI 1 or HDMI 2).
- Tölva (VGA): Connect a VGA cable from your computer to the Computer 1 or Computer 2 port. For audio, connect a separate audio cable to Audio 1 or Audio 2.
- Myndband: Connect composite video and audio cables to the Video and Audio (R/L) ports.
- USB: Use the USB-A port for connecting USB storage devices or the USB-B port for display over USB.
- LAN: Tengdu Ethernet snúru fyrir netstýringu og eftirlit.
4. Initial Power On and Image Adjustment
- Press the power button on the projector or remote control to turn on the device. The power indicator will illuminate.
- Stilltu fókus hringur around the lens until the image is sharp and clear.
- Notaðu zoom lever (if available) to adjust the image size.
- Ef myndin virðist trapisulaga skaltu nota keystone leiðrétting feature (manual or automatic) to square the image. Refer to the Operating section for details on menu navigation.
Að stjórna skjávarpanum
1. Stjórnborð yfirview
The control panel on top of the projector allows access to various functions and settings.
Mynd 3: Efst view of the projector, highlighting the control panel with buttons for power, menu, source selection, and navigation.
- Aflhnappur: Kveikir eða slekkur á skjávarpanum.
- Heimildarleit: Fer í gegnum tiltækar inntaksheimildir.
- Valmyndarhnappur: Opnar skjávalmyndina (OSD).
- Navigation Buttons (Arrow keys): Notað til að fletta í gegnum valmyndarvalkosti.
- Enter hnappur: Staðfestir val í valmyndinni.
- Esc Button: Exits the current menu or returns to the previous screen.
- Heimahnappur: Accesses the home screen or quick settings.
- A/V Mute: Temporarily mutes audio and blanks the screen.
2. Val á inntaksgjafa
Ýttu á Heimildarleit button on the control panel or remote control to cycle through the connected input sources (e.g., HDMI 1, HDMI 2, Computer 1, Video). The projector will automatically detect and display the active source.
3. Adjusting Image and Audio Settings
Ýttu á Matseðill button to access the projector's on-screen display (OSD) menu. Use the navigation buttons to browse categories such as:
- Mynd: Stilltu birtustig, andstæðu, lit, blæ, skerpu og litahita.
- Merki: Configure input signal settings, aspect ratio, and overscan.
- Stillingar: General projector settings like language, display options, and power management.
- Hljóð: Adjust volume, mute, and audio input selection.
Veldu valkost og ýttu á Sláðu inn to modify its value. Press Esc til að fara úr valmyndinni.
Viðhald
1. Þrif á skjávarpanum
- Að utan: Wipe the projector's exterior with a soft, dry, lint-free cloth. For stubborn dirt, dampen the cloth slightly with water, then wipe dry.
- Linsa: Gently wipe the lens with a lens cleaning cloth or lens paper. Avoid using abrasive materials or excessive force.
- Loftsía: Regularly check and clean the air filter to prevent dust buildup, which can affect performance and cause overheating. Refer to the projector's on-screen menu for filter maintenance reminders.
2. Leysiljósgjafi
The Epson EB-L210SF uses a laser light source, which offers a long operational life and does not require lamp replacement. No user maintenance is typically required for the laser light source itself.
Úrræðaleit
Ef þú lendir í vandræðum með skjávarpann þinn skaltu skoða eftirfarandi algeng vandamál og lausnir:
| Vandamál | Möguleg orsök/lausn |
|---|---|
| Engin mynd varpað |
|
| Myndin er óskýr eða úr fókus |
|
| Myndin er brengluð (trapisulaga) |
|
| Ekkert hljóð |
|
| Projector is not wireless | The Epson EB-L210SF is not inherently a wireless projector. Wireless functionality typically requires an optional external wireless adapter, which is sold separately. Please consult Epson's official website or your retailer for compatible wireless adapters. |
| Overheating warning (Temp indicator) |
|
Tæknilýsing
| Eiginleiki | Smáatriði |
|---|---|
| Gerðarnúmer | V11HA75080 |
| Skjáupplausn | 1920 x 1080 (Full HD) |
| Tengitækni | HDMI, VGA, USB, LAN |
| Vörumál | 11.81 x 11.81 x 11.81 tommur |
| Þyngd hlutar | 10.14 pund |
| Ljósgjafi | Laser |
| Framleiðandi | Epson |
| Mælt er með notkun | Eftirlit |
| Sérstakur eiginleiki | Léttur |
| Rafhlöður nauðsynlegar | 1 AAAA (for remote control, not included with projector unit) |
| Dagsetning fyrst í boði | 14. nóvember 2023 |
Ábyrgð og stuðningur
Nánari upplýsingar um ábyrgð er að finna á ábyrgðarkortinu sem fylgir vörunni eða á opinberu vefsíðu Epson. webá síðunni. Ábyrgðarskilmálar geta verið mismunandi eftir svæðum.
For technical support, product registration, or to download the latest drivers and software, please visit the official Epson support website or contact Epson customer service in your region. Contact information can typically be found on the Epson websíða.


