Vara lokiðview
The VEVOR RJ45 Crimp Tool Kit is a comprehensive solution for network cable installation and testing. This kit includes a versatile crimper, wire stripper, network tester, and essential accessories like RJ45 connectors and covers, providing all necessary tools for creating and verifying Ethernet connections.

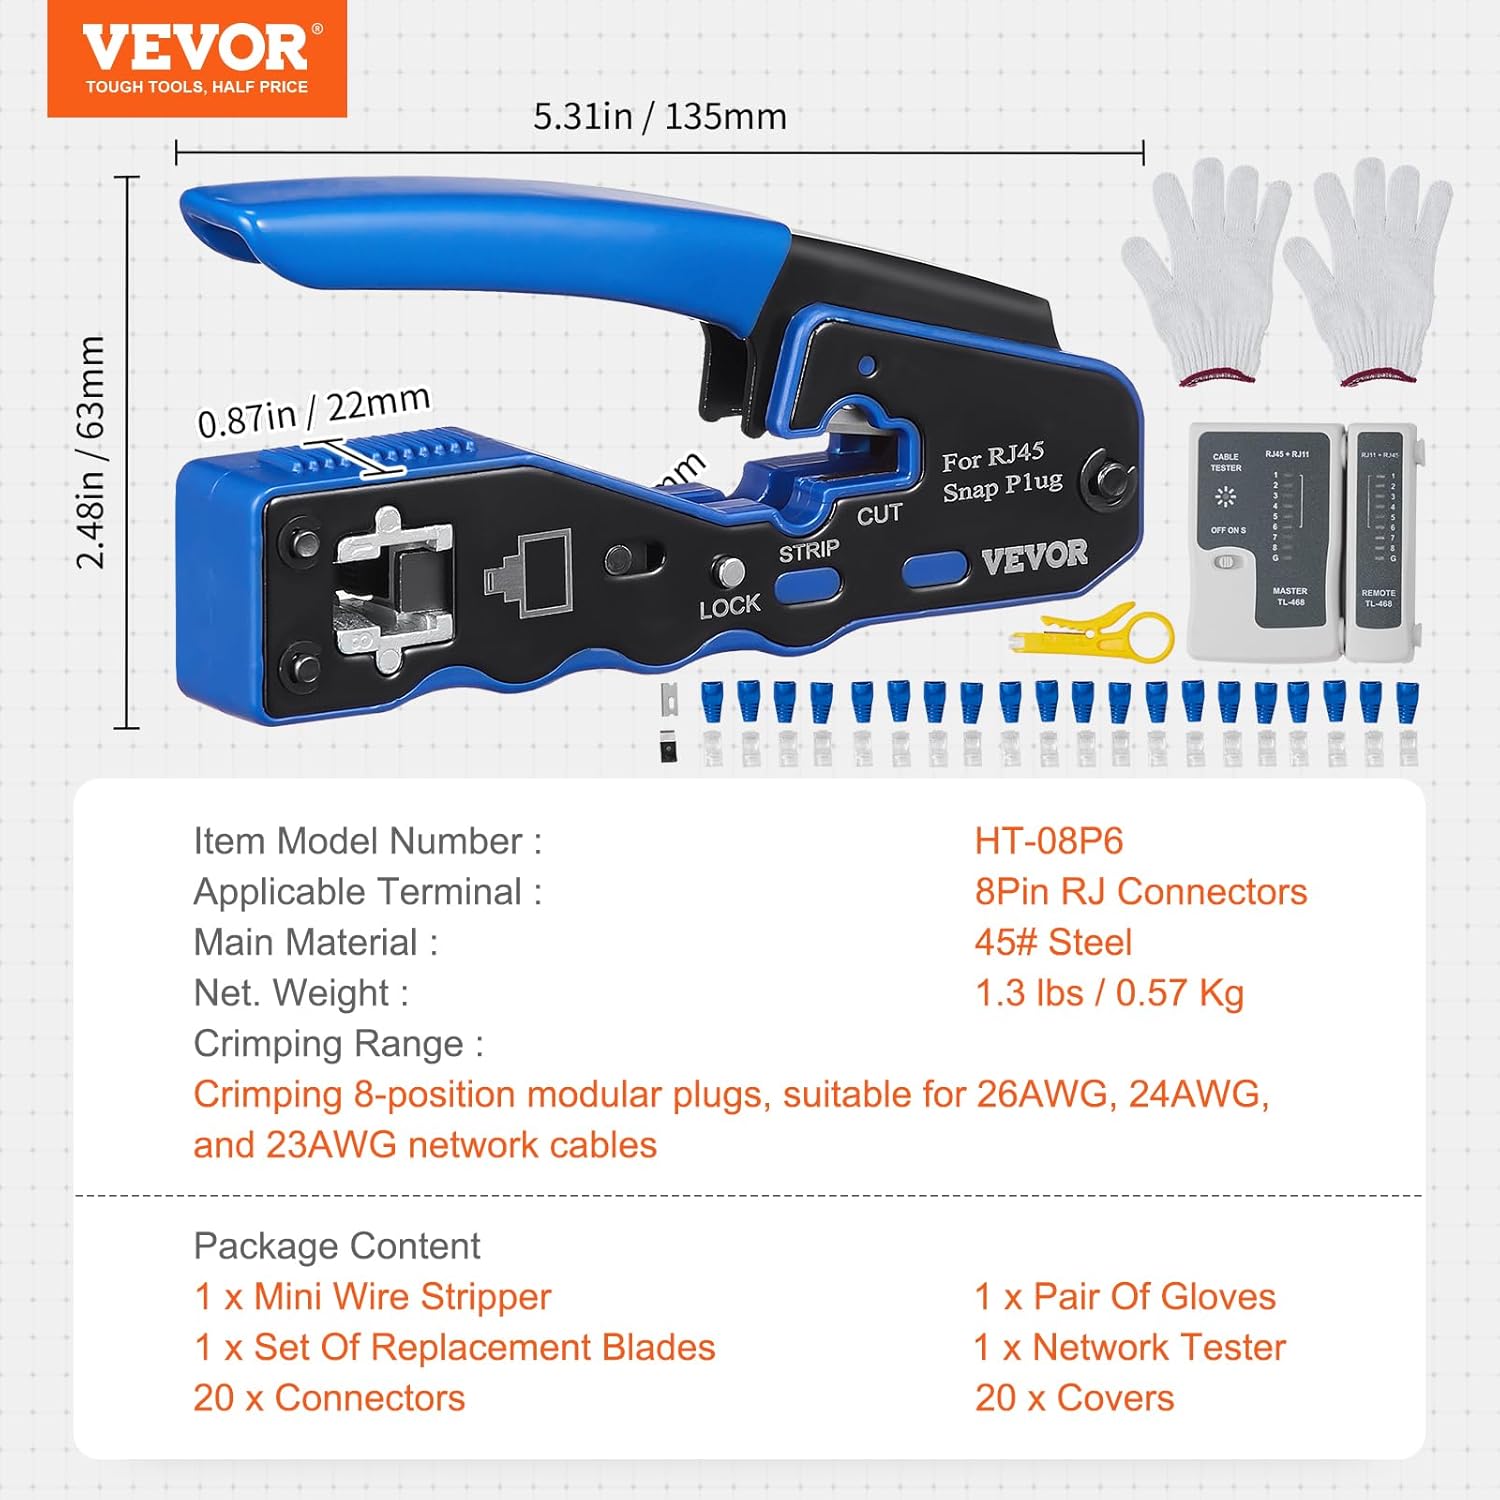
Figure 1: Complete VEVOR RJ45 Crimp Tool Kit contents.
Innihald pakka
Upon opening your VEVOR RJ45 Crimp Tool Kit, please verify that all the following items are included:
- 1 x RJ45 Crimp Tool (Crimper, Wire Stripper, Cutter)
- 1 x Network Cable Tester (Master and Remote units)
- 1 x Mini Wire Stripper
- 1 x par hanskar
- 1 x Set of Replacement Blades for Crimper
- 20 x RJ45 Pass-Through Connectors
- 20 x Connector Covers (Strain Relief Boots)
- 1 x 9V Battery for Network Tester
Mynd 2: Ítarleg view of package contents and product dimensions.
Tæknilýsing
| Eiginleiki | Lýsing |
|---|---|
| Gerðarnúmer | HT-08P6 |
| Applicable Terminal | 8-Pin RJ Connectors (RJ45, Cat5e, Cat6, Cat6a) |
| Aðalefni | 45# Steel (Crimper) |
| Nettóþyngd | Approx. 1.3 lbs / 0.57 Kg |
| Crimping Range | 8-position modular plugs, suitable for 26AWG, 24AWG, and 23AWG network cables |
| Tool Functions | Crimping, Wire Stripping, Cable Cutting |
| Network Tester Compatibility | RJ45 (Ethernet) and RJ11 (Phone Line) |
Uppsetning
Crimper Preparation
The VEVOR crimper is designed for ease of use. It features a locking mechanism for safe storage and a built-in blade for pass-through connectors.
- Unlocking the Crimper: To open the crimper for use, locate the small pin or lever marked "LOCK" on the side of the tool. Push this pin to release the handles and allow the crimper to open.
- Blade Functionality: The crimper includes a blade that automatically trims excess wire when crimping pass-through connectors. This blade can also be used for general wire cutting and stripping by utilizing the designated "CUT" and "STRIP" slots.

Figure 3: Key features of the VEVOR RJ45 crimper.
Network Tester Preparation
The network tester requires a 9V battery (included) for operation. It consists of a master unit and a detachable remote unit.
- Uppsetning rafhlöðu: Open the battery compartment on the back of the master unit. Insert the 9V battery, ensuring correct polarity. Close the compartment securely.
- Separating Units: For testing long cables, the remote unit can be detached from the master unit by sliding it apart. This allows one unit to be connected at each end of the cable.
Notkunarleiðbeiningar
Crimping an RJ45 Connector
Follow these steps to properly crimp an RJ45 connector onto an Ethernet cable:
- Afklæðið kapalhlífina: Use the mini wire stripper or the crimper's stripping function to carefully remove approximately 0.5 to 0.75 inches (1.2 to 1.9 cm) of the outer jacket from the end of the Ethernet cable. Be careful not to nick the inner wires.
- Snúið úr og réttið vírana: Gently untwist the four pairs of wires and straighten them out.
- Arrange Wires (T568B Standard): Arrange the wires according to the T568B wiring standard, which is commonly used for straight-through Ethernet cables. The order from left to right (with the clip of the RJ45 connector facing away from you) is:
- Appelsínugult/hvítt
- Appelsínugult
- Grænn/Hvítur
- Blár
- Blár/Hvítur
- Grænn
- Brúnn/Hvítur
- Brúnn
- Klipptu vírana: Once the wires are arranged correctly and held flat, use the crimper's cutting blade to trim the ends of the wires straight and evenly, ensuring they are all the same length. The length should be just enough to reach the end of the RJ45 connector when inserted, allowing the crimp to be on the cable's outer jacket for strain relief.
- Insert Wires into Connector: Carefully insert the arranged and trimmed wires into the RJ45 connector. Push them all the way in until each wire reaches the front of its respective pin. Verify the wire order through the clear connector body.
- Klemmið tengið: Place the RJ45 connector into the 8-pin crimping slot of the VEVOR crimper. Squeeze the handles firmly and completely until you hear a click, indicating the pins have been pressed down and the connector is secured. The crimper's blade will automatically trim any excess wires if using pass-through connectors.

Figure 4: Inserting the RJ45 connector into the crimper for secure crimping.

Figure 5: The compact design of the crimper allows for comfortable single-handed operation.
Using the Network Tester
After crimping, use the network tester to verify the integrity of your Ethernet cable connection:
- Tengdu snúruna: Plug one end of the newly crimped Ethernet cable into the RJ45 port on the master unit of the network tester. Plug the other end of the cable into the RJ45 port on the remote unit.
- Kveikt á: Slide the power switch on the master unit to the "ON" position. There are typically two speeds: a fast test mode and a slower test mode (often labeled "S" for slow) for easier observation of individual wire connections.
- Athugið LED-ljós: The LEDs on both the master and remote units will light up sequentially, indicating the connection status of each wire (1 through 8).
- If all LEDs light up in sequence on both units (1-8), the cable is correctly wired and has continuity.
- If any LED fails to light up, or lights up out of sequence, it indicates a wiring error, short circuit, or open circuit in that specific wire.
- Úrræðaleit (ef þörf krefur): If the test fails, refer to the Troubleshooting section for common issues and solutions.
Viðhald
- Þrif: Keep the crimper and tester clean and free of debris. Wipe them down with a dry cloth after each use.
- Skipt um blað: The crimper's cutting blade is replaceable. If the blade becomes dull or damaged, use the included replacement blades. To replace, carefully unscrew the retaining screw, remove the old blade, insert the new blade, and secure the screw. Exercise caution as blades are sharp.
- Geymsla: Store the kit in a dry, cool place. Use the crimper's lock mechanism to keep the handles closed for compact and safe storage.
- Umhirða rafhlöðu: Remove the 9V battery from the network tester if it will not be used for an extended period to prevent battery leakage.
Úrræðaleit
- Network Tester LEDs Not Lighting Up:
- Check if the 9V battery is correctly installed and has sufficient charge. Replace if necessary.
- Ensure the cable is fully inserted into both the master and remote units.
- Incorrect LED Sequence on Network Tester:
- This indicates a wiring error. Double-check your wire arrangement against the T568B standard (Orange/White, Orange, Green/White, Blue, Blue/White, Green, Brown/White, Brown).
- Re-crimp the connector, ensuring wires are pushed all the way to the front of the connector before crimping.
- No Continuity (Some LEDs Don't Light Up):
- This suggests an open circuit or a wire not making proper contact. Ensure the wires are trimmed evenly and fully inserted into the connector before crimping.
- Inspect the crimped connector for any bent or unseated pins.
- Short Circuit (Multiple LEDs Light Up Simultaneously or Incorrectly):
- This means two or more wires are touching. Ensure wires are properly separated and untwisted only as much as necessary before insertion.
- Verify that the outer jacket is crimped under the strain relief, not inside the pin area, to prevent shorts.
- Crimper Not Cutting Wires Cleanly:
- The blade may be dull. Replace the crimper blade as described in the Maintenance section.
- Ensure the cable is properly positioned in the cutting slot.
Ábyrgð og stuðningur
VEVOR products are designed for durability and performance. For warranty information, technical support, or assistance with your RJ45 Crimp Tool Kit, please refer to the warranty card included with your product or visit the official VEVOR website. You may also contact VEVOR customer service directly for further assistance.
Fyrir frekari upplýsingar, heimsækja VEVOR verslun á Amazon.