1. Inngangur
This manual provides detailed instructions for the installation, operation, and maintenance of your CP PLUS 4MP Wi-Fi Floodlight Camera, model CP-F42A. Please read this manual thoroughly before using the product to ensure proper functionality and safety. This camera combines high-resolution video surveillance with integrated floodlighting for enhanced security.
2. Öryggisupplýsingar
- Gakktu úr skugga um að aflgjafinn passi við kröfur myndavélarinnar.
- Ekki reyna að taka myndavélina í sundur eða breyta henni.
- Install the camera in a location where it is protected from extreme weather conditions, although it has an IP54 rating, direct exposure to heavy rain or prolonged submersion is not recommended.
- Keep the camera away from heat sources and direct sunlight.
- Farðu varlega með myndavélina til að forðast líkamlegan skaða.
- Consult a qualified electrician for installation if you are unsure about electrical wiring.
3. Innihald pakka
Gakktu úr skugga um að allir hlutir séu til staðar í pakkanum:
- CP PLUS 4MP Wi-Fi Floodlight Camera (CP-F42A)
- Rafmagns millistykki
- Festingarskrúfur og veggpluggar
- Leiðbeiningar um hraða notkun (ekki innifaldar í þessari handbók)
4. Vöru lokiðview
The CP-F42A is an outdoor Wi-Fi floodlight camera designed for surveillance and illumination. It features a 4MP sensor for clear video, H.265 video compression for efficient storage, and a 110° viewing angle. The integrated floodlight provides illumination, and the PIR sensor detects motion up to 12 meters.
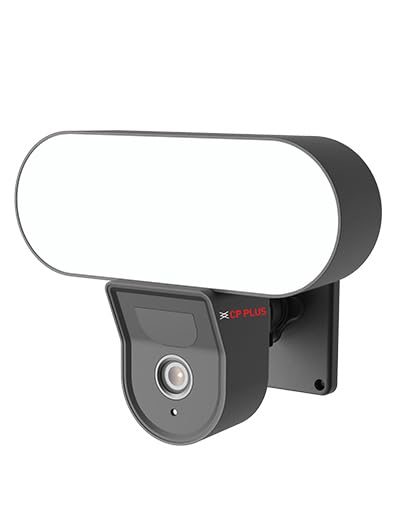
Mynd: Framan view of the CP PLUS 4MP Wi-Fi Floodlight Camera CP-F42A, showing the camera lens and the integrated floodlight panel.
Lykilhlutir:
- Myndavélarlinsa: Tekur 4MP myndband.
- Floodlight Panel: Veitir lýsingu.
- PIR skynjari: Greinir hreyfingu.
- Hljóðnemi: Fyrir hljóðinntak.
- Ræðumaður: Fyrir tvíhliða hljóðútgang.
- Festingarfesting: Fyrir örugga uppsetningu.
5. Uppsetning
5.1 Líkamleg uppsetning
- Veldu staðsetningu: Veldu útisvæði með skýru view of the area you wish to monitor and within Wi-Fi range. Ensure the mounting surface is sturdy.
- Merktu borunarpunkta: Notið festingarfestinguna sem sniðmát til að merkja skrúfugötin á veggnum.
- Bora holur: Boraðu forholur á merktu punktunum. Settu inn veggtappa ef fest er á múrstein.
- Festu myndavélina: Secure the mounting bracket to the wall using the provided screws. Attach the camera to the bracket.
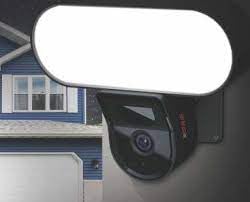
Image: The CP PLUS Floodlight Camera mounted on the exterior of a house, illustrating a typical installation scenario during the day.
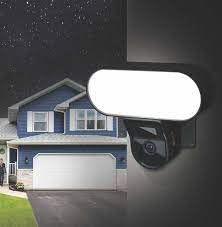
Image: The CP PLUS Floodlight Camera mounted on the exterior of a house at night, with the floodlight illuminated, demonstrating its night-time functionality.
5.2 Rafmagnstenging
Connect the provided power adapter to the camera's power input port and then plug it into a suitable electrical outlet. Ensure the connection is secure and protected from moisture.
5.3 Wi-Fi tenging og pörun við forrit
- Sækja appið: Leitaðu að the "ezyKam+" app (or the recommended CP PLUS app) on your smartphone's app store (iOS or Android) and install it.
- Búðu til reikning: Opnaðu appið og stofnaðu nýjan aðgang eða skráðu þig inn ef þú ert nú þegar með einn.
- Bæta við tæki: Follow the in-app instructions to add a new device. Select "Floodlight Camera" or a similar option.
- Tengjast Wi-Fi: The app will guide you through connecting the camera to your home Wi-Fi network. This usually involves scanning a QR code on the camera or entering your Wi-Fi credentials.
- Ljúka uppsetningu: Þegar tengingin er komin geturðu nefnt myndavélina og breytt upphafsstillingum.
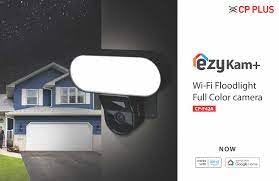
Image: Branding for CP PLUS ezyKam+ Wi-Fi Floodlight Full Color Camera, indicating compatibility with Alexa and Google Home, relevant for app pairing and smart home integration.
6. Notkunarleiðbeiningar
Access all camera functions through the dedicated mobile application.
6.1 Í beinni View
Opnaðu appið og veldu myndavélina þína af tækjalistanum til að view the live video feed. You can pinch to zoom and pan across the image.
6.2 Upptaka og spilun
- Handvirk upptaka: Tap the record button in the live view to start/stop manual recording.
- Upptaka viðburða: The camera automatically records when motion is detected. These recordings are stored on the installed microSD card (if any) or cloud storage (subscription may be required).
- Spilun: Aðgangur skráð footagí gegnum hlutann „Spilun“ eða „Saga“ í appinu.
6.3 Hreyfiskynjun og viðvaranir
Configure motion detection sensitivity and areas within the app settings. When motion is detected, the camera can send push notifications to your phone and trigger recording. The PIR sensor has a detection range of 6-12 meters.
6.4 Flóðljósastýring
The floodlight can be controlled manually via the app or set to activate automatically upon motion detection during specific times or low-light conditions. Adjust brightness and duration settings in the app.
6.5 Tvíhliða hljóð
Use the microphone and speaker icons in the live view to communicate with visitors or deter intruders. Press and hold the microphone icon to speak, and release to listen.
6.6 Nætursjón
The camera features infrared (IR) night vision for clear black-and-white video in low-light conditions and can also utilize the floodlight for full-color night vision when activated. The night vision range is up to 12 meters.
7. Viðhald
7.1 Þrif
Wipe the camera lens and floodlight panel with a soft, damp klút til að fjarlægja ryk og óhreinindi. Notið ekki sterk efni eða slípiefni.
7.2 vélbúnaðaruppfærslur
Periodically check the app for available firmware updates. Keeping your camera's firmware up-to-date ensures optimal performance and security features.
7.3 Geymslustjórnun
If using a microSD card, regularly check its status in the app. Format the card periodically to maintain performance. Back up important recordings before formatting.
8. Bilanagreining
| Vandamál | Möguleg lausn |
|---|---|
| Myndavélin kviknar ekki. | Check power adapter connection and ensure the outlet is functional. |
| Ekki er hægt að tengjast Wi-Fi. | Ensure the camera is within Wi-Fi range. Verify Wi-Fi password. Try resetting the camera and router. |
| Léleg myndgæði. | Check Wi-Fi signal strength. Clean the camera lens. Ensure sufficient lighting. |
| Hreyfiskynjun virkar ekki. | Adjust motion detection sensitivity and area settings in the app. Ensure there are no obstructions. |
| Floodlight not activating. | Check floodlight settings in the app. Ensure it's set to activate on motion or during low light. |
9. Tæknilýsing
| Eiginleiki | Smáatriði |
|---|---|
| Gerðarnúmer | CP-F42A |
| Upplausn | 4MP (Effective Still Resolution: 4 MP) |
| Myndbandsþjöppun | H.265, MPEG |
| Viewí horn | 110 gráður |
| PIR fjarlægð | 6 ~ 12 metrar |
| Þráðlaus tækni | Wi-Fi |
| Nætursjónarsvið | 12 Meters (Infrared, Night Color) |
| Rammahlutfall | 20 rammar á sekúndu |
| Optískur aðdráttur | 3x |
| International Protection Rating | IP54 |
| Viðvörunargerð | Aðeins hreyfing |
| Aflgjafi | Rafmagn með snúru |
| Innifalið íhlutir | Millistykki |
| Mál (L x B x H) | 20 x 12 x 10 sentimetrar |
| Þyngd hlutar | 630 g |
| Inni/úti notkun | Útivist |
| Ljósmyndaskynjaratækni | CMOS |
| Mælt er með notkun | Home Security, Night Vision |
10. Ábyrgð og stuðningur
Fyrir upplýsingar um ábyrgð og tæknilega aðstoð, vinsamlegast skoðið opinberu CP PLUS webvefsíðu eða hafðu samband við þjónustuver þeirra. Geymdu kaupkvittunina sem sönnun fyrir kaupum vegna ábyrgðarkröfu.
CP PLUS opinbert Websíða: www.cpplusworld.com