1. Inngangur
This manual provides essential information for setting up, operating, maintaining, and troubleshooting your Beelink SER3 Mini PC. Please read this guide thoroughly to ensure proper usage and to maximize the performance and longevity of your device.

Mynd 1: Framan view of the Beelink SER3 Mini PC, showcasing its compact design and accessible front ports.
2. Hvað er í kassanum
Gakktu úr skugga um að allir hlutir séu til staðar í pakkanum:
- 1 x Mini PC
- 1 x HDMI snúru
- 1 x straumbreytir
- 1 x Notendahandbók
3. Vöru lokiðview
The Beelink SER3 Mini PC is a compact and powerful computing solution designed for various tasks, from office work to 4K media playback. It features an AMD Ryzen 3 3200U processor, 16GB DDR4 RAM, and a 500GB PCIe 3.0 x4 SSD.

Figure 2: Key features of the Beelink SER3 Mini PC, highlighting its core components and capabilities.
3.1. Tengitengi
The Mini PC offers a variety of ports for extensive connectivity:
- Framhöfn: 2x USB 3.2, 1x Audio Jack (HP&MIC), 1x CLR CMOS button, 1x Power button
- Hafnir að aftan: 1x 1000M LAN (RJ-45), 2x USB 3.2, 2x HDMI (4K@60Hz), 1x DC Jack for power adapter
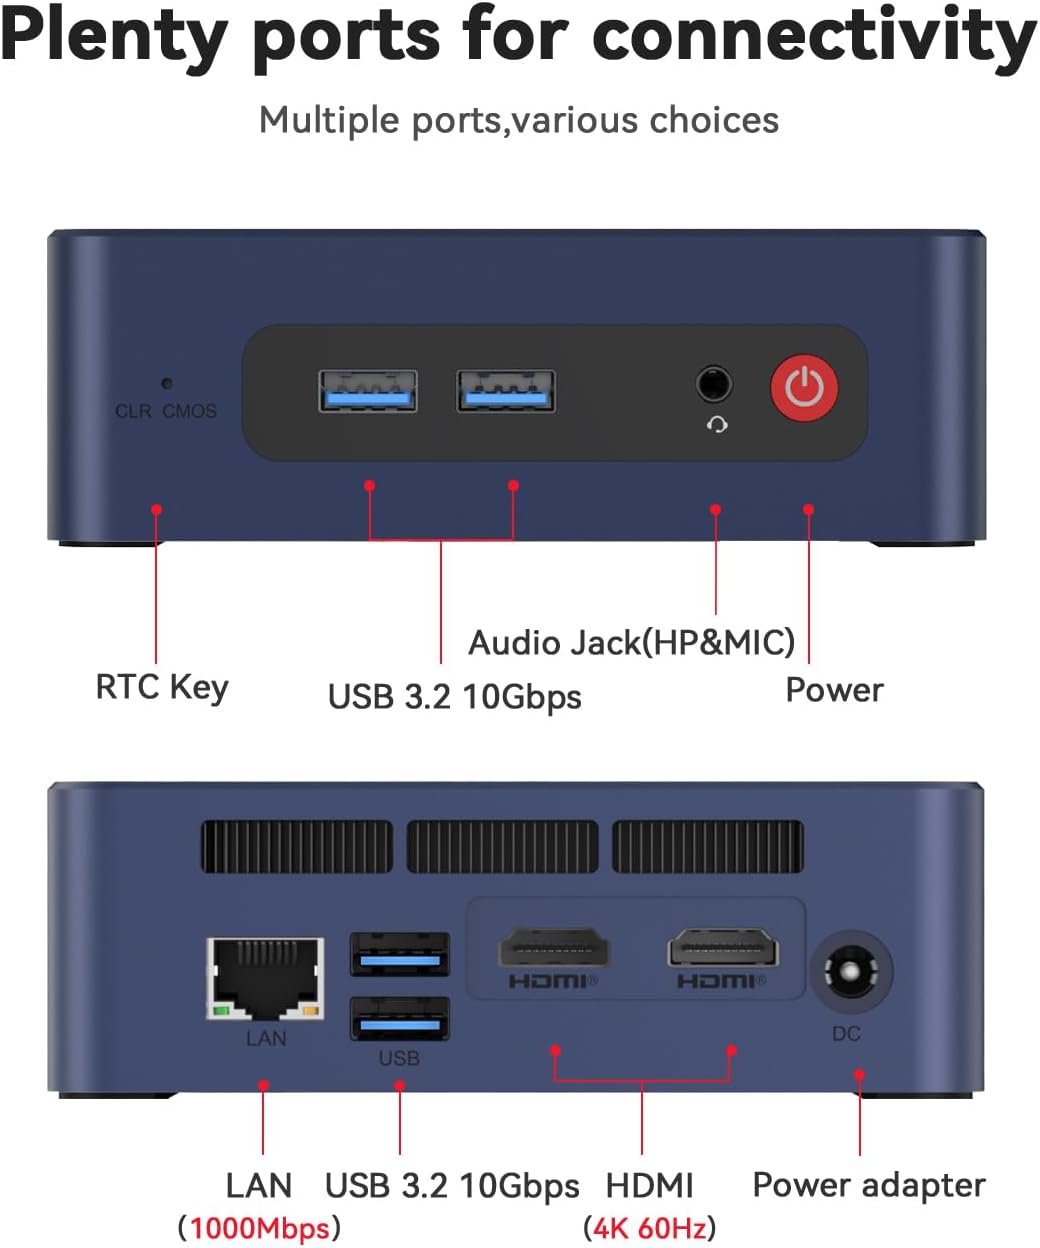
Mynd 3: Ítarleg view of the front and rear connectivity ports on the Beelink SER3 Mini PC.
4. Uppsetning
4.1. Upphafleg tenging
- Connect your monitor(s) to the HDMI ports on the rear of the Mini PC using the provided HDMI cable.
- Tengdu lyklaborðið og músina við tiltæk USB tengi.
- Connect the power adapter to the DC Jack on the rear of the Mini PC and then plug it into a power outlet.
- Ýttu á rofann á framhlið Mini-tölvunnar til að kveikja á henni.
4.2. Operating System Installation (Windows 11)
The Beelink SER3 Mini PC comes with Windows 11 Pro pre-installed. If you need to reinstall or perform a clean installation of Windows 11, follow the steps outlined in the video below. Ensure you have a bootable USB drive with Windows 11 installation media.
Video 1: Guide on how to install Windows 11 on your Beelink Mini PC using a USB flash drive.
4.3. Operating System Installation (Windows 10)
For users who prefer Windows 10, the following video provides instructions on how to install Windows 10 from a USB drive. Remember to back up any important data before proceeding with the installation.
Video 2: Instructions for installing Windows 10 on your Beelink Mini PC from a USB drive.
5. Rekstur
Once the operating system is set up, you can begin using your Beelink SER3 Mini PC. Its AMD Ryzen 3 3200U processor and Radeon Vega 3 Graphics are designed for efficient multitasking, 4K video playback, and light gaming.
5.1. Dual Display Setup
The Mini PC supports dual 4K@60Hz displays via its two HDMI ports. Connect two monitors to enhance your productivity or multimedia experience.
5.2. Þráðlaus tenging
Utilize the built-in Dual-band 2.4G/5G WiFi (802.11ac) for high-speed internet access and Bluetooth 5.2 for connecting wireless peripherals such as keyboards, mice, or headphones.
6. Viðhald og uppfærslur
The Beelink SER3 Mini PC is designed for easy maintenance and upgrades, allowing you to expand its storage and memory capacity.

Mynd 4: Sprungið view illustrating the internal components of the Beelink SER3 Mini PC.
6.1. SSD Replacement/Upgrade
The Mini PC supports M.2 PCIe 3.0 x4 (2280) SSDs and has a SATA HDD (2.5-inch 7mm) slot for additional storage. Refer to the video below for instructions on how to replace or upgrade your SSD.
Video 3: Tutorial on replacing or upgrading the SSD in your Beelink Mini PC.
6.2. RAM Upgrade
The device comes with 16GB DDR4 2400MHz RAM and can be upgraded to 32GB (2 x 16GB). Consult the exploded view (Figure 4) for the location of the RAM slots.
7. Bilanagreining
If you encounter any issues with your Beelink SER3 Mini PC, consider the following basic troubleshooting steps:
- Enginn kraftur: Gakktu úr skugga um að rafmagnsbreytirinn sé vel tengdur bæði við mini-tölvuna og virkan rafmagnsinnstungu.
- Enginn skjár: Check HDMI cable connections to both the Mini PC and the monitor. Try a different HDMI port or cable. Ensure the monitor is set to the correct input source.
- Jaðarmál: Verify USB connections for keyboard and mouse. Try different USB ports.
- Operating System Problems: If the OS is not booting correctly, consider reinstalling Windows using the instructions in Section 4.2 or 4.3.
- CLR CMOS: If you experience boot issues or BIOS settings problems, press the CLR CMOS button on the front panel to reset BIOS settings to default.
8. Tæknilýsing
Ítarlegar tæknilegar upplýsingar um Beelink SER3 Mini PC:
| Eiginleiki | Forskrift |
|---|---|
| Örgjörvi | AMD Ryzen 3 3200U (2C/4T, allt að 3.5 GHz) |
| Grafík | AMD Radeon Vega 3 Graphics (3core, 1200 MHz) |
| vinnsluminni | 16GB DDR4 2400MHz (Upgradeable to 32GB) |
| Geymsla | 500GB M.2 PCIE3.0 X4 (2280) SSD, 2.5" SATA HDD slot |
| Myndbandsúttak | 2x HDMI (4K@60Hz Dual Display) |
| Þráðlaus tenging | WiFi 6 (802.11ax), Bluetooth 5.2 |
| LAN | 1000M (Gigabit Ethernet) |
| USB tengi | 4x USB 3.2 |
| Hljóð | 1x hljóðtengi (HP og hljóðnemi) |
| Stýrikerfi | Windows 11 Pro (fyrirfram uppsett) |
| Mál | Um það bil 124 mm x 113 mm x 42 mm |
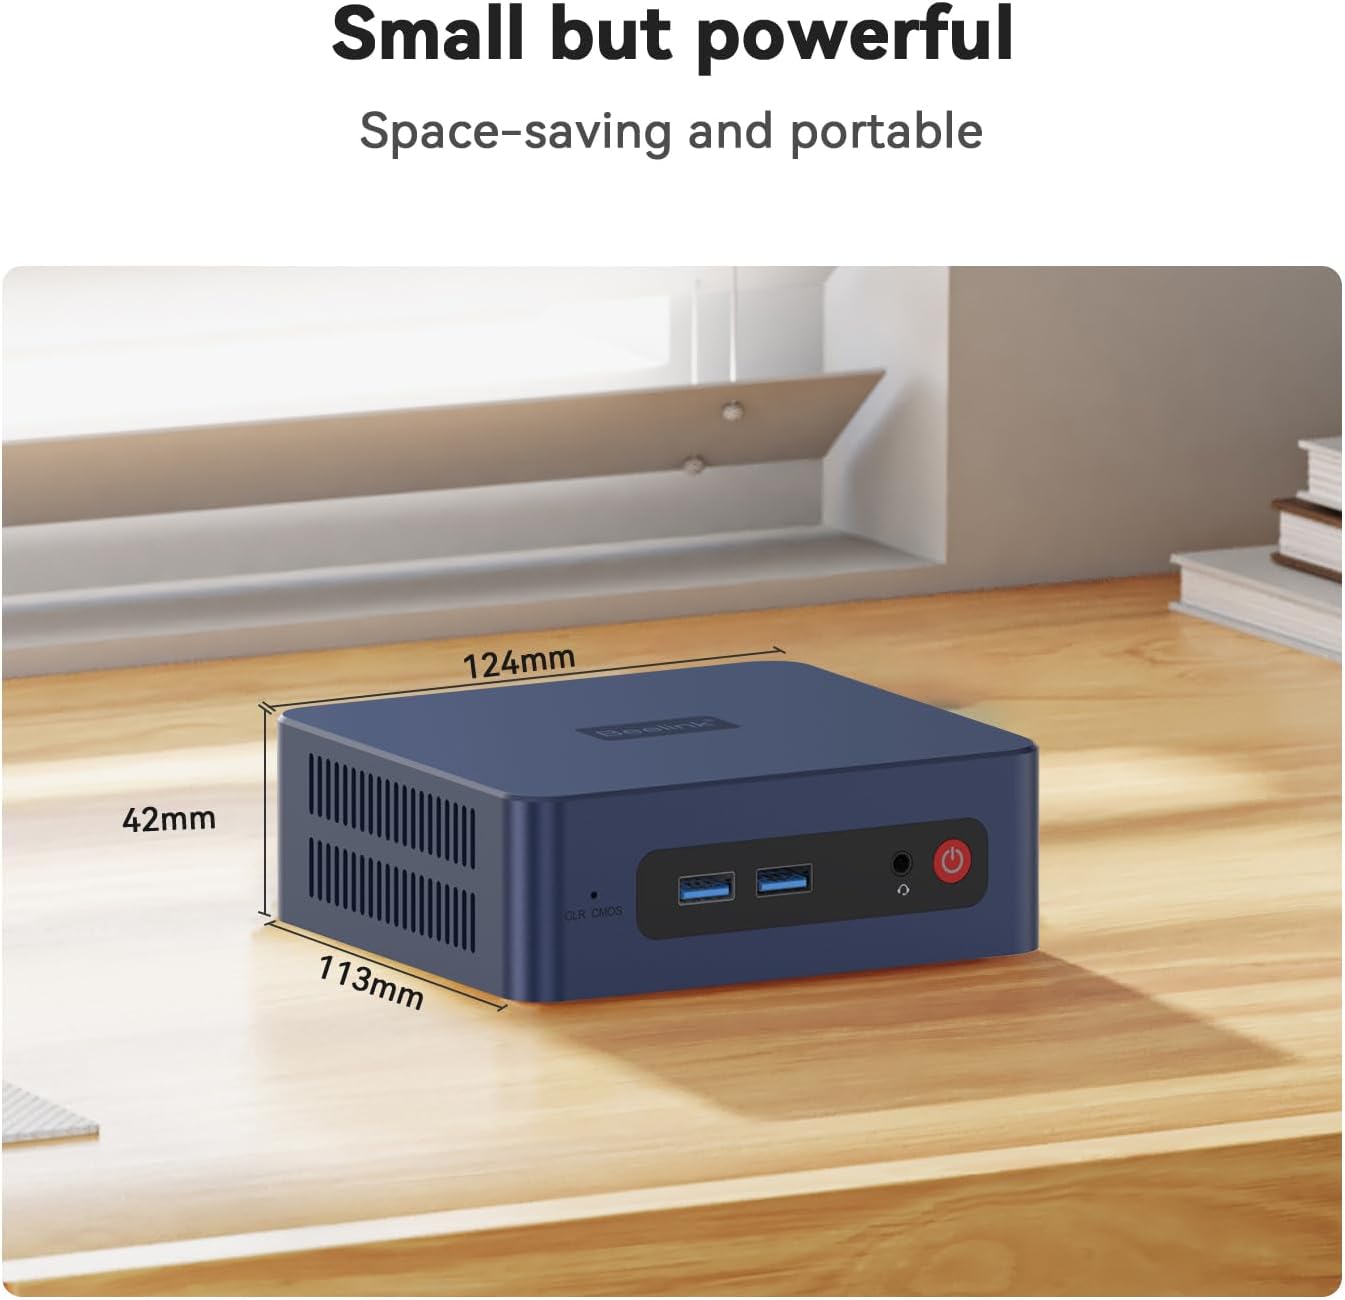
Figure 5: Physical dimensions of the Beelink SER3 Mini PC.
9. Ábyrgð og stuðningur
Beelink is committed to providing excellent customer service and support for its products.
- Ábyrgð: The Beelink SER3 Mini PC comes with a 1-Year free warranty.
- Tæknileg aðstoð: Tæknileg aðstoð er í boði allan lífstíða.
- Þjónusta eftir sölu: 24/7 after-sales service is provided to address any questions or issues.
For any inquiries or support needs, please do not hesitate to contact Beelink customer service. The following video provides guidance on how to reach us:
Video 4: Guide on how to contact Beelink customer support for assistance.


