1. Inngangur
The ATOMSTACK P9 M50 is a portable and professional laser engraver designed for various materials including wood, leather, metal, and more. This manual provides essential information for safe operation, setup, and maintenance of your device, ensuring optimal performance and longevity.
2. Öryggisupplýsingar
VIÐVÖRUN: Laser radiation can cause eye damage and skin burns. Always follow safety guidelines to prevent injury.
- Augnvernd: The laser module includes a protective cover. While this cover helps, it is highly recommended to wear additional laser safety goggles (not included) during operation to ensure maximum eye protection.
- Neyðarstopp: Familiarize yourself with the emergency stop button. In case of any unexpected situation, press this button immediately to halt all machine operations. Rotate the button to disengage it before restarting.
- Loftræsting: Operate the laser engraver in a well-ventilated area to dissipate fumes and smoke produced during engraving and cutting. Consider using an exhaust system.
- Efnisöryggi: Do not engrave or cut unknown materials. Some materials can produce toxic fumes or catch fire. Always verify material compatibility and safety data.
- Eftirlit: Never leave the machine unattended during operation. Stay within close proximity to monitor the process.
- Börn og gæludýr: Keep children and pets away from the operating area and the machine at all times.

Figure 2.1: Emergency Stop Button and Control Panel. The red button is the emergency stop, the silver button is On/Off, and the small button is Reset.
3. Innihald pakka
Gakktu úr skugga um að allir íhlutir séu til staðar í pakkanum:
- 1 x ATOMSTACK P9 M50 Laser Engraving Machine
- Parts for screw assembly (steps 2/3/4/5)
- 1 x Anti-dust cloth
- 1 x Tool set
- 1 x Fixed focus film
- 3 x Acrylic panels
- 3 x Wood chips
- 1 x kortalesari
- 5 x kapalband
- 1 x Accessory package
- 1 x Display assembly
- 1 x Display cable
- 1 x straumbreytir
- 1 x Rafmagnssnúra
- 1 x gagnasnúru
- 1 x Metal cutting support plate
- 1 x handbók
- 1 x Laser assembly
- 1 x X-axis assembly
- 1 x Y-axis assembly
- 2 x Stuðningsfætur
- 4 x Mounting spacers
4. Uppsetningarleiðbeiningar
The ATOMSTACK P9 M50 comes 85% pre-assembled, simplifying the setup process. Follow these steps to prepare your engraver for use:
- Upptaka: Carefully remove all components from the packaging and place them on a clean, stable surface.
- Rammasamsetning: Connect the X-axis and Y-axis assemblies as per the included manual's diagrams. Secure them using the provided screws and tools. Ensure all connections are firm.
- Uppsetning leysigeislaeiningar: Mount the laser assembly onto the X-axis carriage. Ensure it is securely fastened and the cables are properly connected.
- Stuðningsfætur: Attach the two support feet to the base of the machine for stability.
- Control Terminal: Connect the independent control terminal to the main unit using the display cable. The terminal features a magnetic adsorption design for easy attachment.
- Rafmagnstenging: Connect the power adapter to the machine and then plug it into a suitable power outlet (100-240V AC, 50/60Hz).
- Gagnatenging: For computer control, connect the machine to your computer using the provided USB data cable. Alternatively, you can use a TF card for offline operation.

Figure 4.1: Assembled ATOMSTACK P9 M50 Laser Engraver.
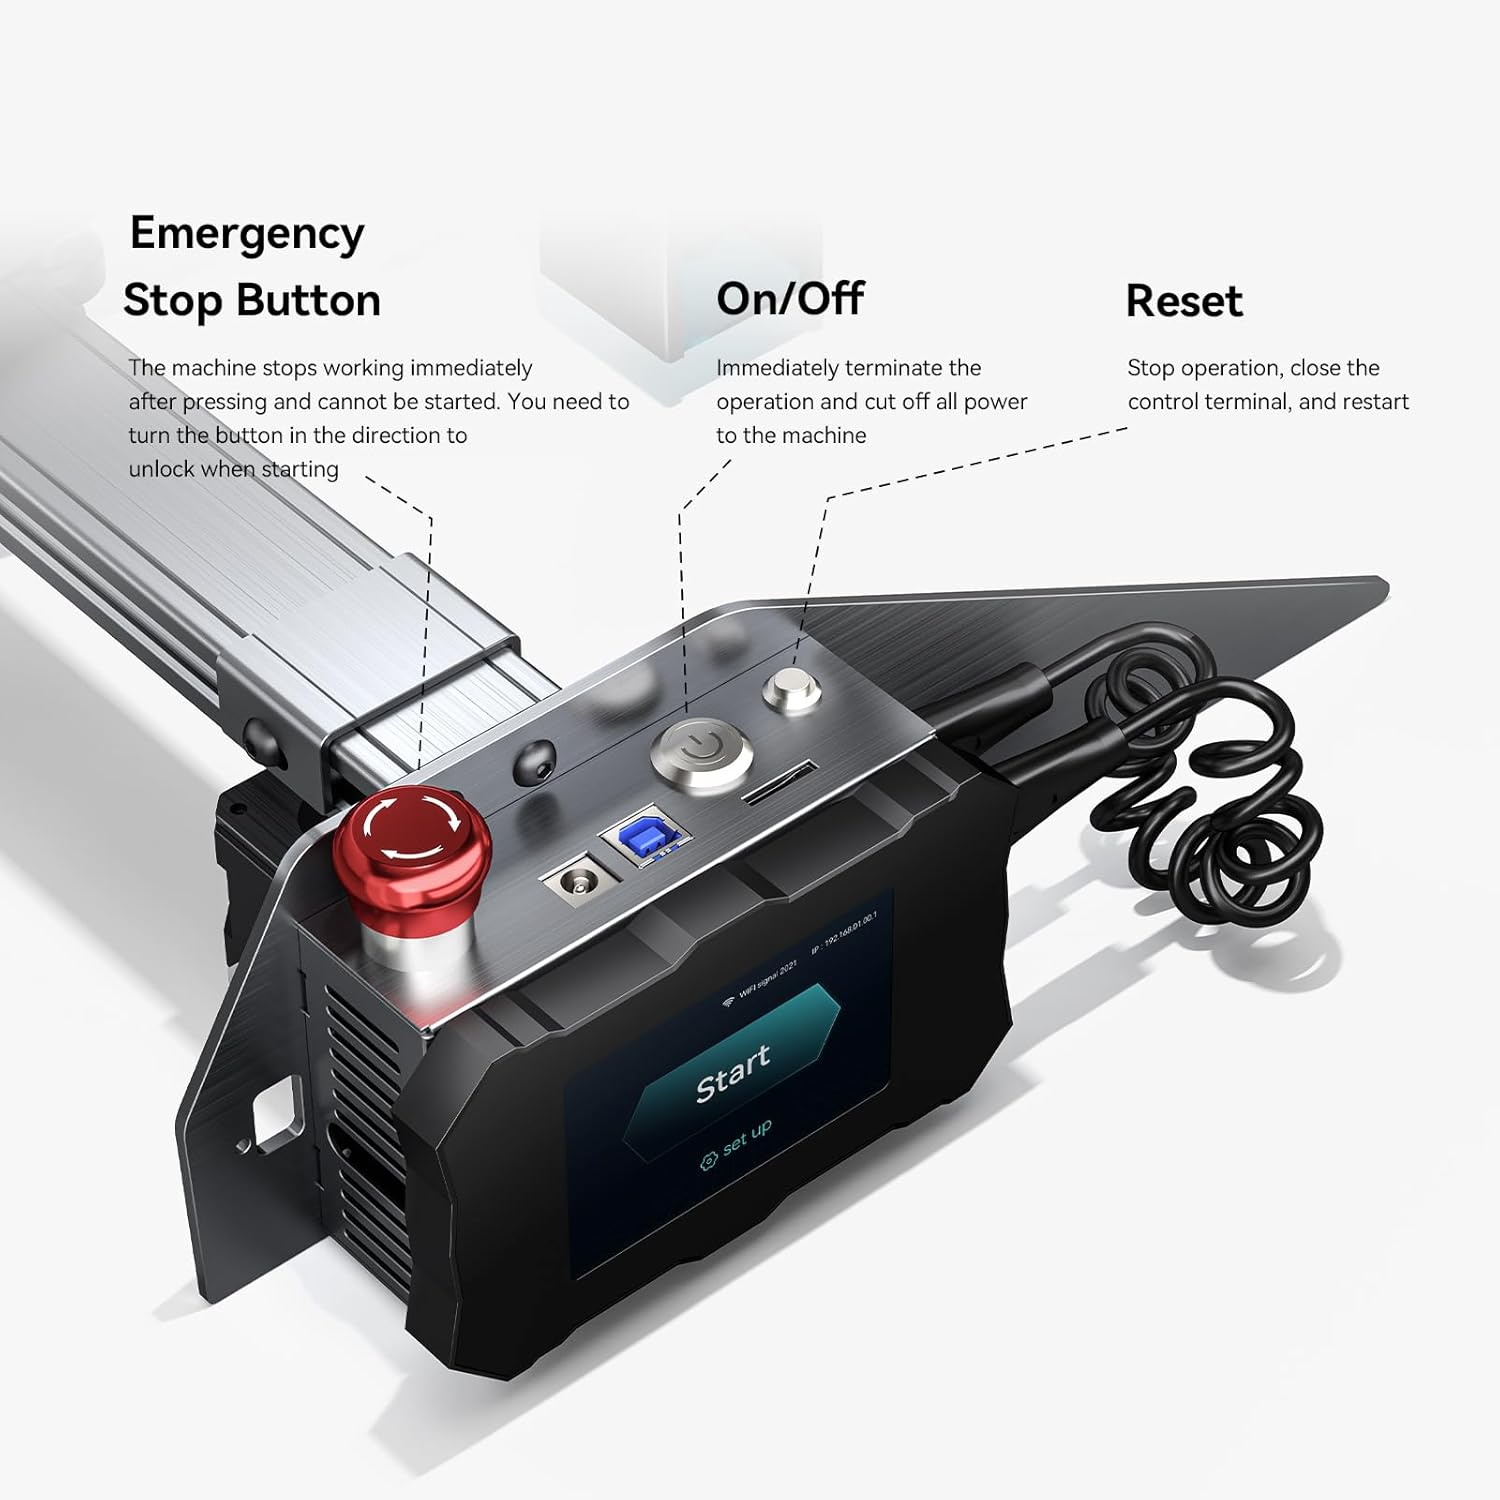
Figure 4.2: Independent Control Terminal connection.
5. Notkunarleiðbeiningar
5.1 Uppsetning hugbúnaðar og tenging
The ATOMSTACK P9 M50 is compatible with popular laser engraving software:
- LaserGRBL: Supports Win XP/Win 7/Win 8/XP/Win 10.
- LightBurn: Supports Win XP/Win 7/Win 8/XP/Win 10 and Mac systems.
Download and install your preferred software from the official websites. Connect the engraver to your computer via USB. Follow the software's instructions to establish a connection and begin your projects.

Figure 5.1: Software Compatibility and Connection.
5.2 Offline Engraving
The P9 M50 supports offline engraving via its independent control terminal and TF card, allowing operation without a continuous computer connection.
- Prepare your engraving file (NC, BMP, JPG, PNG, DXF) using your chosen software.
- Vistaðu file to a TF card.
- Insert the TF card into the slot on the control terminal.
- Use the terminal's interface to select and start your engraving project.

Figure 5.2: Independent Control Terminal for Offline Engraving.
5.3 Fixed Focus Laser
The P9 M50 features a fixed-focus laser, eliminating the need for manual focus adjustment. This design ensures consistent precision and high energy density for both engraving and cutting tasks.
Figure 5.3: Fixed Focus Laser Technology.
5.4 Stuðningsefni
The ATOMSTACK P9 M50 can engrave and cut a wide range of materials:
- Viður
- Bambus
- Pappi
- Plast
- Leður
- PCB
- Áloxíð
- Non-reflective electroplated and painted metal
- 304 mirror stainless steel
- Gler
- Keramik
- Bómull
- Slate
- Pappi
- Óofinn dúkur
- Wood board (up to 15mm)
- Acrylic (black, up to 15mm)
- Some thin plastic sheets
- Svampur

Figure 5.4: Dual Compression Spot Coupling Technology for Cutting.
6. Viðhald
Regular maintenance ensures optimal performance and extends the lifespan of your ATOMSTACK P9 M50. Perform these tasks periodically:
- Hreinsið leysilinsuna: Periodically clean the laser lens with a soft, lint-free cloth and a specialized lens cleaning solution to maintain engraving precision and laser power.
- Clean the Work Area: Remove debris, dust, and residue from the engraving area after each use to prevent interference with the laser path and machine movement.
- Smyrðu hreyfanlega hluta: Apply a small amount of appropriate lubricant to the guide rails and lead screws as needed to ensure smooth and precise operation of the machine's axes.
- Skoðaðu snúrur: Regularly check all power and data cables for signs of wear, fraying, or damage. Replace any damaged cables immediately to prevent electrical hazards.
7. Bilanagreining
This section addresses common issues you might encounter with your ATOMSTACK P9 M50.
| Vandamál | Möguleg orsök | Lausn |
|---|---|---|
| Ekki kveikir á vélinni | Power cable loose; power adapter faulty; emergency stop engaged | Check all power connections; ensure the emergency stop button is disengaged (rotate to unlock). Test power adapter if possible. |
| Laser kviknar ekki | Laser module not connected; software settings incorrect; material too reflective | Check laser module connection; verify software power settings (e.g., 100% power); ensure material is suitable for laser engraving/cutting. |
| Engraving is blurry or weak | Dirty laser lens; incorrect material settings; material not flat or properly positioned | Clean the laser lens; adjust power/speed settings in software for the specific material; ensure material is flat and secure on the work surface. |
| Machine not connecting to computer | USB cable faulty; driver issues; incorrect port selection in software | Try a different USB cable or port; reinstall necessary drivers for the engraver; select the correct COM port in your engraving software. |
8. Tæknilýsing
Detailed technical specifications for the ATOMSTACK P9 M50 Laser Engraver:
| Vélarafl | 50 W |
| Laser Optical Power | 10-11 W |
| Laser bylgjulengd | 455 ± 5 fm |
| Nákvæmni leturgröftur | 0.01 mm |
| Einbeitingaraðferð | Fastur fókus |
| Leturgröftur svæði | 220 x 250 mm |
| Gagnaflutningur | USB connection / TF card |
| Stýrihugbúnaður | LaserGRBL, LightBurn |
| Styður stýrikerfi | Win XP/7/8/10, Mac (LightBurn) |
| Stuðningur File Snið | NC, BMP, JPG, PNG, DXF |
| Power Input | 100-240 V AC, 50/60 Hz |
| Power Output | 12 V 5 A |
| Nettóþyngd | 3.5 kg |
| Vottanir | CE, FCC, RoHS, FDA, PSE |
Mynd 8.1: Vöruvíddir og helstu upplýsingar.
9. Ábyrgð og stuðningur
For warranty information and technical support, please refer to the official ATOMSTACK websíðuna eða hafið samband við söluaðila. Geymið kaupkvittunina sem sönnun fyrir kaupunum.
Tilföng á netinu:
- Visit the official ATOMSTACK store on Amazon: ATOMSTACK Official Store
- For software support, visit the official websíður af LaserGRBL og LightBurn.


