1. Inngangur
Thank you for choosing the VEVOR Commercial Slushy Machine, Model XN240B. This instruction manual provides essential information for the safe and efficient operation, maintenance, and troubleshooting of your new appliance. Please read this manual thoroughly before initial use and retain it for future reference.

Figure 1: VEVOR Commercial Slushy Machine (Model XN240B)
2. Mikilvægar öryggisleiðbeiningar
Til að tryggja örugga notkun og koma í veg fyrir skemmdir skal alltaf fylgja eftirfarandi öryggisleiðbeiningum:
- Lesið allar leiðbeiningar áður en vélin er notuð.
- Gakktu úr skugga um að aflgjafinn passi við voltage specified on the machine's rating label.
- Ekki nota vélina með blautum höndum eða í blautum aðstæðum.
- Haltu börnum og óviðkomandi starfsfólki frá vélinni meðan á notkun stendur.
- Taktu alltaf vélina úr sambandi fyrir þrif eða viðhald.
- Ekki dýfa aðaleiningunni í vatn eða annan vökva.
- Ensure adequate ventilation around the machine to prevent overheating.
- Only use liquid ingredients. Solid ingredients can damage the machine.
- Maintain a sugar content of 13-25% for optimal slush consistency. Insufficient sugar can lead to ice block formation.
- For alcoholic beverages, ensure alcohol content is below 13% to prevent freezing issues.
3. Vöru lokiðview
The VEVOR Commercial Slushy Machine (Model XN240B) is designed for efficient production of various frozen and cold beverages. It features a durable stainless steel body and food-grade PC tanks.
3.1 Íhlutir
- Dual 12L Tanks: Transparent tanks for simultaneous preparation of two different beverages.
- Stjórnborð: User-friendly interface for mode selection, temperature control, and cleaning.
- Dispensing Faucets: Spring-loaded, anti-drip design for easy serving.
- Augers/Stirrers: Internal components that continuously mix and freeze the liquid.
- Dropbakkar: Removable trays at the bottom to catch spills and facilitate cleaning.
- Loftgrill: Three-sided design for efficient heat dissipation.
- Gúmmífætur: Provide stability and prevent slipping during operation.
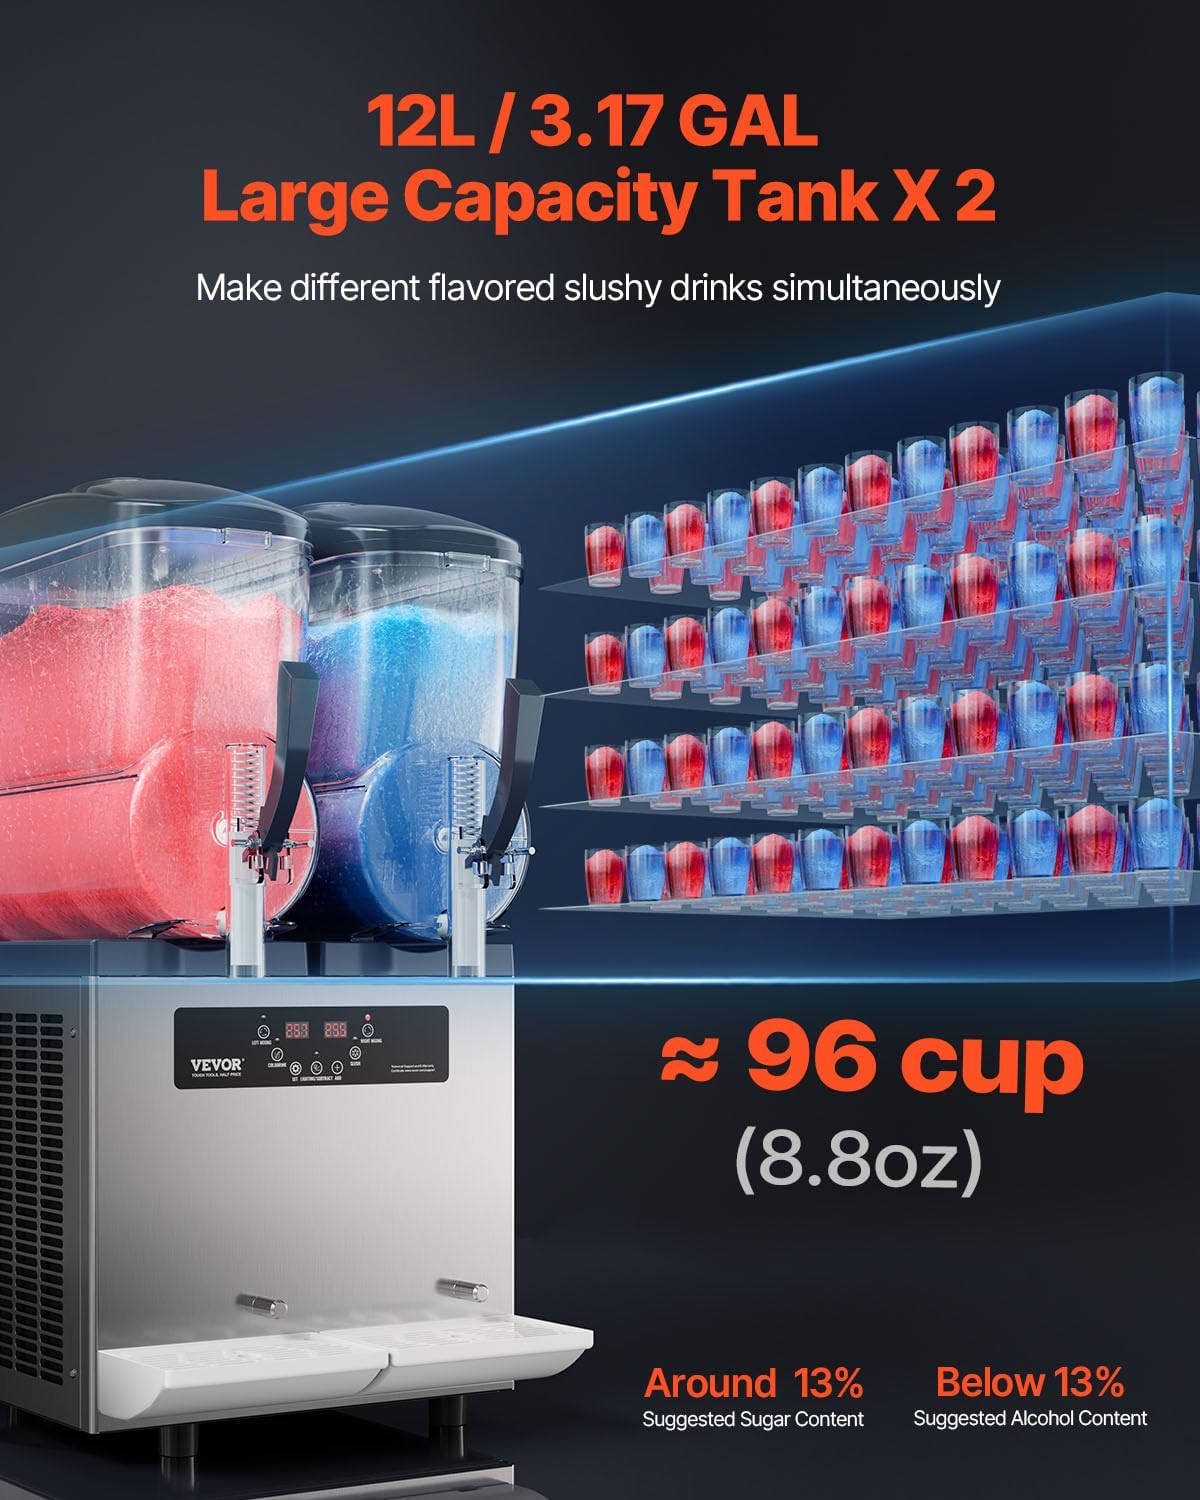
Figure 2: Main components of the Slushy Machine

Mynd 3: Stjórnborð yfirview
4. Uppsetning
4.1 Upptaka og staðsetning
- Takið vélina varlega úr umbúðunum.
- Place the machine on a stable, level surface. Ensure there is sufficient space (at least 20 cm) around the machine for proper ventilation.
- Allow the unit to stand upright for at least 2 hours after unboxing before plugging it in. This allows the refrigerant to settle for optimal performance.
4.2 Upphafsþrif
Before first use, thoroughly clean all parts that will come into contact with beverages:
- Remove the tanks, augers, and dispensing faucets (refer to Section 6.2 for disassembly).
- Wash all removable parts with warm, soapy water. Rinse thoroughly and dry completely.
- Þurrkið af ytra byrði aðaleiningarinnar með auglýsinguamp klút.
- Reassemble all parts, ensuring seals are correctly seated.
5. Rekstur
5.1 Að bæta við innihaldsefnum
- Ensure the machine is clean and all parts are correctly assembled.
- Opnaðu tanklokið.
- Pour your prepared liquid mixture into the tank. Do not exceed the 'MAX' fill line. For slushy mode, fill only up to 1L to allow for expansion.
- Close the tank lid securely.

Figure 4: Adding ingredients to the tank
5.2 Notaðu stjórnborðið
The control panel allows you to select different modes and adjust settings:
- Aflhnappur: Press to turn the machine on/off.
- Mixing Button: Activates/deactivates the stirring function in the tanks.
- Kalt drykkjarstilling: Sets the temperature for cold beverages (e.g., 3-5°C / 37.4-41°F).
- Slush Mode: Sets the temperature for frozen slush (e.g., -3 to -1°C / 26.6-30.2°F for non-alcoholic, -15 to -6°C / 5-21.2°F for alcoholic).
- Hitastilling (+/-): Use to fine-tune the temperature for desired consistency.
- Lýsing: Turns internal tank lighting on/off.
Press the desired mode button (Slush or Cold Drink). The machine will begin the cooling and mixing process. Monitor the temperature on the digital display.
5.3 Dispensing Drinks
Once the desired consistency is reached (typically 20-40 minutes for slush, depending on ingredients and ambient temperature):
- Place a cup under the dispensing faucet.
- Pull the dispensing handle down to release the beverage.
- Slepptu handfanginu til að hætta að gefa út.

Figure 5: Dispensing a frozen drink
5.4 Kennslumyndbönd
Video: VEVOR Slushie Machine Operation Guide. This video demonstrates the basic operation of the VEVOR Slushie Machine, including adding ingredients and dispensing drinks.
Video: VEVOR Commercial Slushy Machine 12L Frozen Drink Maker. This video provides a detailed overview of the 12L VEVOR Commercial Slushy Machine, including its features and usage.
6. Viðhald
6.1 Sjálfvirk hreinsun
The machine features a one-button automatic cleaning function:
- Empty the tanks of any remaining beverage.
- Fill the tanks with clean water.
- Press the 'Clean' button on the control panel. The augers will rotate to clean the tanks.
- Drain the water through the dispensing faucets. Repeat if necessary.
6.2 Thorough Cleaning and Disassembly
For thorough cleaning, especially after prolonged use, disassemble the tanks and components:
- Slökktu á tækinu og taktu það úr sambandi.
- Remove the dispensing faucets by unscrewing the retaining nut, then pulling out the handle, drain valve, and spring.
- Lift the bottom of the tank slightly and shake it left and right to detach it from the main unit. Carefully pull the tank forward to remove it.
- Take off the outer spiral, auger, sealing ring, and drain pan in turn.
- Wash all disassembled parts with warm, soapy water. Use a soft brush for hard-to-reach areas. Rinse thoroughly and dry completely.
- Clean the main unit's exterior with a damp klút.
- Before reassembly, apply food-grade lubricant (e.g., cooking oil or provided lubricant) to the sealing rings to ensure smooth operation and prevent leaks.
- Reassemble all components in reverse order, ensuring each part is securely in place.

Figure 6: Removable drip trays for easy cleaning
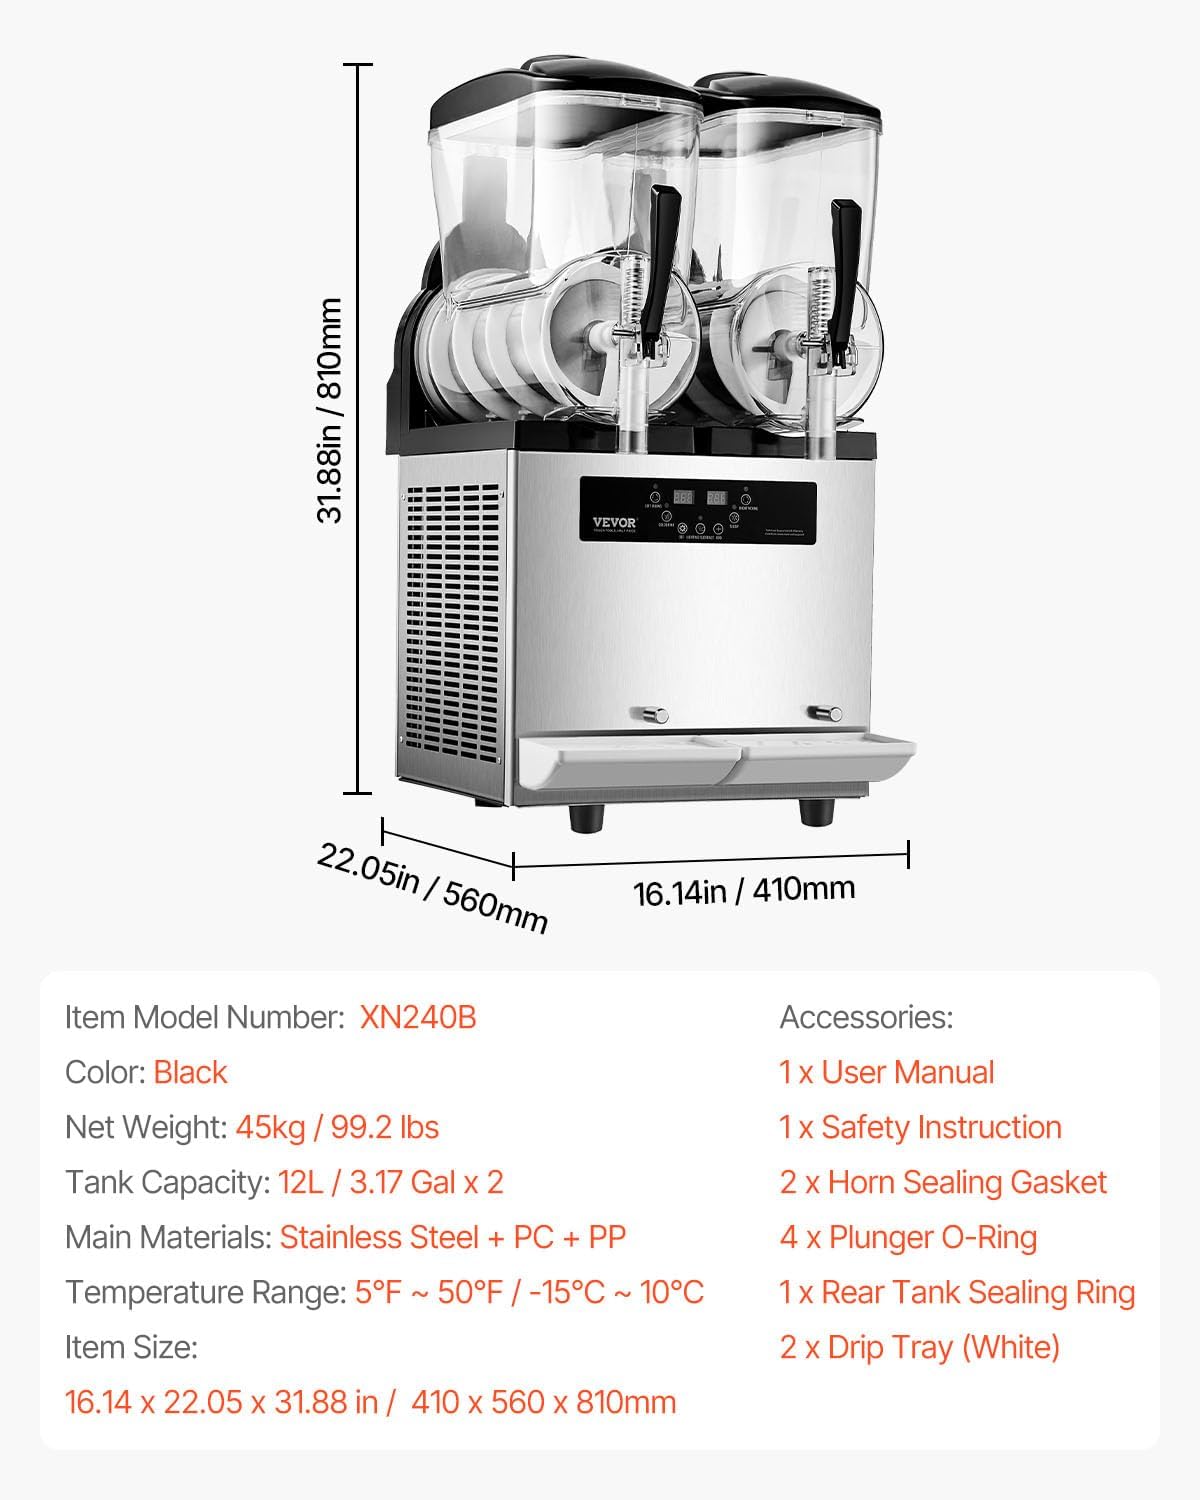
Figure 7: Anti-drip faucet design
Video: Operation of FOHERE Commercial Slushie Machine. This video demonstrates the operation and disassembly for cleaning of a similar commercial slushie machine.
Video: Commercial Slushy Machine. This video shows the setup and cleaning process for a commercial slushy machine.
7. Bilanagreining
| Vandamál | Möguleg orsök | Lausn |
|---|---|---|
| Kveikir ekki á vélinni | No power, power switch off | Check power connection, ensure switch is on. |
| Liquid not freezing / Slush too thin | Insufficient sugar content, too much alcohol, incorrect temperature setting | Ensure sugar content is 13-25%. Reduce alcohol content if above 13%. Adjust temperature to a lower setting. |
| Stirrer making rubbing noise | Liquid too thin | Add 1-2 tablespoons of sugar, syrup, or honey per cup to thicken the mixture. |
| Ice block formation | Insufficient sugar content | Add more sugar or concentrate to the mix. |
| Error Code 'LLL' | Lágt voltage viðvörun | Athugaðu rekstrarmagntage. Ef binditage is regular, contact customer support. |
| Leakage from faucet | Improperly seated seal, worn seal | Disassemble and reassemble faucet, ensuring seals are correctly seated. Replace worn seals if necessary. |
8. Tæknilýsing
| Eiginleiki | Smáatriði |
|---|---|
| Gerðarnúmer | XN240B |
| Vörumál | 38.98 x 23.7 x 19.69 tommur |
| Þyngd hlutar | 99.2 pund |
| Stærð tanka | 2 x 12L / 3.17 GAL |
| Hitastig | 5 ~ 50°F / -15 ~ 10°C |
| Aðalefni | Stainless Steel + Food-grade PC + PP |

Mynd 8: Stærð vörunnar og helstu eiginleikar
9. Ábyrgð og stuðningur
VEVOR is committed to providing quality products and excellent customer service. For warranty information, technical support, or any inquiries regarding your VEVOR Commercial Slushy Machine, please refer to the contact information provided in your product packaging or visit the official VEVOR websíða.
Vinsamlegast geymið kaupkvittunina sem sönnun fyrir kaup vegna ábyrgðarkröfu.