1. Inngangur
This manual provides detailed instructions for the setup, operation, and maintenance of your Radiomaster TX16S MKII MAX Radio Control System. Please read this manual thoroughly before using the device to ensure safe and optimal performance.
2. Vöru lokiðview og Eiginleikar
The Radiomaster TX16S MKII MAX is an advanced radio control system designed for precision and reliability. It features AG01 CNC Hall Gimbals and supports both ExpressLRS and Multi-Protocol 4in1 modules.
Helstu eiginleikar:
- Improved internal circuitry and optimized power supply.
- New charge circuitry with integrated reverse-polarity protection.
- Optimized charge IC allowing up to 2.2A internal USB-C charge current.
- Rear-mounted audio jack for headphone output.
- V4.0 Gimbal improved centering and temperature stability (Same circuitry as AG01).
- Optional high/low rear grips for improved ergonomics.
- Improved S1/S2 knobs with clear center detents.
- Improved LS/RS Sliders with smoother feel and better center detents.
- Redesigned battery cover for improved battery access.
- Retooled body shell with improved fit and finish.
- Trainer socket changed to standard TRS 3.5mm socket.
- Rear DIY Socket added for personalized mods.
- Improved internal plastics for better longevity.
- Built-in ExpressLRS Backpack and 4in1 versions.
- Support for EdgeTX and OpenTX (EdgeTX installed by default, touch screen enabled).
- AG01 Gimbals: Fully CNC milled for ultimate precision with quad ball bearings, featuring front-accessible tension and travel adjustment.
- External Module Bay: Natively supports Team Black Sheep MicroTX modules in CRSFmode with LUA scripts. Internal 4-in-1 Multi-protocol module allows switching between internal RF and Crossfire via software.
The TX16S MKII MAX is available in 4in1 and ELRS versions.
Vörumyndband lokiðview:
Myndband: Yfirview of the TX15 Max V5.0 16CH 2.4G RC Transmitter, highlighting its advanced features and capabilities.
3. Íhlutir og stjórntæki
Familiarize yourself with the various components and controls of your Radiomaster TX16S MKII MAX radio controller.
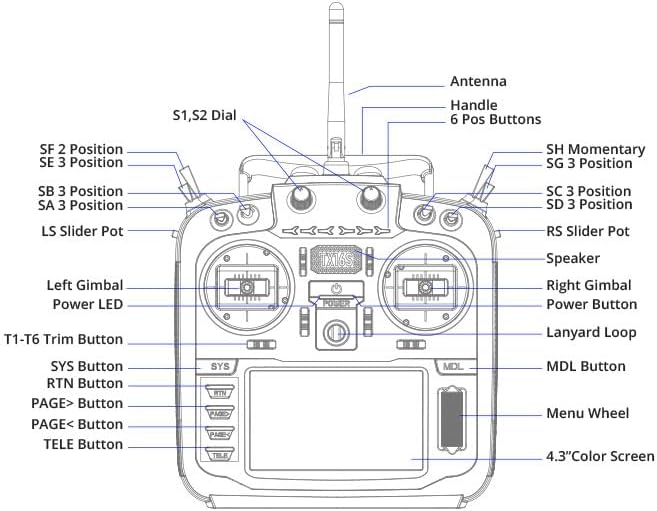
Image: Front panel diagram of the Radiomaster TX16S MKII MAX, illustrating the location and labels of its various switches, gimbals, buttons, and screen.
- Loftnet: Fyrir merki sendingu.
- Handfang: For carrying the transmitter.
- S1, S2 Dial: Rotary dials for various functions.
- 6 Pos Buttons: Six programmable position buttons.
- SF 2 Position, SE 3 Position, SB 3 Position, SA 3 Position, SH Momentary, SG 3 Position, SC 3 Position, SD 3 Position: Various 2- and 3-position switches for control.
- LS Slider Pot, RS Slider Pot: Left and Right slider potentiometers.
- Left Gimbal, Right Gimbal: Precision control sticks.
- Power LED: Gefur til kynna orkustöðu.
- Aflhnappur: Til að kveikja/slökkva á tækinu.
- Lykkjustrengur: Festingarpunktur fyrir hálsól.
- T1-T6 Trim Button: Trim buttons for fine-tuning controls.
- SYS Button, RTN Button, PAGE> Button, PAGE< Button, TELE Button, MDL Button: Navigation and function buttons.
- Valmyndarhjól: Rotary wheel for menu navigation.
- 4.3" litaskjár: TFT full-color touch display for interface and settings.
- Ræðumaður: Fyrir hljóðviðbrögð.
4. Uppsetning
4.1. Uppsetning rafhlöðu
The TX16S MKII MAX uses a 7.4V Li-Ion or Li-Po battery. Ensure the battery is fully charged before installation.
- Opnaðu rafhlöðulokið aftan á sendinum.
- Connect the battery's balance lead (JST-XH) and power lead (XT30) to the corresponding ports inside the compartment.
- Carefully place the battery into the compartment, ensuring wires are not pinched.
- Lokaðu rafhlöðuhólfinu tryggilega.
Video: Demonstration of installing a 6200mAh battery into a Radiomaster TX16S transmitter, showing the connection of the battery leads and securing the compartment cover.
Video: A detailed look at the Radiomaster 5000mAh battery, its connectors (JST-XH and XT30), and its compatibility with TX12, TX16S, and TX15 MAX transmitters, including installation steps.
4.2. Fyrsta ræsing
After installing the battery, press and hold the power button until the screen illuminates and the system boots up. Follow any on-screen prompts for initial setup.
5. Notkunarleiðbeiningar
5.1. Gimbal Adjustments
The AG01 CNC Hall Gimbals offer precise control. Tension and travel adjustments are front-accessible for easy fine-tuning to your preference. Refer to the diagram for gimbal locations.
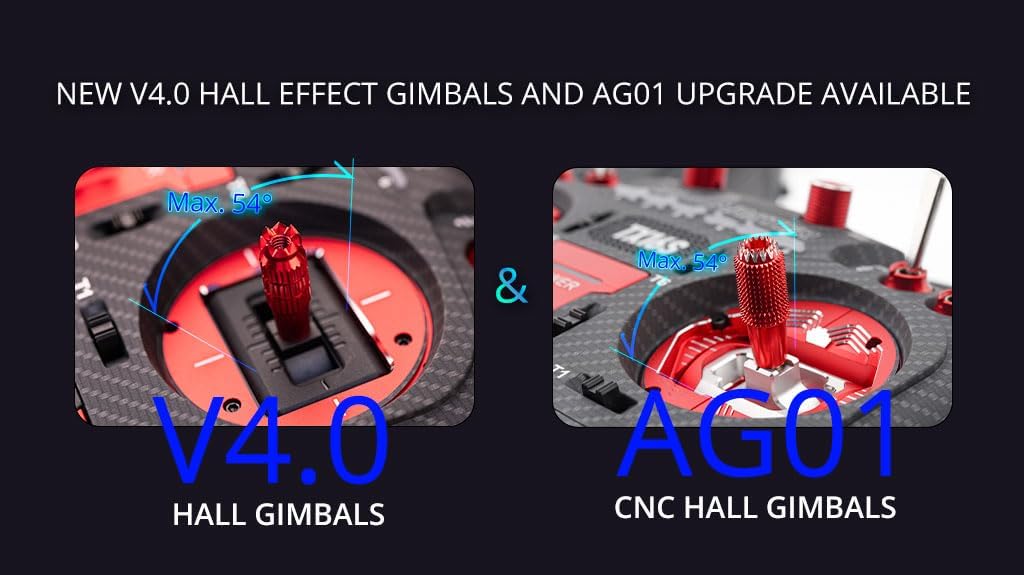
Image: A visual comparison highlighting the V4.0 Hall Gimbals and the upgraded AG01 CNC Hall Gimbals, emphasizing their precision and adjustable features.
5.2. Skjáleiðsögn
The 4.3-inch TFT full-color touch display allows for intuitive navigation through menus and settings. Use the touch screen or the Menu Wheel and associated buttons (SYS, RTN, PAGE>, PAGE<, TELE, MDL) to access and modify parameters.
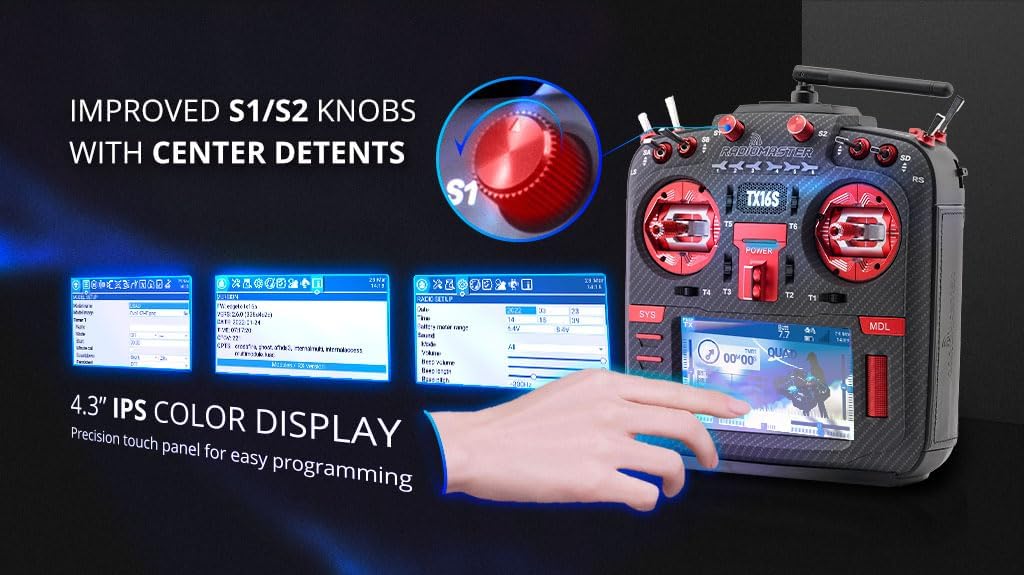
Image: Close-up of the Radiomaster TX16S MKII MAX's 4.3-inch IPS color display and the improved S1/S2 knobs with clear center detents, demonstrating ease of programming.
5.3. Module Bay Usage
The JR compatible module bay allows for external RF module expansion. The internal 4-in-1 Multi-protocol module enables seamless switching between internal RF and external modules like Crossfire via software settings.
5.4. Tengingar
The TX16S MKII MAX features a USB-C port for charging, simulator connectivity, and firmware updates. An SD card slot is also available for storing models, scripts, sounds, and themes.

Mynd: Hlið view of the Radiomaster TX16S MKII MAX, highlighting the UART Port, Charging Port, and SD Card Slot for various connectivity options.
5.5. Vinnuvistfræði
The radio controller is designed for comfort and control. It includes optional high/low rear grips for improved ergonomics and features improved S1/S2 knobs and LS/RS Sliders for a smoother feel and better center detents.
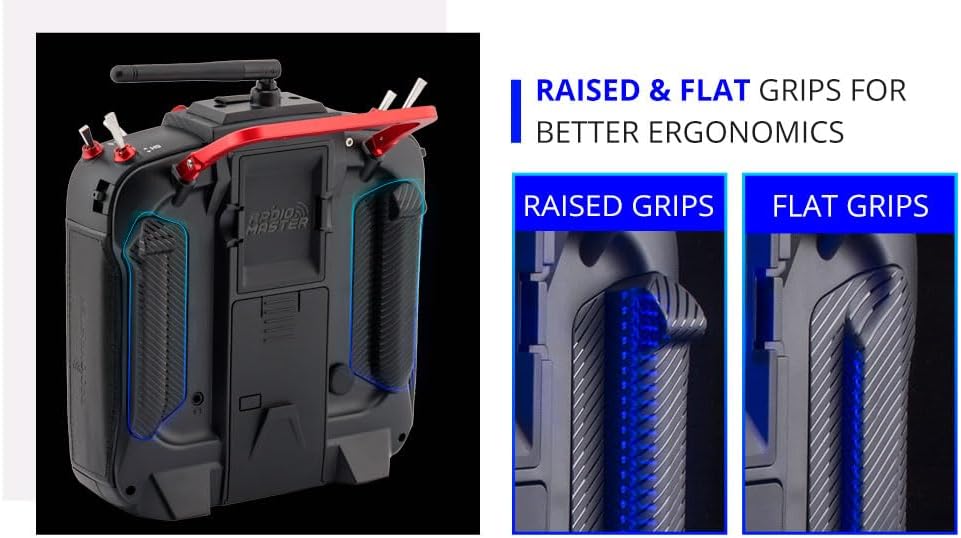
Image: A visual comparison of raised and flat grips for the Radiomaster TX16S MKII MAX, demonstrating options for improved ergonomic comfort during use.
6. Viðhald
- Haldið sendinum hreinum og lausum við ryk og óhreinindi. Notið mjúkan, þurran klút til að þrífa hann.
- Geymið sendinn á köldum, þurrum stað fjarri beinu sólarljósi og miklum hita.
- Regularly check all switches, gimbals, and buttons for proper function.
- Gakktu úr skugga um að loftnetið sé vel fest og ekki skemmt.
- Periodically check for and install firmware updates to ensure optimal performance and access to new features.
- Always charge the battery using appropriate charging devices and follow safety guidelines.
7. Bilanagreining
- Sendirinn kveikir ekki á sér: Check battery connection and charge level. Ensure the power button is pressed correctly.
- No signal to receiver: Verify that the transmitter and receiver are properly bound. Check the RF module settings (internal 4in1 or external). Ensure the antenna is correctly positioned.
- Vandamál með gimbal eða rofa: Check physical connections and ensure no debris is obstructing movement. Calibrate gimbals if necessary through the system settings.
- Skjárinn svarar ekki: Perform a soft reset by powering off and on. If issues persist, check for firmware updates.
- Vandamál með uppfærslu á vélbúnaði: Ensure a stable USB connection and sufficient battery charge. Follow the specific firmware update instructions provided by Radiomaster.
8. Tæknilýsing
| Atriði | Forskrift |
|---|---|
| Stærð | 287x129x184mm |
| Þyngd | 750g (án rafhlöðu) |
| Sendingartíðni | 2.400GHz-2.480GHz |
| Sendieining | Internal 4-in-1 multi-protocol module (CC2500 CYRF6936 A7105 NRF2401) OR Internal ELRS (SX1280) |
| SD kort | 256MB by default, 8GB maximum |
| Loftnetsaukning | 2db (stillanleg sendarafl) |
| Vinnustraumur | 400mA |
| Vinna voltage | 6.6-8.4v DC |
| Vélbúnaðar fyrir útvarp | EdgeTX |
| Fastbúnaðareiningar | Multiprotocol-Module (4IN1) -OR- ExpressLRS (ELRS) |
| Rásir | Allt að 16 rásir (fer eftir móttakara) |
| Skjár | 4.3 tommu TFT snertiskjár í fullum lit með upplausn 480 * 272 |
| Gimbal | V4.0 Hall sensor with Aluminium fascia; Option 2: AG01 CNC Hall sensor |
| Module Bay | JR samhæft einingarými |
| Uppfærsluaðferð | Styður USB-C á netinu / SD kort offline uppfærslu |
9. Hvað er í kassanum
The Radiomaster TX16S Mark II Max package includes:
- 1 * TX16S Mark II Max Radio Controller
- 1 * 18650 Tray
- 1 * USB-C snúru
- 1 * Skjávörn
- 1 pair of flat grips
- 1 * TX16S Key Chain
10. Ábyrgð og stuðningur
Fyrir upplýsingar um ábyrgð og tæknilega aðstoð, vinsamlegast vísið til opinberu Radiomaster websíðuna eða hafið samband við söluaðila. Geymið kaupkvittunina vegna hugsanlegra ábyrgðarkröfu.
Heimsæktu RADIOMASTER verslun fyrir fleiri vörur og upplýsingar.


