1. Inngangur
Thank you for choosing the Olvy A10 Cordless Stick Vacuum Cleaner with Mop Function. This appliance is designed for efficient cleaning of various floor types, offering both vacuuming and mopping capabilities. Please read this manual thoroughly before use to ensure proper operation, maintenance, and safety.

Image: The Olvy A10 Cordless Stick Vacuum Cleaner in its full assembly, alongside various attachments and the wall mount.
2. Öryggisleiðbeiningar
Til að draga úr hættu á eldsvoða, raflosti eða meiðslum skal alltaf fylgja grunnöryggisráðstöfunum þegar rafmagnstæki eru notuð.
- Lestu allar leiðbeiningar áður en þú notar tækið.
- Ekki nota utandyra eða á blautu yfirborði.
- Ekki leyfa að nota sem leikfang. Nauðsynlegt er að fylgjast vel með þegar börn eru notuð eða nálægt þeim.
- Notið aðeins eins og lýst er í þessari handbók. Notaðu aðeins viðhengi sem framleiðandi mælir með.
- Notið ekki tækið með skemmdri snúru eða kló. Ef tækið virkar ekki eins og það á að gera, hefur dottið, skemmst, verið skilið eftir utandyra eða dottið í vatn, skal skila því til þjónustumiðstöðvar.
- Ekki toga eða bera í snúru, nota snúruna sem handfang, loka hurð á snúru eða draga snúruna um skarpar brúnir eða horn. Ekki keyra tækið yfir snúruna. Geymið snúruna frá heitum flötum.
- Ekki taka úr sambandi með því að toga í snúruna. Til að taka úr sambandi skaltu grípa í klóna, ekki snúruna.
- Ekki meðhöndla kló eða tæki með blautum höndum.
- Ekki setja neinn hlut inn í op. Ekki nota með stíflað opi; Haltu lausu við ryk, ló, hár og allt sem getur dregið úr loftflæði.
- Haltu hári, lausum fötum, fingrum og öllum líkamshlutum fjarri opum og hreyfanlegum hlutum.
- Slökktu á öllum stjórntækjum áður en þú tekur úr sambandi.
- Farið varlega í þrif í stiga.
- Ekki nota til að taka upp eldfiman eða eldfiman vökva, eins og bensín, eða nota á svæðum þar sem þeir geta verið til staðar.
- Ekki taka upp neitt sem brennur eða reykir, svo sem sígarettur, eldspýtur eða heita ösku.
- Ekki nota án þess að rykbolli og/eða síur séu á sínum stað.
- Komið í veg fyrir óviljandi gangsetningu. Gakktu úr skugga um að rofinn sé í slökktu stöðu áður en hann er tengdur við rafhlöðupakkann, tekur upp eða ber heimilistækið.
- Endurhlaða aðeins með hleðslutækinu sem framleiðandi tilgreinir. Hleðslutæki sem hentar fyrir eina tegund rafhlöðupakka getur skapað eldhættu þegar það er notað með öðrum rafhlöðupakka.
- Við slæmar aðstæður getur vökvi skolast út úr rafhlöðunni; forðast snertingu. Ef snerting verður fyrir slysni skal skola með vatni. Ef vökvi kemst í snertingu við augu, leitaðu einnig læknishjálpar. Vökvi sem lekur út úr rafhlöðunni getur valdið ertingu eða bruna.
3. Innihald pakka
Gakktu úr skugga um að allir íhlutir séu til staðar í pakkanum:
- Aðaleining (handryksuga)
- Stillanlegt framlengingarrör
- Gólfburstahaus
- Fjarlæganleg rafhlaða
- Vatnstankur (til að moppa)
- Mopppúði
- 2-í-1 burstaverkfæri
- Sprunguverkfæri
- Veggfestingarfesting
- Rafmagns millistykki
- Replacement HEPA Filter (2x)
- Notendahandbók

Image: A visual representation of all components included with the Olvy A10 Cordless Stick Vacuum Cleaner.
4. Vöru lokiðview
The Olvy A10 features a powerful 350W motor providing up to 35,000 Pa suction, an integrated mop function, and a multi-stage HEPA filtration system. It includes an intelligent LED display for monitoring status and an auto-mode for adaptive cleaning.
Helstu eiginleikar:
- Öflugt sog: 350W motor with 35,000 Pa for deep cleaning on various surfaces.
- 2-í-1 virkni: Seamlessly switch between vacuuming and mopping.
- Greindur LED skjár: Provides real-time information on battery level, suction mode, and dust concentration.
- Sjálfvirkur háttur: Automatically adjusts suction power based on detected dirt levels.
- HEPA 13 Filtration: Captures 99.99% of fine particles, suitable for allergy sufferers.
- Langur tími: Up to 60 minutes on a single charge with a 2200 mAh removable battery.
- Létt og fjölhæft: Easy to maneuver and convert into a handheld vacuum for various cleaning tasks.

Image: Close-up of the intelligent LED display showing battery indicator, low power warning, auto mode, dust concentration, and control panel.

Image: The LED display indicating 'Auto-mode' and the current power level during operation.
5. Uppsetning og samsetning
5.1 Upphafshleðsla
Before first use, fully charge the battery. The battery takes approximately 4-5 hours to fully charge.
- Remove the battery from the main unit by pressing the release button.
- Tengdu straumbreytinn við hleðslutengið á rafhlöðunni.
- Plug the adapter into a power outlet. The battery indicator on the LED display will show charging status.
- Þegar tækið er fullhlaðið skaltu aftengja millistykkið.

Image: The removable battery unit, highlighting its 2200 mAh capacity, 4-5 hour charging time, and up to 60 minutes run time.
5.2 Samsetning ryksugunnar
- Festu rafhlöðuna: Slide the charged battery into the main unit until it clicks into place.
- Festið framlengingarrörið: Connect the adjustable extension tube to the main unit. Ensure it clicks securely.
- Festið gólfburstann: Connect the floor brush head to the other end of the extension tube.
- Setja upp veggfestingu (valfrjálst): Choose a suitable location for the wall mount. Secure it to the wall using the provided screws and anchors. This allows for convenient storage and charging.
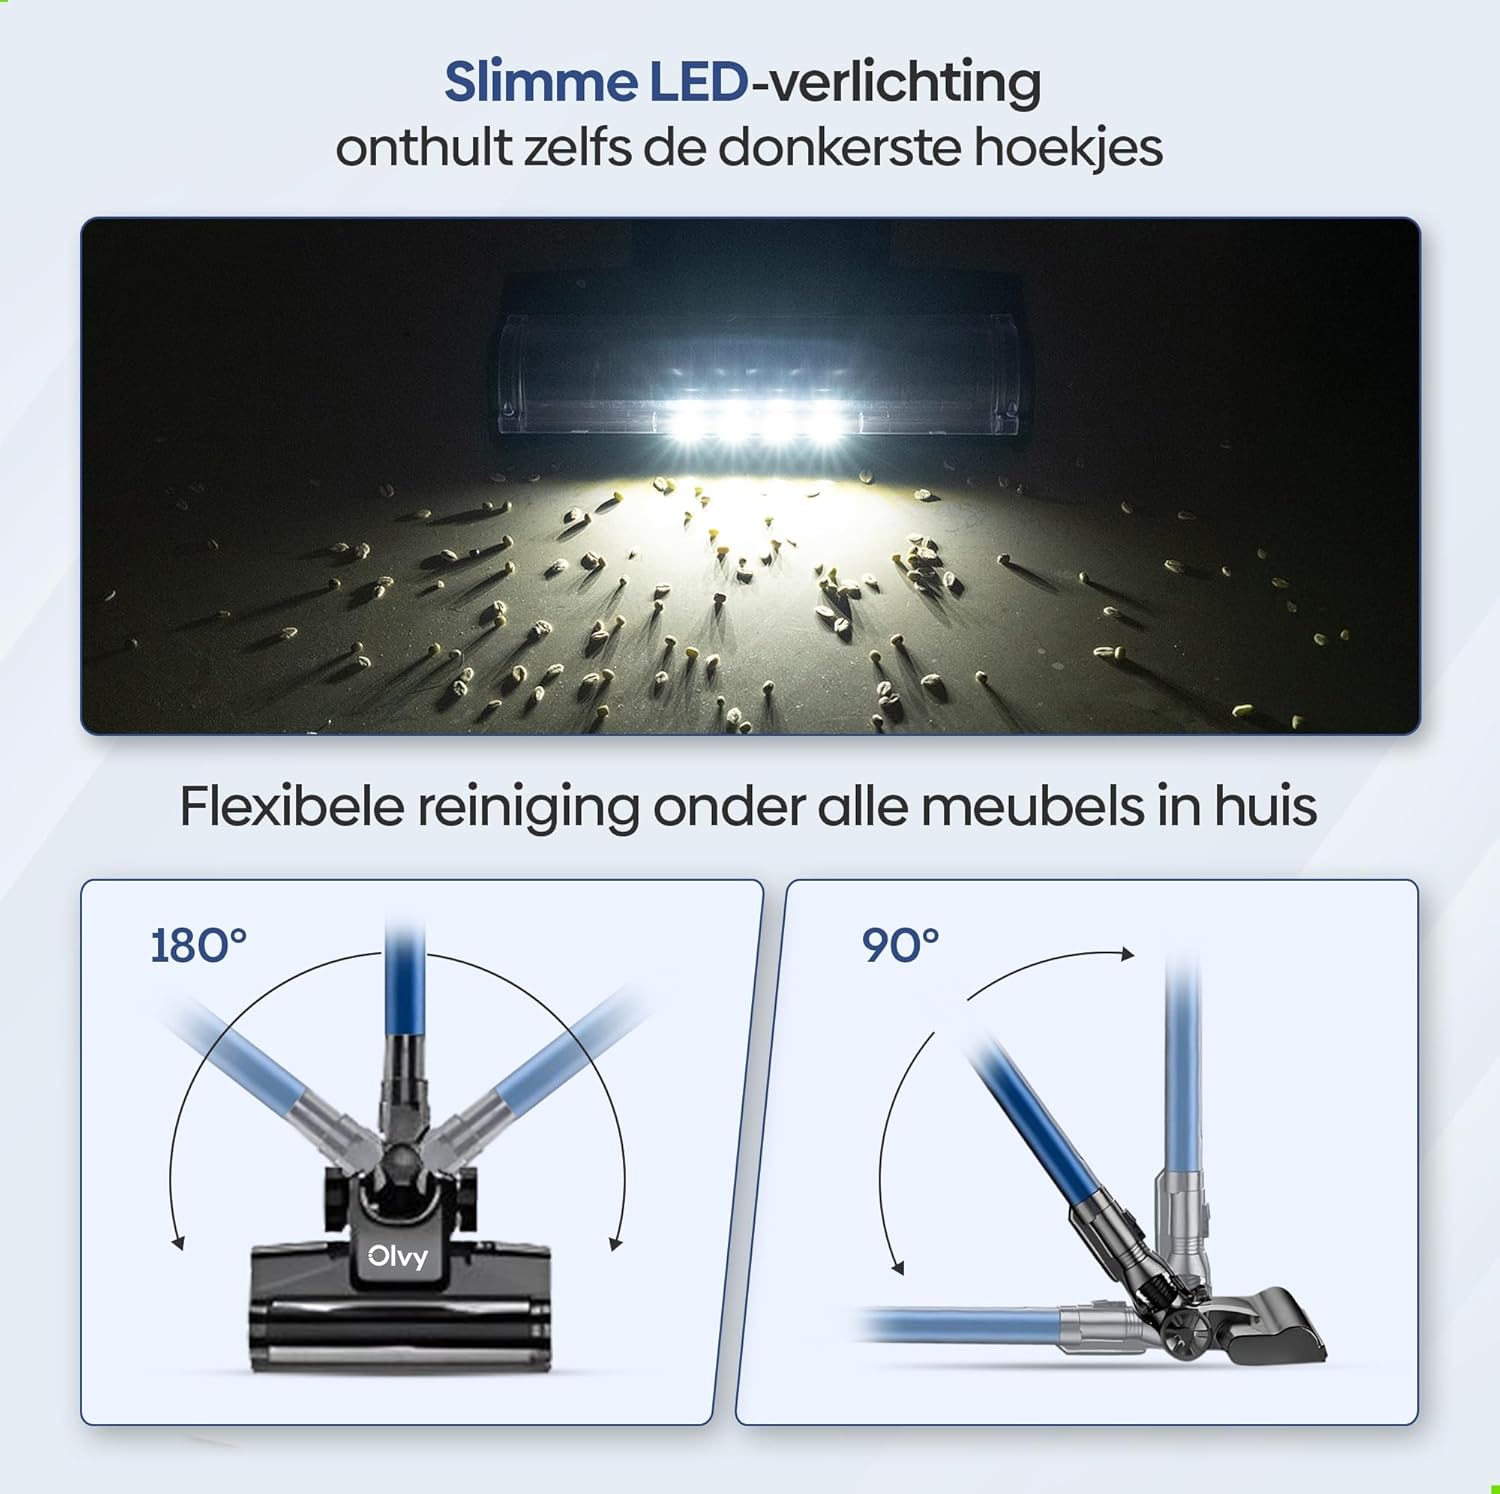
Image: The vacuum cleaner demonstrating both wall-mounted storage and self-standing capability.
6. Notkunarleiðbeiningar
6.1 Grunnaðgerð
- Kveikt/slökkt: Ýttu á rofann á aðaleiningunni til að kveikja eða slökkva á ryksugunni.
- Stilla sogkraft: The vacuum offers 5 suction levels. Use the control panel on the LED display to cycle through the power modes (Low, Normal, High, Turbo).
- Sjálfvirkur háttur: Activate the intelligent auto mode for automatic suction adjustment based on dirt detection. The LED display will show 'Auto' when this mode is active.
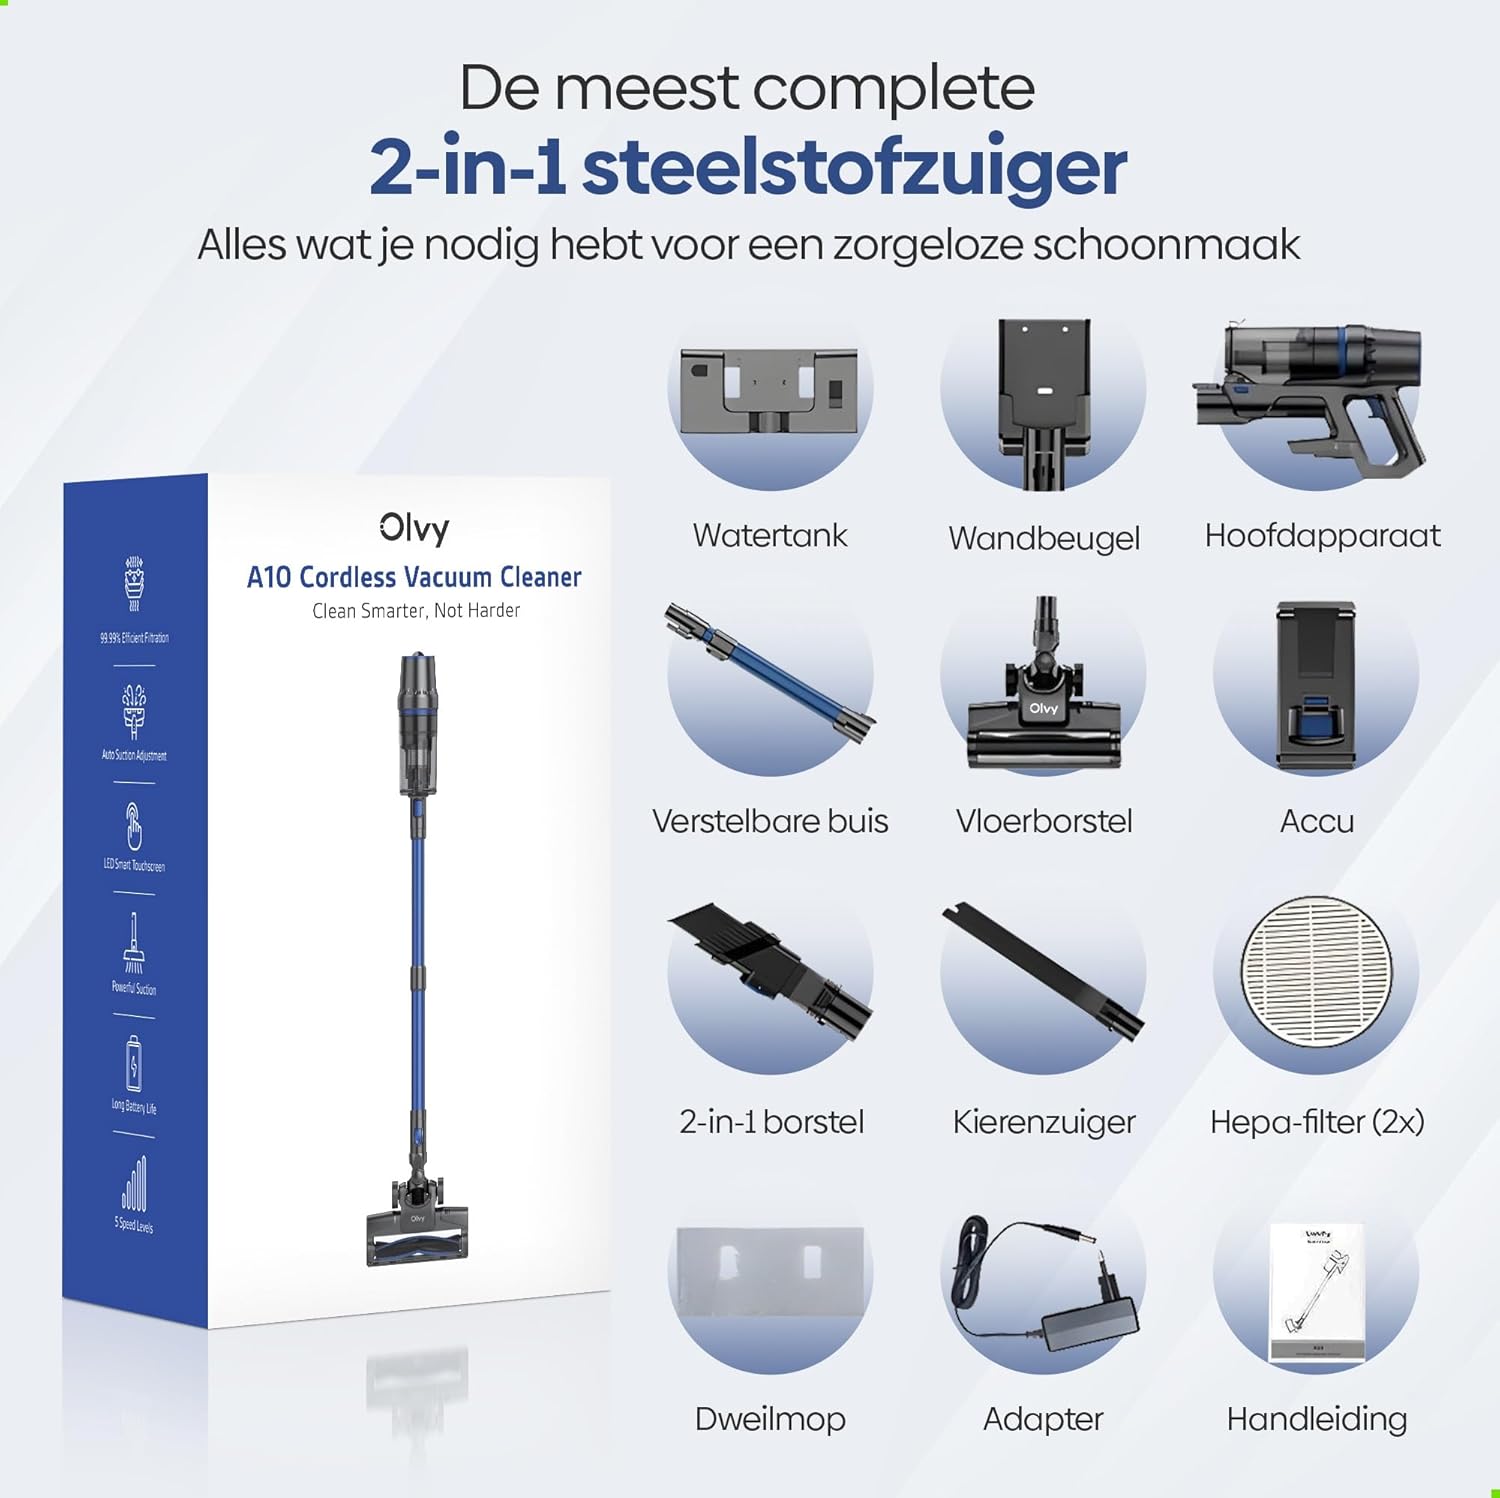
Image: The vacuum cleaner demonstrating its 4 suction levels (Low, Normal, High, Turbo) and intelligent auto mode, which adapts to dirt levels.
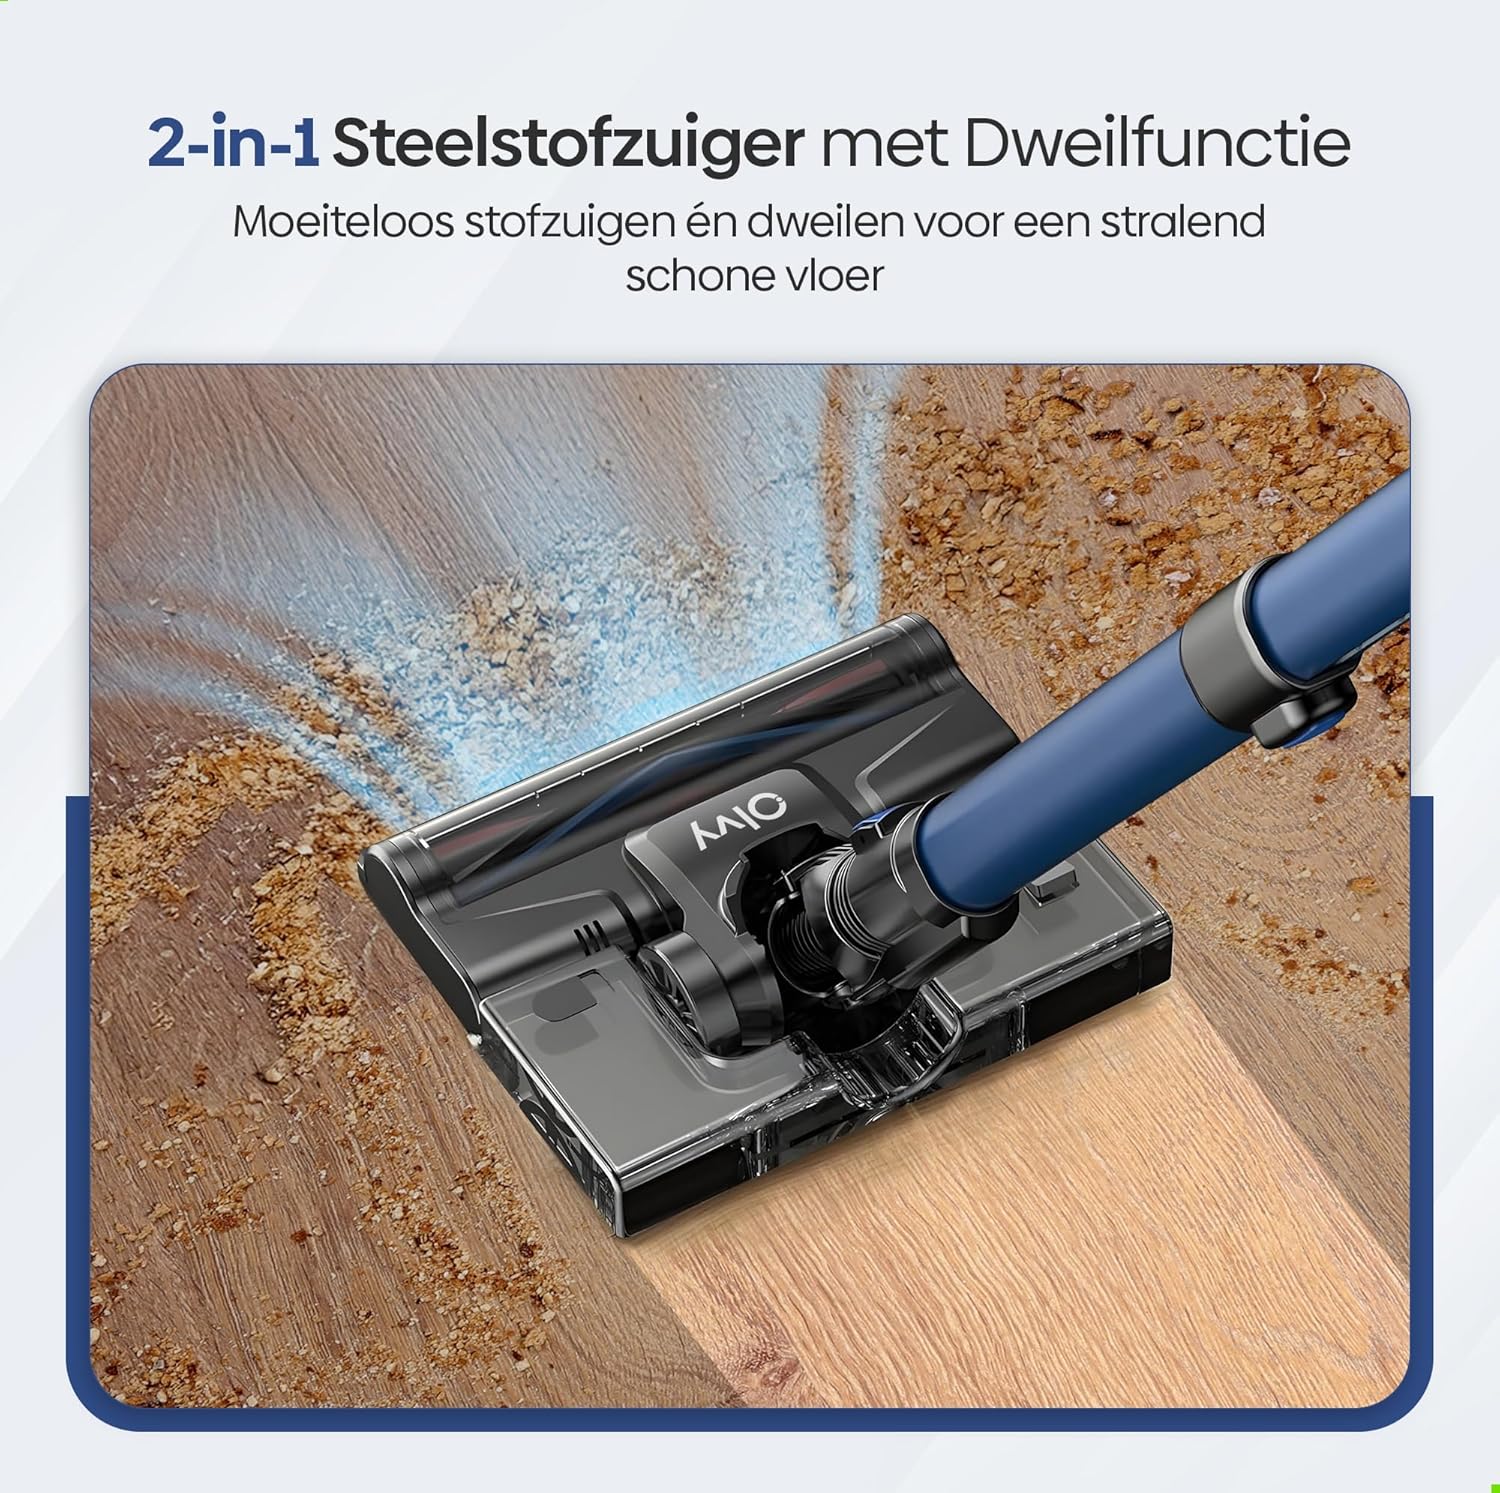
Image: A user operating the Olvy A10, showcasing its powerful 350W motor and 35,000 Pa suction for effective cleaning of various debris like hair, dust, crumbs, and sand.
6.2 Notkun moppuaðgerðarinnar
The integrated mop function allows for simultaneous vacuuming and wet cleaning of hard floors.
- Fylltu vatnstank: Detach the water tank from the floor brush head. Fill it with clean water. Do not use corrosive liquids or detergents that may damage the tank or floor.
- Festið moppupúða: Securely attach the mop pad to the bottom of the water tank.
- Reattach Water Tank: Reinstall the filled water tank onto the floor brush head.
- Begin Mopping: Operate the vacuum cleaner as usual. The mop pad will dampen the floor as you vacuum, providing a streak-free clean.

Mynd: Ítarleg view of the 2-in-1 stick vacuum with mop function, showing water being dispensed for simultaneous vacuuming and mopping on a hard floor.

Image: The mop function of the Olvy A10 actively cleaning a hard floor, demonstrating its effectiveness in removing dirt and leaving a clean surface.
6.3 Notkun viðhengja
- 2-í-1 burstaverkfæri: Ideal for cleaning upholstery, curtains, and delicate surfaces.
- Sprunguverkfæri: Tilvalið til að ná í þröng rými, horn og brúnir.
- To use, detach the extension tube and connect the desired attachment directly to the main unit.

Image: The Olvy A10 being used in different configurations, including as a stick vacuum for floors, a handheld for high areas, and for cleaning under furniture.

Image: The vacuum's LED lighting revealing hidden dust particles on the floor, and diagrams illustrating its 180° and 90° flexible head rotation for cleaning under furniture.
7. Viðhald
Regular maintenance ensures optimal performance and extends the lifespan of your Olvy A10 vacuum cleaner.
7.1 Tæming ruslatunnunnar
Empty the dustbin regularly, especially when the 'Dust Concn' indicator on the LED display shows high concentration.
- Gakktu úr skugga um að ryksugan sé slökkt.
- Ýttu á losunarhnappinn fyrir ruslatunnuna til að losa hana frá aðaleiningunni.
- Hold the dustbin over a trash can and press the bottom release latch to open the lid and empty the contents.
- Close the lid and reattach the dustbin to the main unit.

Image: The dustbin being emptied with a single click, demonstrating its large 0.8L capacity.

Image: A user washing the dustbin under running water, illustrating the washable components for easy cleaning.
7.2 Þrif á síunum
The Olvy A10 uses a multi-stage filtration system, including an HEPA filter, which should be cleaned regularly.
- Fjarlægðu ruslatunnu.
- Twist and pull out the filter assembly (HEPA filter, dust filter, stainless steel filter).
- Tap off loose dirt from each filter component.
- Rinse the filters under cold running water. Do not use hot water or detergents.
- Leyfið öllum síuhlutum að loftþorna alveg í að minnsta kosti 24 klukkustundir áður en þeir eru settir saman aftur. Notið ekki ryksuguna með blautum síum.
- Reassemble the filters and place them back into the dustbin, then reattach the dustbin to the main unit.

Image: A cutaway diagram illustrating the multi-stage HEPA filtration system, including the dustbin filter, stainless steel filter, dust filter, HEPA air filter, and air outlet filter.
7.3 Þrif á burstarúlunni
Athugið reglulega hvort hár eða rusl hafi flækst í burstarúllunni.
- Slökktu á ryksugunni.
- Press the release tab on the side of the floor brush head to remove the brush roll cover.
- Lyftu bursta rúllunni út.
- Notið skæri eða hreinsitæki til að klippa og fjarlægja flækjuð hár eða trefjar.
- Settu burstarúlluna aftur á og festu hlífina.
7.4 Þrif á moppupúða
After each use of the mop function, remove and clean the mop pad.
- Losaðu moppupúðann frá vatnstankinum.
- Rinse the mop pad under running water or machine wash it with mild detergent.
- Allow the mop pad to air dry completely before storing or reusing.
8. Bilanagreining
If you encounter any issues with your Olvy A10, refer to the following common problems and solutions:
| Vandamál | Möguleg orsök | Lausn |
|---|---|---|
| Tómarúm kviknar ekki á | Rafhlaðan er ekki hlaðin eða ekki rétt sett í. | Charge the battery fully. Ensure the battery is securely clicked into the main unit. |
| Lítið sogkraftur | Dustbin is full. Filters are clogged. Brush roll is tangled. Obstruction in the nozzle or tube. | Empty the dustbin. Clean all filters thoroughly and ensure they are dry. Remove any hair or debris from the brush roll. Check for and remove any blockages. |
| Bursta rúlla snýst ekki | Burstarúllan er flækt eða fast. | Turn off the vacuum. Remove the brush roll and clear any obstructions. |
| Moppuvirknin virkar ekki | Water tank is empty or not properly installed. Mop pad is dry. | Fill the water tank. Ensure the water tank is securely attached to the floor brush. Dampen the mop pad slightly before use if needed. |
| Stuttur tími | Battery not fully charged. Using high suction mode continuously. Battery degradation. | Ensure battery is fully charged. Use lower suction modes for longer run time. If battery life significantly decreases, consider replacing the battery. |
9. Tæknilýsing
| Eiginleiki | Forskrift |
|---|---|
| Vörumerki | Olvy |
| Gerðarnúmer | A10 |
| Litur | Svartur |
| Vörumál | 32 x 19 x 32 cm |
| Þyngd | 5 kg |
| Mótorafl | 350W |
| Sogkraftur | Allt að 35,000 Pa |
| Fjöldi hraða | 5 (including Auto Mode) |
| Hávaðastig | 55 desibel |
| Run Time | Up to 1 hour (60 minutes) |
| Rafhlöðugeta | 2200 mAh |
| Hleðslutími | 4-5 tímar |
| Síugerð | HEPA 13 (Washable) |
| Getu ruslatunnu | 0.8L |
| Aflgjafi | Rafhlaða |
| Yfirborð sem mælt er með | All floors (carpets, hard floors) |
| Sérstakir eiginleikar | 2-in-1 Vacuum & Mop, LED Display, Auto Mode, Pet-friendly, Lightweight |
10. Ábyrgð og stuðningur
Olvy products are manufactured to high-quality standards. For warranty information, technical support, or service inquiries, please refer to the contact information provided with your purchase documentation or visit the official Olvy websíða. Vinsamlegast geymið kaupkvittunina vegna ábyrgðarkröfu.


